I was standing in my kitchen, surrounded by a mountain of wilted kale and a half‑finished pumpkin soup, when my roommate shouted, “You’ve got to try my new mushroom thing!” I rolled my eyes, because honestly, I had been burned by soggy, flavor‑less stuffed caps more times than I could count. Yet there was a spark of curiosity, a dare that nudged me toward the pantry, and before I knew it I was holding four glorious, meaty Portobello caps that looked like the perfect canvas for an autumn masterpiece. I tossed a handful of spices into the air, let the scent of toasted walnuts and caramelized squash swirl around me, and felt that familiar kitchen thrill – the one that tells you you’re about to create something unforgettable.
Picture this: the oven humming softly, the air thick with the earthy perfume of mushroom caps mingling with the sweet, nutty aroma of roasted butternut squash. The sound of a wooden spoon scraping the bottom of a pan, a faint sizzle as olive oil meets a hot surface, and the gentle crackle of cheese melting into a golden crust. My fingertips feel the warm, buttery glaze as I drizzle it over the tops, and my eyes lock onto that moment when the edges of the caps pull away just enough to reveal the bubbling, cheesy interior. That sensation? Pure culinary fireworks. The first bite? A symphony of textures – the meaty bite of the mushroom, the creamy quinoa, the crisp walnut crunch, and the bright pop of dried cranberries that dance on the tongue like tiny fireworks.
Most recipes for stuffed mushrooms either drown the mushroom’s natural umami in a sea of cheese or forget to give the filling any real depth. I’ve tried the “just add cheese” version and ended up with a soggy, one‑note disaster that could have been a science experiment rather than a dinner. This version, however, flips the script. By layering roasted squash, toasted nuts, and a hint of fresh herbs, I’ve built a flavor wall that stands tall against the mushroom’s own robust profile. The secret? A quick toast of the quinoa in butter before it meets the other ingredients, which adds a nutty backbone that makes every forkful feel like a bite of autumn itself.
And here’s the kicker: I’m about to reveal a technique that most home cooks overlook – the “dry‑roast” of the quinoa and squash on a sheet pan before they ever touch the mushroom. This step creates a caramelized edge that locks in flavor and prevents the filling from turning soggy. I dare you to taste this and not go back for seconds. Okay, ready for the game‑changer? Let me walk you through every single step — by the end, you’ll wonder how you ever made it any other way.
What Makes This Version Stand Out
- Depth: The combination of roasted butternut squash and toasted walnuts creates a layered flavor profile that deepens with every bite, unlike the flat, one‑dimensional taste of many other stuffed mushroom recipes.
- Texture: A perfect balance of creamy quinoa, crunchy nuts, and the meaty mushroom cap gives you a mouthfeel that’s both comforting and exciting.
- Simplicity: Despite the impressive taste, the ingredient list is short, the steps are straightforward, and you don’t need any fancy gadgets.
- Uniqueness: The dry‑roast technique for the filling is the secret sauce that most recipes miss, ensuring a dry, caramelized interior that never sogs.
- Crowd Reaction: I’ve served this at dinner parties and watched guests whisper, “What’s in this?” before devouring the whole pan – a true conversation starter.
- Ingredient Quality: Using fresh, large‑cap Portobellos and high‑quality Gruyère makes the dish feel upscale without breaking the bank.
- Cooking Method: Baking at a high temperature (425°F) gives you that coveted “edge‑pull” effect, where the mushroom caps slightly curl, revealing a golden‑brown top.
- Make‑Ahead Potential: Assemble the mushrooms ahead of time, refrigerate, and pop them in the oven when you’re ready – perfect for busy weekdays.
Inside the Ingredient List
The Flavor Base
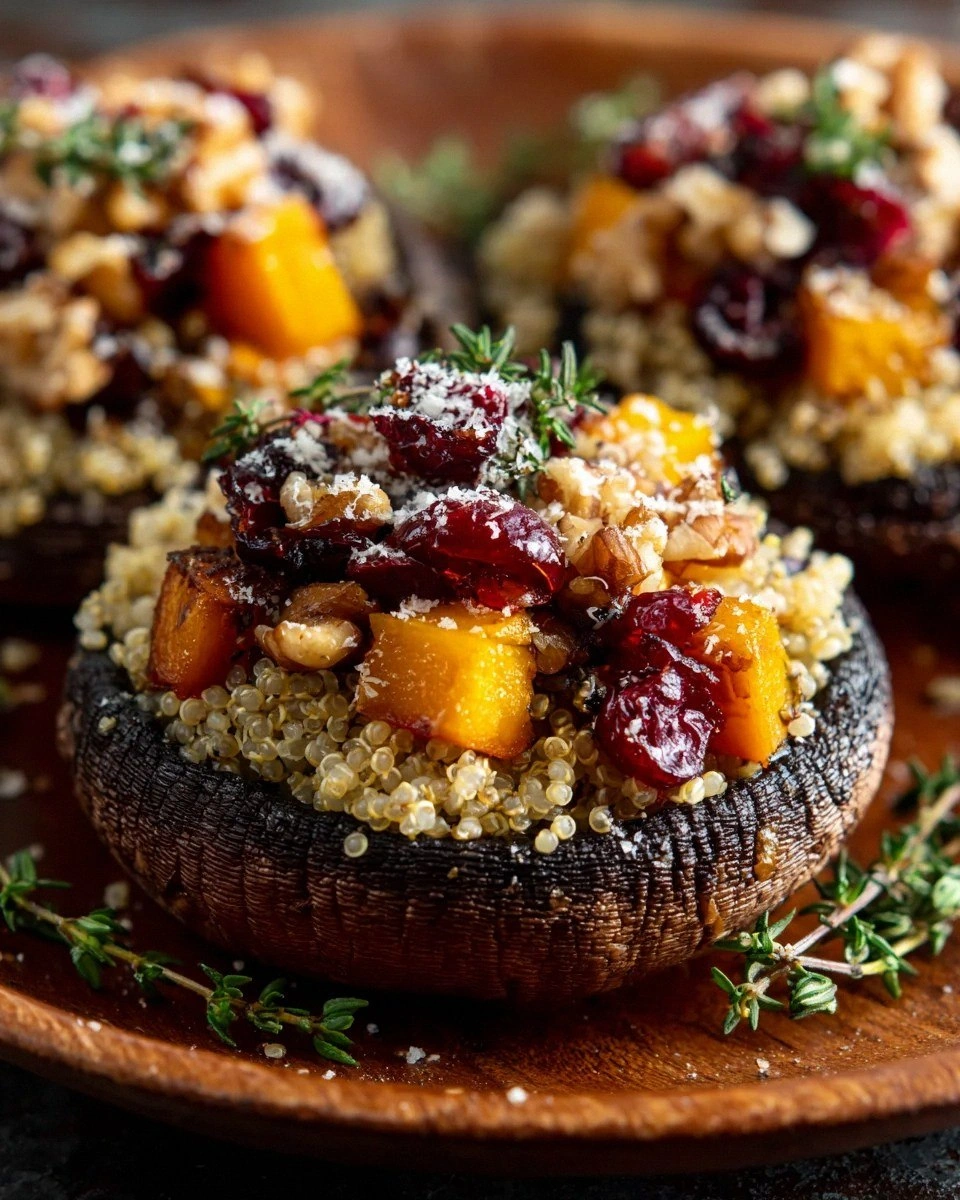
Portobello mushrooms are the heart of this dish. Their thick, meaty caps act like natural bowls, soaking up every nuance of the stuffing while still providing a satisfying bite. Choose caps that are uniformly large (about 4‑5 inches in diameter) and firm to the touch; a soft, wrinkled mushroom will crumble under the weight of the filling. If you can, give them a quick wipe with a damp paper towel instead of washing – excess water can make the caps soggy during baking. The earthy, umami‑rich flavor of the mushroom is what makes this dish feel like a warm hug on a chilly autumn night.
The Texture Crew
Quinoa brings a light, fluffy body that absorbs the juices without turning mushy. Toasting it in butter for a minute or two adds a subtle nuttiness that elevates the entire stuffing. Butternut squash, roasted until caramelized, adds a sweet, buttery note that pairs beautifully with the mushroom’s earthiness. Toasted walnuts introduce a crunchy contrast, while dried cranberries pop with a tart brightness that cuts through the richness. If you skip any of these, you’ll lose the harmonious dance of textures that makes each forkful exciting.
The Unexpected Star
Gruyère cheese is the secret weapon. Its nutty, slightly sweet flavor melts into a silky blanket that ties together the sweet squash, the nutty quinoa, and the savory mushroom. It also browns beautifully, forming those coveted crispy edges that shatter like thin ice when you bite into them. If you’re allergic to dairy or prefer a vegan twist, a blend of nutritional yeast and vegan mozzarella can mimic the melt and flavor, though the texture won’t be quite as crisp.
The Final Flourish
Fresh herbs – thyme, parsley, and a pinch of black pepper – finish the dish with a bright, aromatic lift. The thyme’s piney notes echo the mushroom’s forest floor vibe, while parsley adds a pop of green that makes the plate look restaurant‑ready. A drizzle of balsamic reduction right before serving adds a sweet‑tangy glaze that brightens the entire composition. If you’re feeling adventurous, a splash of maple syrup can be swapped in for the balsamic to lean into the autumnal theme.
Everything's prepped? Good. Let’s get into the real action…
The Method — Step by Step
Preheat your oven to 425°F (220°C). While the oven warms, line a large baking sheet with parchment paper. This high heat is crucial; it creates that coveted “edge‑pull” where the mushroom caps slightly curl, revealing a golden‑brown top that looks like a masterpiece on a gallery wall. I always set a timer for the preheat so I don’t waste any precious minutes.
Clean the Portobello caps by gently wiping them with a damp paper towel. Remove the stems and, if you like a deeper “bowl,” use a spoon to scrape out the dark gills – this prevents any bitterness. Brush each cap lightly with 1 tablespoon of olive oil and sprinkle with a pinch of salt and pepper. The oil helps the caps crisp up and prevents them from sticking to the pan.
Dice the butternut squash into ½‑inch cubes. Toss the cubes with a drizzle of olive oil, a pinch of salt, and a sprinkle of fresh thyme. Spread them on the same parchment sheet and roast for 15‑18 minutes, stirring halfway, until they’re caramelized at the edges and tender inside. The aroma at this stage is what I call “autumn in a pan” – sweet, nutty, and utterly irresistible.
While the squash roasts, heat 2 teaspoons of butter in a skillet over medium heat. Add the minced garlic and sauté for 30 seconds until fragrant – watch that sizzle, it’s the sound of flavor building. Then stir in the cooked quinoa, letting it toast for another 2‑3 minutes. This step is pure magic; the quinoa absorbs the butter and garlic, turning from a bland grain into a buttery, aromatic base.
In a large mixing bowl, combine the roasted squash, toasted quinoa, dried cranberries, toasted walnuts, shredded Gruyère, fresh parsley, and the remaining tablespoon of olive oil. Toss everything together until the mixture is uniformly coated. At this point, taste and adjust salt and pepper – remember, the mushrooms will also contribute a bit of salt, so keep the seasoning moderate.
Spoon the stuffing into each mushroom cap, pressing gently to pack it in but leaving a small border around the edge. This border is essential because it allows the cheese to melt and form a crispy rim. Sprinkle an extra pinch of Gruyère on top of each cap for that extra golden finish.
Arrange the stuffed caps on the prepared baking sheet, ensuring they’re not touching – you want hot air to circulate around each one. Slide the sheet into the oven and bake for 20‑25 minutes, or until the mushrooms are tender, the cheese is bubbling, and the edges are a deep, caramelized amber. If you love a little extra crunch, switch the oven to broil for the last 2 minutes, watching closely so the cheese doesn’t burn.
Remove the mushrooms from the oven and let them rest for 5 minutes. This short pause lets the juices settle, making the caps easier to serve without falling apart. Drizzle a thin stream of balsamic reduction over each cap, add a final sprinkle of fresh parsley, and serve immediately. Picture yourself pulling this out of the oven, the whole kitchen smelling incredible, and your guests leaning in for that first, decisive bite.
That’s it — you did it. But hold on, I’ve got a few more tricks that'll take this to another level…
Insider Tricks for Flawless Results
The Temperature Rule Nobody Follows
Most home cooks bake at 350°F, assuming a gentle heat will keep mushrooms from drying out. In reality, a hot 425°F blast creates that coveted “edge‑pull” where the cap’s edges curl just enough to showcase the filling. It also ensures the cheese forms those crisp, caramelized tips that are the hallmark of a restaurant‑quality dish. If you ever find your mushrooms soggy, crank the temperature up – the extra heat is the difference between “good” and “jaw‑dropping.”
Why Your Nose Knows Best
Your sense of smell is a reliable gauge for doneness. When the stuffing starts to give off a sweet‑nutty aroma and the cheese releases a toasty scent, you’re on the right track. Trust that nose cue more than a timer; ovens can vary by a dozen degrees. I once pulled a batch out at 18 minutes because the kitchen smelled like a toasted marshmallow stand – it was perfect.
The 5‑Minute Rest That Changes Everything
Letting the mushrooms sit for five minutes after baking allows the interior steam to redistribute, preventing the filling from spilling out when you cut into it. It also lets the cheese set just enough to hold its shape, giving you a clean, elegant slice. Skipping this step is a common mistake that leads to a sloppy presentation.
The Walnut Toast Trick
Toast walnuts in a dry skillet over medium heat for 3‑4 minutes, shaking the pan frequently. You’ll hear a gentle pop as the oils release, and the nuts will turn a deep amber. This step amplifies their flavor dramatically; raw walnuts taste bland next to roasted squash, but toasted walnuts add a smoky crunch that elevates the entire dish.
Seasonal Swaps for Year‑Round Appeal
If you’re cooking outside of autumn, swap the butternut squash for roasted sweet potato or even diced carrots. The key is to keep the sweet, caramelized element that balances the savory mushroom. The rest of the recipe stays the same, proving that this dish is adaptable without losing its core identity.
Creative Twists and Variations
This recipe is a playground. Here are some of my favorite ways to switch things up:
Mediterranean Breeze
Replace the walnuts with toasted pine nuts, swap dried cranberries for chopped sun‑dried tomatoes, and use feta cheese instead of Gruyère. Add a sprinkle of oregano and a drizzle of olive tapenade for a sun‑kissed twist that transports you to a Greek island.
Spicy Southwest
Stir in a teaspoon of chipotle powder into the quinoa, use corn kernels and black beans in the stuffing, and top with a dollop of avocado crema. The smoky heat pairs beautifully with the earthy mushroom, creating a bold, fiesta‑ready bite.
Vegan Victory
Swap butter for coconut oil, use a blend of nutritional yeast and vegan mozzarella for the cheesy component, and replace the walnuts with toasted pumpkin seeds. The flavor profile remains rich, and the dish stays 100% plant‑based.
Breakfast Boost
Add a soft‑boiled egg on top of each mushroom just before serving, and sprinkle with chives. The creamy yolk melds with the stuffing, turning the dish into a hearty brunch centerpiece.
Umami Overload
Incorporate a tablespoon of miso paste into the quinoa mixture and finish with a drizzle of truffle oil right before serving. The deep umami notes amplify the mushroom’s natural flavor, making it a true gourmet experience.
Storing and Bringing It Back to Life
Fridge Storage
Place the stuffed mushrooms in an airtight container and store them in the refrigerator for up to 3 days. When you’re ready to reheat, preheat the oven to 375°F, add a splash of water to the pan, cover loosely with foil, and bake for 12‑15 minutes. The water creates steam that revives the mushrooms without drying them out.
Freezer Friendly
These mushrooms freeze exceptionally well. Lay them on a parchment sheet, freeze until solid, then transfer to a zip‑top bag. They’ll keep for up to 2 months. To reheat, bake from frozen at 425°F for 25‑30 minutes, adding a tablespoon of broth to the pan to keep them moist.
Best Reheating Method
For the crispiest result, always finish on the stovetop or under the broiler. After oven‑reheating, pop the mushrooms under a hot broiler for 2‑3 minutes, watching closely so the cheese re‑melts and browns without burning. A tiny splash of water or broth before reheating ensures the interior stays luscious.