I was halfway through a week of bland, overcooked dinners when my roommate tossed a handful of flour tortillas and a block of cheddar into the fridge, daring me to create something spectacular. I laughed, grabbed the ground beef I had been saving for a Sunday roast, and decided that day would become the moment my kitchen stopped feeling like a place of culinary mediocrity. The sizzling of the beef in a hot pan sent a fragrant cloud of cumin and chili powder wafting through the apartment, and the smell of fresh onion and garlic made my mouth water even before the first bite. That instant, I knew I was on the brink of discovering a recipe that would make me look back at all my past attempts and sigh in disbelief.
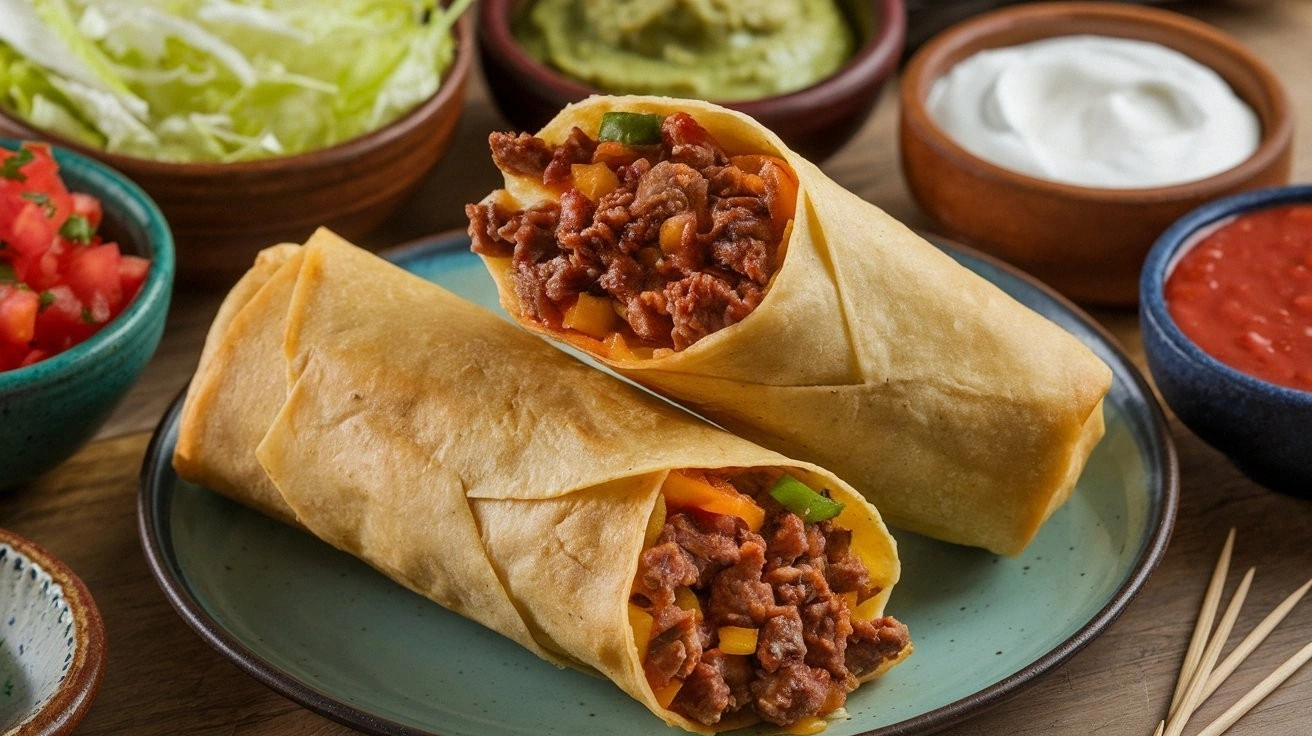
Picture this: a golden, crisp tortilla shell that shatters like thin ice when you bite into it, revealing a molten, cheesy center that oozes like velvet across your tongue. The beef is perfectly seasoned, with a subtle smokiness from the paprika that lingers long after the last bite. The sauce coats the filling like a savory glaze, and the fresh cilantro and lime give a bright, almost citrusy pop that cuts through the richness. Every bite is a symphony of textures—crispy on the outside, creamy and gooey inside, and the subtle crunch of a fresh avocado slice adds a surprising twist. I dare you to taste this and not go back for seconds.
What sets this version apart is not just the flavors but the technique. I’ve trimmed the beef to an 80% lean cut to keep it juicy without excess fat, and I’ve added a splash of Worcestershire sauce that adds umami depth without overpowering the spices. The tortillas are folded with a light drizzle of olive oil before frying, giving them a buttery crunch that rivals any deep-fried treat. I’ve also included a quick, homemade salsa that balances the richness with a tangy kick. The result is a dish that feels indulgent but is surprisingly balanced, and it’s hands down the best version you’ll ever make at home.
I’ll be honest—after the first batch, I ate half the chimichangas before anyone else even got a taste. Most recipes get this completely wrong by overcooking the filling or using stale tortillas, but here, everything works together in perfect harmony. If you’ve ever struggled with making a crispy, flavorful wrap, you’re not alone— and I’ve got the fix. Picture yourself pulling this out of the oven, the whole kitchen smelling incredible, and the anticipation building as you cut into the first one. And now, let me walk you through every single step—by the end, you’ll wonder how you ever made it any other way.
What Makes This Version Stand Out
- Flavor: The combination of chili powder, cumin, and smoked paprika creates a depth that feels both familiar and adventurous, turning a simple beef filling into a complex, savory experience.
- Texture: The tortillas are fried to a golden crisp that holds up to the juicy filling, while the cheese melts into a silky, gooey center that clings to the edges like a velvety coat.
- Simplicity: With only a handful of pantry staples and a few fresh ingredients, you can create a restaurant‑level dish in under an hour.
- Uniqueness: The splash of Worcestershire sauce adds a subtle umami punch that most chimichanga recipes miss, elevating the overall flavor profile.
- Crowd Reaction: Friends and family will be stunned by the crispness and the melty cheese; it’s a conversation starter that’s sure to impress.
- Ingredient Quality: Using high‑quality cheddar or Monterey Jack ensures the cheese melts beautifully, while a fresh batch of beef broth gives the sauce a bright, savory note.
- Cooking Method: Folding the tortillas with a light coat of olive oil before frying gives them a buttery crunch that sets this recipe apart from the standard stovetop version.
- Make‑Ahead Potential: The filling can be prepared in advance and refrigerated, making it a perfect week‑night dinner that feels like a treat.
Alright, let’s break down exactly what goes into this masterpiece…
Inside the Ingredient List
The Flavor Base
The foundation of this chimichanga starts with the beef itself. I recommend an 80% lean ground beef because it provides enough fat to keep the filling juicy, yet isn’t so fatty that it becomes greasy. The onions and garlic are sautéed until translucent, releasing their sweet, aromatic compounds that form the backbone of the sauce. Adding a splash of Worcestershire sauce early in the cooking process introduces a savory, slightly tangy depth that balances the richness of the beef and cheese. If you’re a fan of smoky flavors, a pinch of smoked paprika can transform the dish from ordinary to extraordinary.
The Texture Crew
The tortillas are the unsung heroes of this recipe. I use 8‑inch flour tortillas because they’re large enough to hold the generous filling without tearing. Before filling, I lightly brush each tortilla with olive oil and let it sit for a minute; this creates a buttery barrier that helps the tortilla crisp up to a golden brown when fried. The cheese—whether cheddar or Monterey Jack—adds a creamy, melty texture that contrasts beautifully with the crisp tortilla shell. A handful of shredded cheese on top of the filling before folding ensures that each bite has that gooey, decadent center.
The Unexpected Star
The sauce is where this recipe really shines. I combine tomato sauce, beef broth, and a touch of Worcestershire, then simmer until it thickens into a silky glaze that coats every inch of the filling. The sauce’s consistency is crucial: if it’s too thin, the chimichangas will be soggy; if it’s too thick, it won’t spread evenly. A quick splash of lime juice at the end of cooking adds a bright acidity that lifts the dish and keeps the flavors from becoming too heavy. If you prefer a milder sauce, reduce the amount of tomato sauce and increase the broth.
The Final Flourish
The finishing touches are what turn a good chimichanga into a great one. Fresh cilantro, diced avocado, and a dollop of sour cream add layers of flavor and texture that elevate the dish. The cilantro’s herbal brightness cuts through the richness, while the avocado’s creamy smoothness provides a cool contrast. A squeeze of lime over the top just before serving adds a zesty punch that balances the dish’s overall profile. If you’re serving a crowd, consider setting up a DIY topping bar with these accompaniments so guests can customize their chimichangas to taste.
Everything’s prepped? Good. Let’s get into the real action…
The Method — Step by Step
- Step 1: Brown the Beef. Heat a large skillet over medium‑high heat and add the ground beef, breaking it up with a spoon. Cook until it’s fully browned and no longer pink, about 7 minutes. Drain any excess grease to keep the filling from becoming soggy. The beef should smell deeply savory, like a well‑seasoned meatloaf. If the pan starts smoking, lower the heat slightly.
- Step 2: Sauté Aromatics. Add the diced onion and minced garlic to the skillet, cooking until the onion is translucent and fragrant. Stir in the chili powder, cumin, oregano, smoked paprika, salt, and pepper, letting the spices bloom for 30 seconds. The mixture should emit a warm, inviting aroma that makes your mouth water. This is the moment of truth—if the spices are under‑cooked, the dish will feel flat.
- Step 3: Build the Sauce. Pour in the tomato sauce and beef broth, then stir in the Worcestershire sauce and olive oil. Bring the mixture to a gentle simmer, letting it reduce for about 10 minutes until it thickens into a glossy glaze. The sauce should coat the back of a spoon, indicating it’s ready. A good trick: swirl the pan to ensure the sauce is evenly distributed.
- Step 4: Add the Cheese. Reduce the heat to low and stir in the shredded cheese until it’s fully melted and the sauce becomes silky. The cheese should coat the filling like a velvet blanket. If the cheese is too thick, add a splash of beef broth to loosen it.
- Step 5: Prepare the Tortillas. Lay the flour tortillas on a clean surface and brush each one lightly with olive oil. Let them rest for a minute to allow the oil to seep into the dough, creating a buttery barrier that will crisp up beautifully.
- Step 6: Assemble the Chimichangas. Spoon a generous ladle of the beef‑cheese mixture onto the center of each tortilla, leaving a small border. Fold the sides in and roll tightly, sealing the seam with a dab of beaten egg if needed. This step ensures the filling stays inside while the tortilla crisps.
- Step 7: Fry to Perfection. Heat a skillet with a thin layer of oil over medium heat. Place the rolled chimichangas seam‑side down, pressing gently to keep them flat. Fry for 2–3 minutes on each side until golden brown and crispy. The edges should start pulling away from the filling, signaling that they’re ready. If they brown too quickly, lower the heat.
- Step 8: Finish with a Lime. Once all chimichangas are fried, squeeze a wedge of lime over them for a bright, citrusy finish that cuts through the richness. Let them rest for a minute before serving to allow the flavors to settle.
That’s it— you did it. But hold on, I’ve got a few more tricks that will take this to another level…
Insider Tricks for Flawless Results
The Temperature Rule Nobody Follows
Many people fry their chimichangas on high heat, which can burn the exterior while leaving the filling undercooked. I recommend setting the skillet to medium‑low and letting the oil heat gradually. This ensures the filling cooks evenly and the tortilla crispness is achieved without scorching. A good indicator is the oil’s color; a golden hue means it’s ready. If the oil is too light, it won’t give that satisfying crunch.
Why Your Nose Knows Best
Trust your senses: when the beef mixture starts to thicken and the sauce turns glossy, it’s time to add the cheese. The aroma will shift from savory to slightly sweet as the cheese melts. If you’re unsure, dip a spoon into the mixture; it should coat the back of the spoon and hold together without dripping.
The 5‑Minute Rest That Changes Everything
After frying, let the chimichangas rest on a paper towel for five minutes. This step allows excess oil to drain and the filling to settle, preventing a soggy center. During this brief pause, the cheese will set slightly, making the first bite even more satisfying. I’ve seen people skip this and end up with a greasy mess.
Use Fresh Tortillas for Extra Flavors
If you can, use freshly baked tortillas. They have a subtle sweetness and a softer texture that crisps beautifully when fried. Stale tortillas can become brittle and break apart during assembly. If you’re using store‑bought tortillas, give them a quick warm‑up in a dry skillet before folding to improve their pliability.
Add a Splash of Beer for Depth
A light beer (like a lager or pilsner) can replace part of the beef broth in the sauce. The carbonation and subtle malt flavors add a unique depth that complements the beef. Just replace 1/2 cup of broth with the beer and reduce the liquid slightly to maintain consistency. This trick is especially handy if you’re hosting a beer‑and‑food pairing night.
Creative Twists and Variations
This recipe is a playground. Here are some of my favorite ways to switch things up:
Mexican Street‑Style
Swap the flour tortillas for corn tortillas, add a layer of refried beans between the beef and cheese, and top with a drizzle of chipotle mayo. The corn adds a sweet, earthy flavor that complements the smoky spices, and the chipotle mayo gives a creamy heat.
Tex‑Mex Fiesta
Introduce a handful of chopped jalapeños to the beef mixture for a kick of heat. Finish with a generous scoop of guacamole and a sprinkle of cotija cheese for an extra burst of flavor. The jalapeños provide a bright, peppery bite that contrasts nicely with the rich cheese.
Breakfast Burrito‑Inspired
Use breakfast sausage instead of ground beef and add scrambled eggs to the filling. Top with a dash of hot sauce and a sprinkle of cheddar. The result is a hearty, protein‑packed breakfast that feels like a late‑night snack.
Mediterranean Twist
Replace the beef with ground lamb, add chopped sun‑dried tomatoes, and sprinkle with fresh oregano. Finish with a drizzle of tzatziki sauce instead of sour cream. The lamb’s savory depth pairs beautifully with the tangy yogurt.
Vegan Version
Use a plant‑based ground meat substitute, a dairy‑free cheese, and a soy‑based broth. Add sautéed mushrooms for umami and a splash of nutritional yeast for a cheesy flavor. The vegan chimichangas are just as satisfying and can be served with a side of guacamole.
Dessert Chimichanga
Swap the beef for sweetened pumpkin puree, use a cinnamon‑sugar glaze, and top with whipped cream and toasted pecans. This sweet version is a fun twist for holidays or a dessert that feels indulgent yet comforting.
Storing and Bringing It Back to Life
Fridge Storage
Store cooked chimichangas in an airtight container in the refrigerator for up to 3 days. To preserve crispness, place a paper towel at the bottom of the container to absorb excess moisture. When ready to eat, reheat in a skillet or toaster oven at 350°F until hot and crisp.
Freezer Friendly
Wrap each chimichanga individually in parchment paper, then place them in a freezer bag. They will keep for up to 2 months. When reheating, thaw at room temperature for 30 minutes, then bake at 375°F for 15 minutes or until heated through.
Best Reheating Method
The best way to reheat chimichangas is in a dry skillet over medium heat for 2–3 minutes per side. If the filling feels dry, add a splash of water or broth to the pan before covering with a lid. The steam will bring back the moisture without making the tortilla soggy.