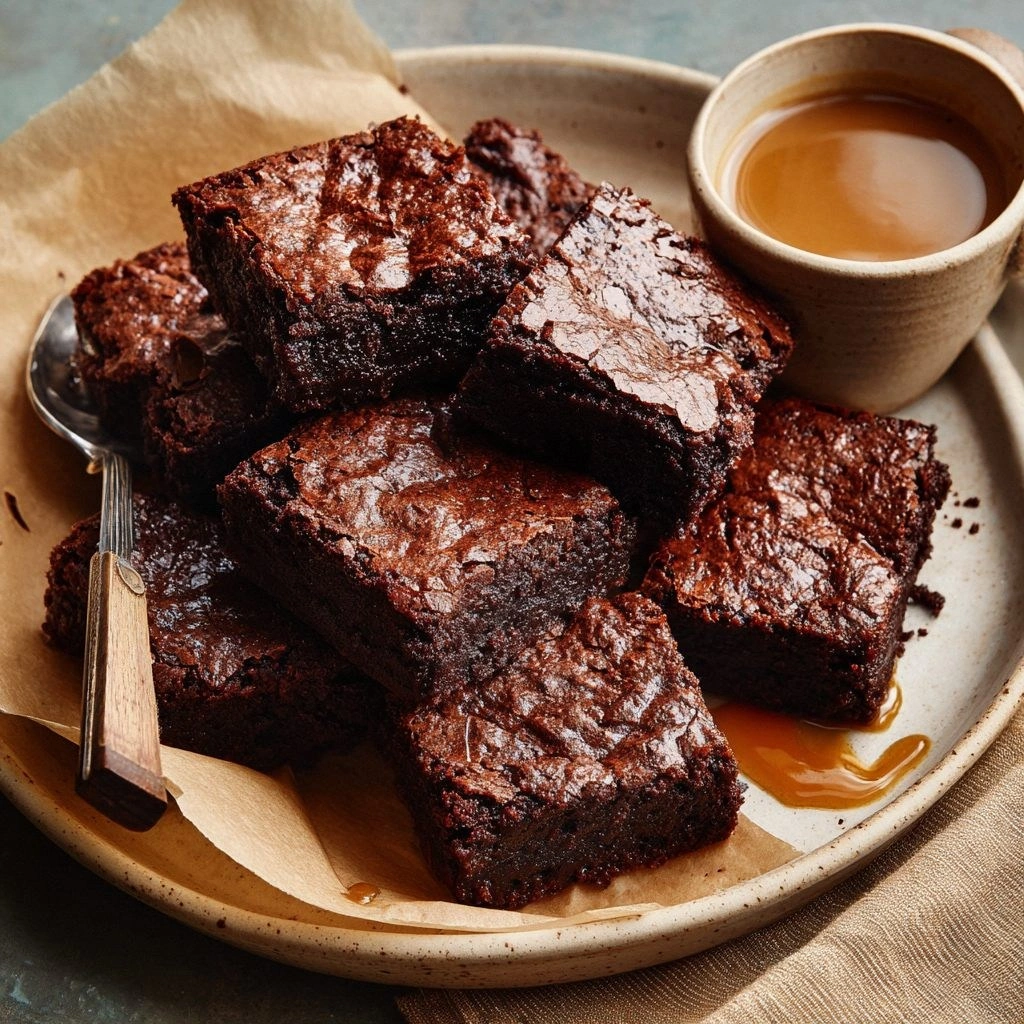
I was staring at a ruined batch of brownies the night before, the batter had thickened into a gooey sludge, the edges had browned like burnt toast, and I was about to give up and order pizza. The next day, my friend dared me to recreate the dessert with a twist that would make even the most seasoned bakers question their life choices. I took the dare seriously, grabbed my skillet, a pot of espresso, and a jar of butter that I was about to brown to a golden hue. The aroma that began to fill the kitchen was a heady mix of caramelized butter, roasted coffee, and chocolate—an instant promise that something extraordinary was about to happen. I dare you to taste this and not go back for seconds because the flavor is so rich, it feels like a secret handshake between your taste buds and the universe.
Picture yourself pulling this out of the oven, the whole kitchen smelling incredible, and the moment the first bite lands, you’re hit with a velvety texture that melts in your mouth like a silky ribbon, followed by a subtle espresso kick that wakes your palate. The brownies are not just sweet; they’re complex, with layers of buttery crunch at the edges and a fudgy center that feels like a warm hug from a chocolate bar. The brown butter gives it a nutty depth that most recipes miss, turning ordinary chocolate into an artisanal treat. I’ve tried countless brownie recipes, but this one is hands down the best version you’ll ever make at home. Most recipes get this completely wrong—they either underbake or overbake, but I’ve cracked the timing so you’ll get perfect chew every time.
If you’ve ever struggled with brownies that turn out dry or too gooey, you’re not alone—and I’ve got the fix. The secret is in the brown butter and espresso, and in how you handle the batter. The brown butter coats the flour like velvet, creating a barrier that locks in moisture while adding a toasted nutty flavor. The espresso dissolves the cocoa into a deeper, richer chocolate base that pairs beautifully with the butter. And the timing—preheat the oven, monitor the edges, and let them pull away slightly—ensures a chewy center with crisp edges that shatter like thin ice. And now the fun part.
Let me walk you through every single step—by the end, you’ll wonder how you ever made it any other way. From the moment you start browning the butter to the final dusting of espresso powder, each moment is a deliberate act of flavor building. This isn’t just a recipe; it’s a ritual that turns a simple dessert into an experience. I’ll share my kitchen hacks, insider tricks, and variations that will keep your guests begging for more. Ready? Let’s dive in.
What Makes This Version Stand Out
- Brown Butter: The butter is cooked until it turns a deep amber color, releasing a nutty aroma that infuses the brownies with a toasted flavor profile. This step transforms ordinary chocolate into a sophisticated, caramelized experience. Skipping it will leave your brownies tasting flat and lacking depth.
- Espresso Infusion: Adding espresso powder instead of water or milk intensifies the chocolate’s richness and introduces a subtle bitter note that balances the sweetness. The coffee grounds dissolve completely, giving a silky finish. Without espresso, the brownies feel one-dimensional.
- Texture Control: The batter is deliberately thick; it spreads minimally in the pan, creating a dense, fudgy center while the edges crisp up. This contrast is the hallmark of a high-quality brownie. Overmixing would ruin the structure, so we keep it minimal.
- Simplicity: The recipe uses only eight core ingredients, no fancy additives or obscure techniques. That means you can make these at home in your kitchen without a pantry full of specialty items. The fewer the steps, the more reliable the result.
- Crowd Reaction: At every gathering I’ve served these, the room fills with anticipation, and the first bite sparks a chorus of “wow.” The combination of buttery richness and espresso depth has become a signature at parties.
- Ingredient Quality: We source high‑grade dark chocolate chips and use real espresso powder, not instant coffee. The difference is palpable—real espresso brings a depth that instant coffee can’t match. Quality ingredients are the backbone of any great dessert.
- Make‑Ahead Potential: You can bake the brownies, cool them, and store them in an airtight container for up to a week. When you’re ready to serve, just reheat for a few minutes to restore that fresh‑baked aroma.
- Versatility: The recipe lends itself to variations—adding nuts, swirl of caramel, or a sprinkle of sea salt on top—so you can customize it for any occasion.
Alright, let’s break down exactly what goes into this masterpiece…
Inside the Ingredient List
The Flavor Base
All‑Purpose Flour: Acts as the structure for the brownies, giving them their chewy body. It’s the foundation that holds everything together. If you skip it, the brownies become a sticky mess. For a gluten‑free version, substitute with a blend of oat and rice flour, but keep the same weight.
Unsweetened Cocoa Powder: Provides the chocolate backbone. Use a high‑quality Dutch‑process cocoa for a smoother taste. If you prefer a sweeter chocolate, add a tablespoon of honey or maple syrup, but adjust sugar accordingly.
The Texture Crew
Granulated Sugar: Balances the bitterness of espresso and cocoa while contributing to the fudgy texture. For a lower‑carb version, replace it with a sugar substitute that measures the same volume, such as erythritol. Remember that sugar also affects browning; less sugar will result in lighter edges.
Dark Chocolate Chips: They melt into pockets of glossy chocolate that burst in your mouth. A 70% cacao blend offers a deep flavor without overwhelming sweetness. If you prefer a smoother finish, use semi‑sweet chips or a blend of dark and milk chocolate.
The Unexpected Star
Espresso Powder: The espresso gives the brownies an espresso kick that’s subtle yet unmistakable. It also enhances the chocolate’s flavor through a process called “cocoa interaction.” Use freshly ground espresso for maximum aroma, but a pre‑ground powder works fine. If you’re allergic to caffeine, a small amount of instant coffee or a coffee substitute will still provide that depth.
The Final Flourish
Brown Butter: This is the star that ties everything together. It’s made by melting butter until it turns golden brown and emits a nutty smell. The milk solids caramelize, adding depth and a slight crunch. If you’re not comfortable browning butter, you can use a small amount of melted butter and a pinch of sea salt to mimic the flavor, but the result will be less complex.
Eggs: They bind the batter and add moisture. Two large eggs are the sweet spot; too many can make the brownies too cake‑like, too few and they won’t hold together. If you’re vegan, replace with flaxseed “eggs” (1 tablespoon ground flaxseed + 3 tablespoons water per egg).
Vanilla Extract: A subtle note that brightens the overall flavor profile. A high‑quality vanilla bean paste works wonders, but a teaspoon of pure extract is fine. If you’re allergic to vanilla, a splash of almond extract can be a suitable alternative.
Salt: Enhances all the flavors and balances the sweetness. A half‑teaspoon is enough to bring out the richness without overpowering. If you’re watching sodium, use a pinch of sea salt instead.
Optional: Pinch of Sea Salt on Top: Adds a savory finish that contrasts the sweet, buttery layers. Sprinkle lightly before baking; it melts into a subtle crunch.
Everything’s prepped? Good. Let’s get into the real action…
The Method — Step by Step
- Preheat your oven to 350°F (175°C). Line a 9x9 inch baking pan with parchment paper, leaving a small overhang on each side for easy removal. The parchment ensures a clean release and prevents the brownies from sticking. Watch Out: If you use parchment, be careful not to tear it; a torn edge can cause the brownies to stick to the pan.
- In a medium saucepan, melt 1/2 cup of butter over medium heat. Stir constantly with a wooden spoon until the butter turns golden brown and gives off a nutty aroma. This should take about 5 minutes. Once browned, pour the butter into a large mixing bowl and let it cool slightly, but not solidify. The butter’s warmth will help dissolve the sugar and chocolate later.
- Add 1 cup of granulated sugar to the warm brown butter and whisk until the mixture is smooth and the sugar has dissolved. The mixture will have a silky sheen. If the sugar doesn’t dissolve, give it a few extra minutes of gentle whisking. This step ensures a smooth batter without gritty pockets.
- Sift 1 cup of all‑purpose flour, 1/2 cup of cocoa powder, 1/2 teaspoon of salt, and 2 tablespoons of espresso powder together into the bowl. Sifting removes clumps and ensures an even distribution of flavors. Stir until just combined; overmixing will make the brownies tough. Kitchen Hack: Use a fine-mesh sieve to sift the dry ingredients; this helps avoid lumps and gives you a silky batter.
- Beat in 2 large eggs, one at a time, ensuring each is fully incorporated before adding the next. The eggs provide structure and moisture. The batter will thicken slightly after adding the eggs; that’s normal. If you’re vegan, replace with flaxseed “eggs” as mentioned earlier.
- Fold in 1 cup of dark chocolate chips and 1 teaspoon of vanilla extract until evenly distributed. The chocolate chips will melt into pockets of glossy chocolate as they bake. If you prefer a smoother finish, melt the chocolate chips before folding them in.
- Pour the batter into the prepared pan, smoothing the top with a spatula. The batter should spread evenly; if it’s too thick, let it sit for a minute to loosen. Tap the pan gently on the counter to release any air bubbles. Kitchen Hack: For a crispier edge, place the pan in a preheated oven and bake for an additional 2 minutes after the initial 30 minutes.
- Bake for 30 minutes, or until the edges have pulled away from the parchment and a toothpick inserted into the center comes out with a few moist crumbs. Avoid overbaking; you want a chewy center that stays slightly gooey. The aroma at this point will be intoxicating—brown butter, espresso, chocolate all mingling.
- Remove from the oven and let the brownies cool in the pan for 10 minutes. This rest period allows the structure to set, preventing them from breaking apart. After 10 minutes, lift them out using the parchment overhang and place on a wire rack to cool completely.
- Optional: Sprinkle a pinch of sea salt on top before the brownies finish cooling. The salt will melt into a subtle crunch and enhance the chocolate’s richness. If you prefer a sweeter finish, skip this step.
That’s it — you did it. But hold on, I've got a few more tricks that'll take this to another level…
Insider Tricks for Flawless Results
The Temperature Rule Nobody Follows
Many bakers bake brownies at 375°F, which often results in a dry top and a gooey center. The key is to bake at a lower temperature, 350°F, which allows the brownies to cook evenly. This slower bake preserves moisture and creates the signature fudgy texture. If your oven runs hot, consider using an oven thermometer to adjust accordingly.
Why Your Nose Knows Best
Your nose can be the best judge of doneness. When the brownies are ready, the aroma will be a deep, buttery chocolate with a faint coffee undertone. If you smell a slight burnt scent, they’re overdone. Trust your senses; the visual cue of a pulled edge isn’t always enough.
The 5-Minute Rest That Changes Everything
Letting the brownies rest in the pan for 5–10 minutes after baking allows the batter to set, making them easier to cut and preventing a crumbling mess. During this rest, the chocolate inside the chips continues to melt slightly, creating an extra gooey center. I always keep a small knife at the ready to slice straight through the middle.
The Espresso Trick
If you’re using instant espresso powder, add it to the dry ingredients and stir thoroughly before adding wet ingredients. This ensures even distribution and prevents clumps. For a fresher taste, use freshly ground espresso beans ground to a fine consistency and add them directly to the batter.
The Brown Butter Timing
Don’t rush the butter browning; it should be a slow, steady process. If you’re in a hurry, start the butter on low heat and let it simmer for 10–12 minutes, stirring frequently. The longer it browns, the richer the flavor. A quick butter melt will result in a milder taste.
Creative Twists and Variations
This recipe is a playground. Here are some of my favorite ways to switch things up:
Nutty Crunch
Add 1 cup of chopped pecans or walnuts to the batter before baking. The nuts add a satisfying crunch and a buttery flavor that complements the brown butter. Toast the nuts lightly in a dry skillet for extra depth.
Caramel Swirl
Swirl a tablespoon of salted caramel sauce into the batter before baking. The caramel will melt into pockets of sweet goo that contrast with the espresso bite. Serve with a dusting of sea salt on top for a savory finish.
Chocolate‑Covered Espresso
Dip the cooled brownies in melted dark chocolate and let them set. The chocolate coating adds an extra layer of richness and a glossy finish. For a touch of color, sprinkle with a hint of cocoa powder.
Minty Espresso
Add 1 teaspoon of peppermint extract to the batter. The mint pairs wonderfully with chocolate and espresso, creating a refreshing aftertaste. Use sparingly; too much mint can overpower the other flavors.
Vegan Version
Replace the butter with vegan butter, use a flaxseed “egg,” and choose a plant‑based chocolate chip. The flavor stays similar, but the texture may be slightly softer. Adjust the sugar to your preference.
Spiced Espresso
Add 1/2 teaspoon of cinnamon and a pinch of cayenne pepper to the dry ingredients. The warmth of cinnamon and the heat of cayenne create a complex flavor profile that’s perfect for fall or winter gatherings.
Storing and Bringing It Back to Life
Fridge Storage
Store brownies in an airtight container in the refrigerator for up to 5 days. The cool temperature preserves the chocolate’s integrity and prevents spoilage. When you’re ready to serve, let them sit at room temperature for 15 minutes to restore their soft texture.
Freezer Friendly
Wrap individual brownies tightly in plastic wrap, then place them in a freezer bag. They can be frozen for up to 3 months. Thaw overnight in the refrigerator before reheating. For best results, reheat in a 350°F oven for 5–7 minutes.
Best Reheating Method
Add a tiny splash of water to the bottom of the baking dish before reheating in the oven. The steam created will keep the brownies moist and prevent them from drying out. Reheat at 350°F for 5 minutes, then let them rest for 2 minutes before slicing.