I still remember the first time I tried to impress my future in-laws with a red velvet cake for Christmas dinner. Picture this: flour in my hair, cocoa powder exploding across the counter like a winter snowstorm, and a cake that looked more like a crime scene than a holiday dessert. My mother-in-law took one bite, smiled politely, and whispered, "Maybe next year we just buy one from the bakery." That moment? That was the catalyst that sent me on a six-month quest to create the most ridiculously moist, eye-rollingly delicious red velvet cake that would make even the most skeptical relative beg for seconds.
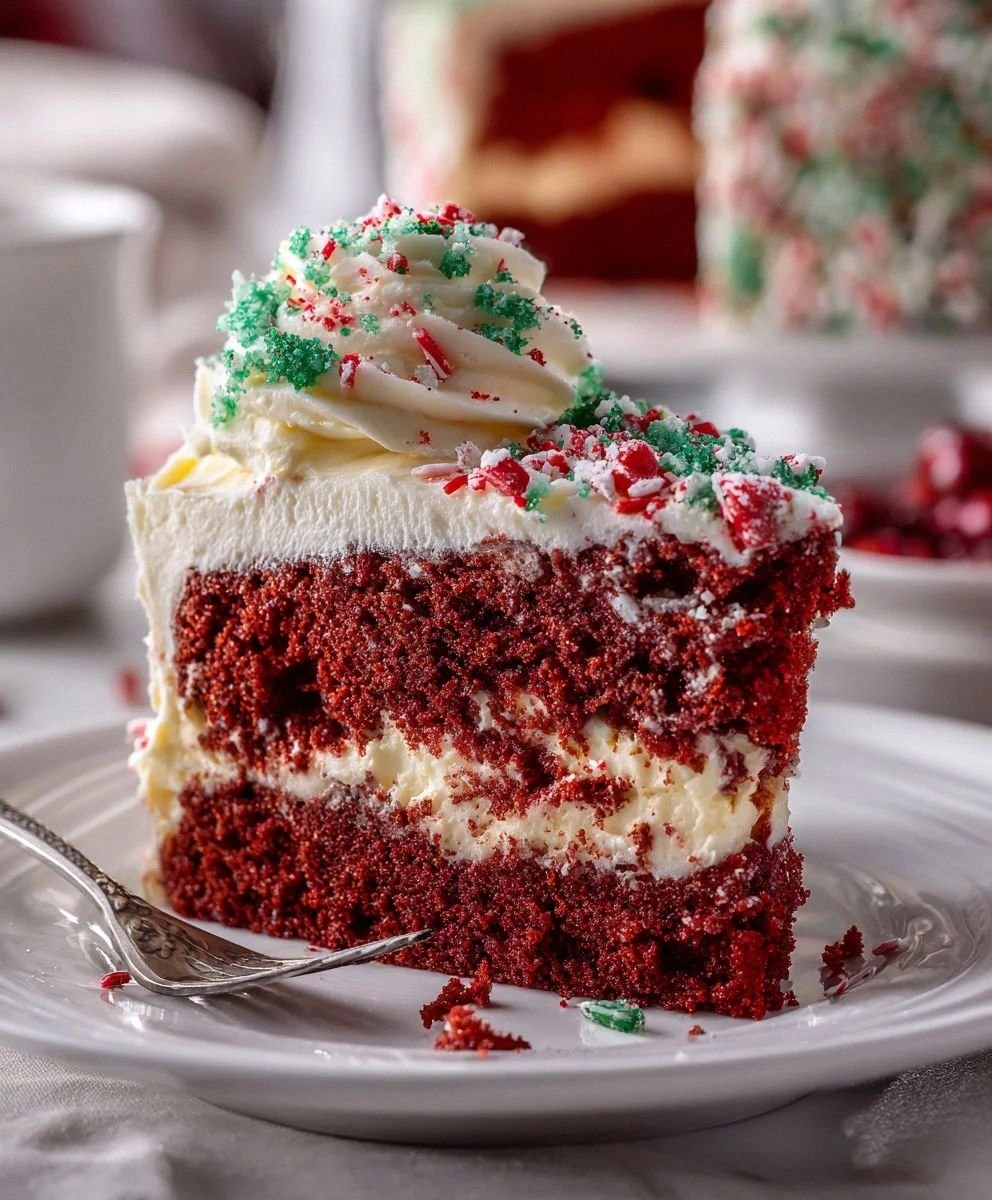
Fast forward three years, and this Christmas Red Velvet Poke Cake has become the stuff of family legend. We're talking about a dessert so moist it practically melts on your fork, with those signature red velvet layers soaking up a vanilla pudding bath that creates pockets of creamy heaven in every bite. The green-tinted whipped topping looks like fresh Christmas garland, and those red and white sprinkles? They're not just decoration — they're tiny flavor bombs that add the perfect crunch to balance all that softness. When I pull this out of the fridge on Christmas Eve, my nephew literally does a happy dance that would put most TikTokers to shame.
Here's the thing that'll make you the hero of your holiday gathering: this recipe takes everything intimidating about scratch-made red velvet and throws it out the window. No more worrying about whether your cocoa powder is the right kind or if you've over-mixed the batter until it's tough enough to patch drywall. We're using a cake mix as our foundation, but we're doctoring it up so magnificently that nobody — and I mean nobody — will guess you didn't slave away for hours. The secret lies in the poke technique, which transforms an ordinary cake into something that tastes like it came straight from a fancy bakery where people wear white hats and speak in French accents.
I dare you to taste this cake and not go back for seconds. Actually, I double-dog dare you, because I've seen grown adults hide the last piece in their coat pockets to ensure they get some for later. The combination of that classic red velvet flavor with the surprise pudding filling creates a texture so luxurious, it coats your tongue like velvet gloves on a winter morning. And when you add that festive green-tinted topping with the cheerful sprinkles? You've got a dessert that tastes like Christmas morning feels — all warmth, joy, and the kind of indulgence that makes you want to curl up by the fire with a massive slice and a glass of milk. Let me walk you through every single step — by the end, you'll wonder how you ever made it any other way.
What Makes This Version Stand Out
Most recipes get this completely wrong. They'll tell you to make red velvet from scratch, spend hours creaming butter and sugar, and end up with a dry cake that tastes like disappointment with food coloring. This version? It's hands down the best version you'll ever make at home, and here's why:
- Moisture Magic: The pudding soak doesn't just add flavor — it creates an impossibly tender crumb that stays moist for days, turning leftover cake into an even better breakfast treat (don't judge me, we've all been there).
- Time-Saving Genius: Starting with a cake mix means you can go from zero to dessert hero in under an hour of active time, leaving you free to deal with that relative who always arrives early and wants to "help" in the kitchen.
- Visual Showstopper: When you slice into this beauty, the contrast between the deep red cake, white pudding stripes, and green topping creates a Christmas color palette that looks professionally styled for Instagram.
- Make-Ahead Marvel: This cake actually improves overnight as the flavors meld together, meaning you can knock it out on December 23rd and still look like a domestic goddess on Christmas Day.
- Crowd-Pleasing Complexity: The combination of chocolate undertones from the red velvet, vanilla pudding creaminess, and the lightness of whipped topping creates flavor layers that satisfy both chocolate lovers and vanilla enthusiasts.
- Fail-Proof Technique: Even if you've never successfully made a box cake mix (looking at you, friend who once served hockey pucks), the poke method ensures you end up with something deliciously moist every single time.
- Holiday Flexibility: Swap the green food coloring for blue and you've got Hanukkah colors, or go wild with multi-colored sprinkles for a birthday celebration that works year-round.
Alright, let's break down exactly what goes into this masterpiece...
Inside the Ingredient List
The Flavor Foundation
Red velvet cake mix isn't just a lazy shortcut — it's your ticket to consistent results every single time. The manufacturers have already figured out the perfect ratio of flour, sugar, cocoa powder, and leavening agents to create that signature red velvet flavor. When you add the eggs, oil, and water according to package directions, you're building a base that's been tested in more kitchens than you can count. The key is choosing a quality mix — skip the dollar store version and go for a name brand that lists cocoa as one of the first ingredients. Trust me, that extra dollar investment pays off in flavor dividends that even your pickiest relative will appreciate.
Eggs do more than just bind everything together — they're the secret to that gorgeous golden color peeking through the red velvet layers. Room temperature eggs incorporate more easily into the batter, creating a smoother texture without over-mixing. If you're the type who forgets to plan ahead (hello, kindred spirit), just submerge cold eggs in warm water for five minutes while you gather your other ingredients. The protein in eggs also helps the cake set properly, ensuring those pudding-filled holes don't turn your dessert into a soggy mess that collapses under its own delicious weight.
The Texture Crew
Oil is the unsung hero of ultra-moist cakes, and in this recipe, it works overtime to keep everything tender. Unlike butter, which can create a firmer texture when cold, oil stays liquid at room temperature, meaning your cake stays soft even straight from the fridge. I use a neutral oil like canola or vegetable because they don't compete with the delicate chocolate-vanilla balance of red velvet. The amount called for on the box mix is perfect — don't be tempted to reduce it for "health reasons" unless you enjoy eating red-tinted cardboard that sucks all joy from the room.
Water might seem boring, but it's crucial for activating the starches and proteins in your cake mix. Hot tip: use hot water instead of room temperature for an even more tender crumb. The heat helps the cocoa powder bloom, releasing those deep chocolate notes that make red velvet so addictive. Just make sure it's not boiling — you want hot tap water, not something that'll start cooking your eggs before they hit the oven.
The Unexpected Star
Instant vanilla pudding mix is the game-changer that separates amateur bakers from dessert legends. When whisked with milk, it creates a thick, creamy filling that seeps into the cake holes and sets up like a dream. Don't even think about using cook-and-serve pudding — you need the instant variety that thickens without heat. The vanilla flavor complements the red velvet perfectly, adding warmth and depth without overwhelming the chocolate undertones. Plus, the slight sweetness balances the tang that makes red velvet so distinctive.
Milk activates the pudding mix and creates that luscious filling that makes people close their eyes in bliss. Whole milk gives you the richest results, but 2% works if that's what you've got. The key is whisking it until smooth before pouring — nobody wants to bite into a pocket of dry pudding powder that tastes like disappointment and poor life choices. Cold milk actually helps the pudding set faster, so resist the urge to use warm milk thinking it'll absorb better.
The Final Flourish
Whipped topping might seem like cheating, but it's the light, airy finish that makes this cake feel special instead of heavy. Freshly whipped cream deflates and weeps after a day, but whipped topping holds its shape and stays picture-perfect for the entire holiday weekend. The trick is letting it come to room temperature for about 15 minutes before spreading — it becomes more pliable and easier to work with. Don't overthink it — this is about creating a dessert that brings joy, not stress about whether your cream was whipped to exactly the right peak.
Green gel food coloring is where the Christmas magic happens, but here's what most recipes get wrong: they add too much and end up with a topping that looks like radioactive slime. Start with the tiniest amount on a toothpick — you can always add more, but you can't take it out once it's in there. The gel variety gives you vibrant color without thinning the whipped topping, unlike liquid food coloring that can make it weep and separate. Mix it in a separate bowl with a small amount of topping first, then fold that colored portion into the rest for even distribution.
Red and white Christmas sprinkles aren't just for show — they add texture and visual appeal that makes people reach for their phones before their forks. The crunch they provide is the perfect contrast to all that creaminess, like finding little treasures in every bite. I mix red and white for classic Christmas colors, but green and white work too if you want to go full holiday theme. Add them just before serving so they stay crisp — nobody wants soggy sprinkles that bleed color into your gorgeous green topping.
Everything's prepped? Good. Let's get into the real action...
The Method — Step by Step
- Preheat your oven to 350°F (or whatever temperature your cake mix specifies) and prepare a 9x13-inch baking pan with nonstick spray. Here's where I get controversial — I also line the bottom with parchment paper, leaving wings to lift the cake out later. You know that moment when you try to serve cake and half of it sticks to the pan like it's holding on for dear life? Parchment paper is your insurance policy against that particular brand of holiday humiliation. While the oven heats, grab your favorite mixing bowl and let's transform that humble cake mix into something worthy of a magazine cover.
- Combine the cake mix with eggs, oil, and water according to package directions, but here's the secret — mix it for 30 seconds longer than they say. Most people under-mix box cakes, leaving little pockets of dry mix that create sad, floury bites. You want a smooth, glossy batter that falls off the spoon in thick ribbons. If you've ever wondered why your box cake tastes flat, it's probably because you were too gentle with it. Give it some love, but stop before you reach the point where the batter starts to look stringy — that's over-mixed territory, and nobody wants tough cake.
- Pour the batter into your prepared pan and smooth the top with an offset spatula, getting it as level as possible. The cake will rise, but starting with an even surface means your pudding pockets will be uniform instead of creating weird puddles. Give the pan a gentle tap on the counter to release any large air bubbles — you'll see them rise to the surface and pop like tiny cake volcanoes. Now slide it into the oven and set a timer for the minimum time listed on the box. We're going for the toothpick test here, but with a twist — you want it to come out with just a few moist crumbs, not completely clean, because the cake will continue cooking from residual heat.
- While the cake bakes, whisk together your pudding mix and milk in a medium bowl. This is where patience pays off — whisk it for a full two minutes instead of the quick 30 seconds most people do. You want it thick enough to coat the back of a spoon, but still pourable. If it sets up too much while your cake finishes, just give it another quick whisk to loosen it. The pudding should be smooth and lump-free, like thick vanilla sauce rather than wallpaper paste.
- When the cake comes out, let it cool for exactly five minutes — not ten, not two, but five. This is the sweet spot where it's cool enough not to melt your pudding into oblivion, but still warm enough to accept all that creamy goodness. Using the handle of a wooden spoon, poke holes about an inch apart all over the cake, going about three-quarters of the way down. Resist the urge to use a fork — you want clean, round holes that'll fill up like little pudding swimming pools, not ragged tears that make your cake look like it lost a fight with a badger.
- Now comes the fun part — pour that pudding slowly over the warm cake, watching it seep into the holes like liquid gold finding its home. Use a spatula to gently spread it around, making sure every hole gets filled and the pudding covers the entire surface. You'll see it disappear into the cake, leaving just a thin layer on top — that's perfect. If any holes look empty, poke them again with your spoon handle to encourage the pudding to flow in. This is the magic moment where ordinary cake becomes extraordinary.
- Cover the cake with plastic wrap (pressing it directly onto the surface prevents a skin from forming) and refrigerate for at least two hours, but overnight is even better. This chilling time is crucial — it lets the pudding set up properly and allows all those flavors to meld together in sweet harmony. If you're impatient and try to rush this step, you'll end up with pudding that runs all over the place instead of staying put in those beautiful pockets. The cake will actually get better as it sits, so this is perfect for holiday entertaining when you want to get ahead of the game.
- Before serving, tint about three-quarters of your whipped topping with the green food coloring. Start with the tiniest amount — seriously, less than you think you need — and mix until you get a soft, mint-green color that says "Christmas" without screaming "radioactive." Spread this over the chilled cake, creating swoops and swirls that look like snow drifts. Then dollop the remaining white topping around the edges for contrast, or pipe it into decorative rosettes if you're feeling fancy.
- The final flourish is those sprinkles — add them just before serving so they stay crisp and don't bleed their colors into the topping. I like to create a border around the edges and then a light dusting across the middle, like fresh snow with holiday confetti. Cut into squares with a sharp knife dipped in hot water between cuts for clean edges that show off all those pudding pockets. Serve chilled, and watch as people take their first bite and their eyes widen in that universal expression of "oh my goodness, what is this magic?"
That's it — you did it. But hold on, I've got a few more tricks that'll take this to another level...
Insider Tricks for Flawless Results
The Temperature Rule Nobody Follows
Here's where most home bakers go wrong — they think room temperature ingredients are just a fancy chef suggestion. Wrong! Cold eggs and oil don't incorporate properly, leaving you with a batter that separates and bakes up with weird, rubbery edges. Set your eggs and milk out 30 minutes before you start, or speed things up by placing eggs in warm (not hot) water for five minutes. Your cake will rise higher, have a finer crumb, and absorb that pudding like it's been personally trained for the job. I learned this the hard way after serving a cake that had the texture of wet cardboard — never again.
Why Your Nose Knows Best
Don't rely solely on the toothpick test — start sniffing around the 25-minute mark. When red velvet cake is perfectly baked, your kitchen fills with this incredible aroma that's part chocolate, part vanilla, part something you can't quite name but know you want more of. If you smell it, check the cake even if your timer says you have ten minutes left. Ovens vary, and that smell test has saved me from over-baked, dry cake more times than I can count. A friend tried skipping this step once — let's just say it didn't end well, and she still blames me for her dessert disaster.
The 5-Minute Rest That Changes Everything
After you pour the pudding but before you refrigerate, let the cake sit on the counter for exactly five minutes. This allows the pudding to start setting in those holes while the cake is still warm enough to keep everything moving smoothly. Skip this step and you risk the pudding sliding off to the sides, creating a weird pudding moat around your cake. I discovered this when I was rushing to get out the door for a party — those five minutes make the difference between professional-looking results and something that looks like it lost a fight with a pudding monster.
The Pudding Consistency Sweet Spot
Your pudding should be thick enough to coat a spoon but still pourable — think heavy cream consistency, not mayonnaise. If it sets up too much while your cake bakes, whisk in a tablespoon of milk at a time until it loosens up. Too thin and it'll just run right through the cake and pool at the bottom, creating a soggy mess that nobody wants to deal with. The perfect consistency is when it flows like lava but doesn't just disappear when you spread it — it should sit on top for a second before slowly sinking into those holes.
The Make-Ahead Magic Window
This cake actually improves over 24-48 hours as the flavors meld and the pudding fully incorporates into every bite. Make it on December 23rd and serve it on Christmas Day for maximum impact. After 48 hours, though, the texture starts to break down and it gets a bit mushy around the edges. If you need to make it earlier, bake and pudding the cake, then freeze it (without the topping) for up to a month. Thaw overnight in the fridge, add the whipped topping and sprinkles, and it'll taste like you just made it.
Creative Twists and Variations
This recipe is a playground. Here are some of my favorite ways to switch things up:
White Chocolate Wonderland
Swap the vanilla pudding for white chocolate instant pudding and add a teaspoon of peppermint extract to the whipped topping. The result tastes like a candy cane exploded in the best possible way, with rich white chocolate pockets that make people close their eyes in bliss. Top with crushed candy canes instead of sprinkles for extra crunch and that classic peppermint flavor that screams Christmas morning.
Salted Caramel Dream
Use caramel instant pudding instead of vanilla, and fold a few tablespoons of caramel sauce into the whipped topping. The sweet-salty combination is absolutely addictive — like eating a caramel apple but in cake form. Drizzle extra caramel over the top just before serving for that bakery-style finish that makes people think you spent way more time on this than you actually did.
Chocolate Overload
Replace half the water in the cake mix with strong coffee to deepen the chocolate flavor, and use chocolate instant pudding instead of vanilla. This creates a red velvet meets mocha experience that's perfect for adult gatherings where you want something sophisticated but still fun. Add chocolate shavings on top for visual appeal and extra chocolate crunch in every bite.
Birthday Party Flip
Keep the vanilla pudding but tint the whipped topping pink instead of green, then load up on rainbow sprinkles for a birthday celebration that works any time of year. This version is my go-to for summer birthdays when you want something festive but don't want to turn on the oven for hours. Kids go absolutely wild for the bright colors, and adults appreciate that it's not tooth-achingly sweet.
Eggnog Extravaganza
Replace the milk in the pudding with eggnog for a holiday twist that tastes like Christmas in every bite. Add a splash of rum extract to the whipped topping for that authentic eggnog flavor without the alcohol content that makes grandma raise her eyebrows. Top with a dusting of nutmeg for the full eggnog experience that'll have people asking if you secretly trained at culinary school.
Lemon Bright
Use lemon instant pudding instead of vanilla for a bright, tangy version that cuts through the richness of the red velvet. The yellow pudding against the red cake creates a beautiful color contrast, and the lemon adds a refreshing note that makes this perfect for spring celebrations or when you want something a little different from the usual chocolate-heavy holiday desserts.
Storing and Bringing It Back to Life
Fridge Storage
Cover the cake tightly with plastic wrap or store in an airtight container in the refrigerator for up to 4 days. The key is keeping it covered — exposed cake will dry out faster than you can say "leftovers" and absorb weird fridge odors that nobody wants in their dessert. If you've already cut into it, press plastic wrap directly against the cut surfaces to prevent them from drying out. The pudding keeps everything moist, but it won't work miracles if you leave it uncovered next to last night's garlic chicken.
Freezer Friendly
This cake freezes beautifully for up to 2 months, but here's the trick: freeze it after adding the pudding but before adding the whipped topping. Wrap individual pieces in plastic wrap, then aluminum foil, and store in a freezer bag. When you're ready to serve, thaw overnight in the fridge, then add fresh whipped topping and sprinkles. The texture stays perfect, and you can have single servings ready for those "I need cake right now" emergencies that seem to happen more often during the holidays.
Best Reheating Method
Honestly, this cake is best served cold straight from the fridge — the pudding sets up perfectly and the flavors are at their peak. But if you prefer your cake room temperature (and some people do), let individual pieces sit out for 15-20 minutes before serving. Don't microwave it — the whipped topping will melt into a sad puddle and the pudding will turn runny. If you must warm it, place a piece in a 200°F oven for 5 minutes max, but really, embrace the chill factor that makes this dessert so refreshing after a heavy holiday meal.