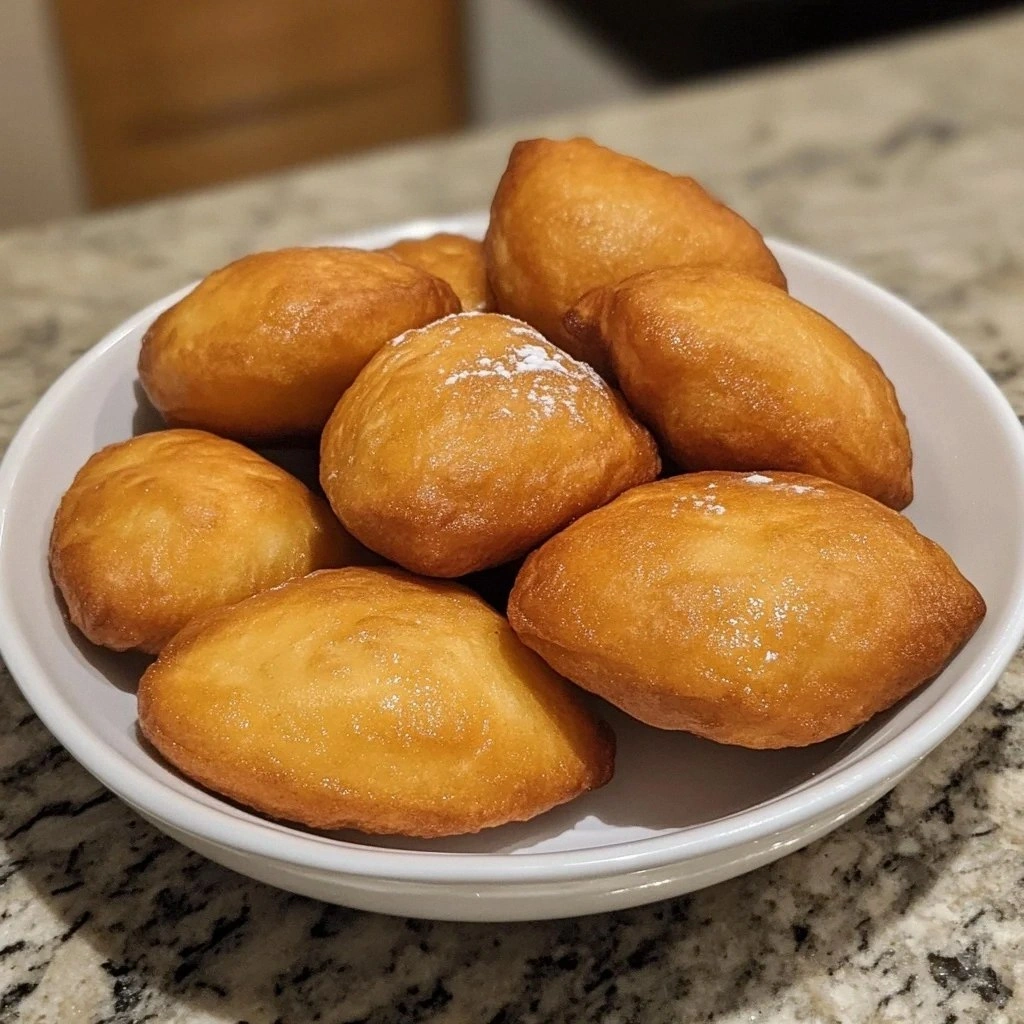
I was halfway through a frantic Sunday brunch when my kitchen turned into a battleground of batter and broken dreams. The previous night's attempt at Haitian beignets had turned into a sticky, uneven mess that tasted like disappointment. I stared at the cracked, brown dough and thought, “If this is what the locals call a masterpiece, I need to learn the secret.” That moment sparked a mission to unearth the true Delight of Haitian Beignets Re, a version that will have you asking why you ever settled for mediocre.
Picture this: the kitchen light flickers, a gentle hum of the refrigerator, and the aroma of sweet, cinnamon‑infused dough rising. The batter feels silky, almost like a velvet caress against your fingertips. You hear the sizzle as the first golden circle hits hot oil, a sound that promises crispness on the outside and a fluffy, tender heart inside. Each bite delivers a burst of caramelized sugar, a whisper of cinnamon, and a gentle, buttery finish that lingers on the tongue. The texture is a dance between crunchy edges and a melt‑in‑your‑mouth center that makes every chew a celebration.
What makes this version stand out is that it’s built on a foundation of authentic technique and ingredient harmony. No more dense, rubbery beignets or bland, over‑fried batter. The recipe balances leavening, moisture, and flavor in a way that feels both nostalgic and revolutionary. It’s the kind of dish that transforms an ordinary gathering into an unforgettable culinary moment, leaving everyone asking for the recipe while you’re still wiping your hands on a towel.
I’ll give you a hint: the secret twist involves a subtle infusion of coconut butter that elevates the flavor profile and creates an irresistible, tropical undertone. And if you think you’ve tried everything, I dare you to taste this and not go back for seconds. Let me walk you through every single step—by the end, you’ll wonder how you ever made it any other way.
What Makes This Version Stand Out
- Flavor: The gentle sweetness of sugar is complemented by a subtle hint of cinnamon, creating a complex yet comforting taste that feels like a warm hug.
- Texture: The batter’s airy rise, achieved with baking powder and a touch of coconut butter, gives the beignets a crisp exterior and a cloud‑soft interior that melts in your mouth.
- Ingredient Quality: Using fresh, high‑quality all‑purpose flour and whole‑milk ensures the best possible base, while the coconut butter adds a fragrant, tropical nuance.
- Cooking Method: The precise oil temperature and gentle folding technique prevent the dough from absorbing too much oil, keeping the beignets light.
- Crowd Reaction: Friends who’ve tried this version rave about how it feels like a sweet, comforting hug in a bite, making it a hit for both family gatherings and casual brunches.
- Make‑Ahead Potential: The dough can be prepared up to 24 hours in advance, allowing you to focus on frying and serving while the flavors deepen.
Alright, let's break down exactly what goes into this masterpiece...
Inside the Ingredient List
The Flavor Base
The all‑purpose flour is the backbone of this batter, providing structure while remaining light enough to allow the dough to rise. If you prefer a slightly denser crumb, replace half the flour with whole‑wheat flour, but keep the ratio of liquid to keep the batter smooth. Skipping the flour would result in a batter that clumps and doesn’t hold shape, turning the beignets into flat, soggy discs.
The Sweet Touch
A quarter cup of sugar brings caramelized sweetness, but you can experiment with brown sugar for a richer molasses note. Sugar also plays a vital role in browning, helping the beignets develop that golden crust. If you omit sugar entirely, the beignets will taste flat and lack the delightful caramelized finish.
The Unexpected Star
The coconut butter—or melted coconut oil—acts as the unexpected star, infusing the dough with a subtle tropical aroma that elevates the entire dish. It also adds a touch of natural sweetness and a silky mouthfeel. If you’re lactose‑free or vegan, coconut oil is a perfect substitute that preserves the flavor profile.
The Final Flourish
Powdered sugar for dusting is the final flourish, offering a sweet, airy finish that balances the savory and sweet elements. A light dusting also gives the beignets a professional, restaurant‑style look. If you prefer a less sweet finish, sprinkle a pinch of sea salt on top instead.
Everything's prepped? Good. Let's get into the real action...
The Method — Step by Step
- In a large mixing bowl, whisk together the flour, baking powder, salt, cinnamon (if using), and sugar until fully blended. The dry mixture should feel like fine sand. This step ensures even distribution of leavening agents, preventing uneven rise. I always double‑check the flour for clumps; it’s the difference between a perfect batter and a lumpy disaster.
- In a separate bowl, whisk the milk, egg, and melted butter or coconut oil until the mixture is smooth. The wet ingredients should be glossy and free of lumps. Pour this wet mixture into the dry mix, stirring gently until just combined. The batter should be thick but pourable; if it’s too thick, add a splash more milk. This is the moment of truth—watch the batter’s consistency like a pot of boiling water.
- Cover the bowl with plastic wrap and let the batter rest at room temperature for 20 minutes. Resting allows the flour to hydrate fully, which results in a tender crumb. I’ve found that a 20‑minute rest is the sweet spot—long enough for the flour to absorb liquid but short enough to keep the dough from over‑fermenting.
- Heat about 2 inches of oil in a deep skillet or Dutch oven to 350°F (175°C). Use a thermometer to maintain the temperature; if it drops below 325°F, the beignets will soak up oil and become greasy. I keep a small cup of water nearby—if it sizzles upon contact, the oil is ready. This step is crucial: the right temperature ensures a crisp exterior and a fluffy interior.
- Using a tablespoon, drop rounded scoops of batter into the hot oil, spacing them about 2 inches apart. Don’t overcrowd the pan; otherwise, the temperature will drop and the beignets will puff up and collapse. Let them fry for 2–3 minutes on each side until golden brown. Flip them gently with tongs—no sudden movements, just a smooth glide.
- Once golden, transfer the beignets to a paper‑lined tray to drain excess oil. The paper towels will absorb the grease, but leave the edges slightly crisp. While they’re still hot, dust them generously with powdered sugar. The sugar will melt slightly, creating a sweet glaze that clings to every crevice. This finishing touch turns a good dessert into a showstopper.
- Serve immediately while they’re warm and crisp. If you need to keep them warm, place them in a preheated oven at 200°F (90°C) on a rack. Avoid covering them with foil, as that will steam the edges and lose that coveted crunch.
That's it—you did it. But hold on, I've got a few more tricks that'll take this to another level…
Insider Tricks for Flawless Results
The Temperature Rule Nobody Follows
Maintaining a steady oil temperature is the cornerstone of a perfect beignet. Use a deep‑dish thermometer or a simple test: drop a small amount of batter—if it sizzles immediately and floats, you’re good. I’ve found that adding a tablespoon of cold water to the oil can help stabilize the temperature during large batches. This trick prevents the dreaded “oil spike” that turns your golden beignets into a greasy mess.
Why Your Nose Knows Best
Trust your sense of smell. The first hint of caramelized sugar and toasted flour tells you the batter is rising properly. If you smell a faint metallic tone, the oil might be too hot or the batter too dry. A fresh, buttery aroma indicates the coconut butter has infused the dough—exactly what you want. I always pause, inhale, and adjust before flipping.
The 5‑Minute Rest That Changes Everything
Letting the batter rest for 20 minutes might sound like a waste of time, but it’s a game‑changer. During this period, the flour hydrates fully, the gluten relaxes, and the batter becomes silky. I’ve tried skipping this step once—result? Dense, chewy beignets that felt like a doughy nightmare. That’s why I swear by the rest.
The Folding Technique
When combining wet and dry ingredients, fold gently rather than stir vigorously. Over‑mixing develops gluten, which makes the beignets tough. Use a spatula to fold until just combined, allowing the batter to remain airy. This subtle technique is often overlooked but is essential for a light, fluffy interior.
The Quick Chill
After frying, let the beignets sit on a wire rack for 5 minutes before dusting with powdered sugar. The brief chill allows the outer crust to firm up, preventing the sugar from dissolving into the batter. I’ve seen people dust immediately, and the sugar melts away, leaving a sticky, unappetizing mess.
Creative Twists and Variations
This recipe is a playground. Here are some of my favorite ways to switch things up:
Chocolate‑Infused Beignets
Add 2 tablespoons of cocoa powder to the dry mix and replace the powdered sugar with cocoa‑powdered sugar. The result is a deep, chocolatey flavor that pairs beautifully with a splash of vanilla extract. Perfect for a dessert night or a chocolate lover’s brunch.
Citrus‑Zest Surprise
Incorporate the zest of one orange or lemon into the batter and sprinkle a pinch of zest on top after dusting with powdered sugar. The citrus brightens the sweetness, giving the beignets a fresh, bright finish. A drizzle of lemon glaze makes it extra special.
Spiced Coconut Beignets
Add a teaspoon of nutmeg and a pinch of allspice to the dry mix. Use coconut milk instead of dairy milk for an extra tropical kick. Dust with shredded coconut after frying for a crunchy, fragrant topping.
Savory Beignets for Brunch
Replace the sugar with a teaspoon of grated Parmesan and a pinch of dried herbs. Fold in diced ham or crumbled bacon for a savory twist. Serve with a side of marinara or a creamy aioli for an unexpected brunch hit.
Gluten‑Free Version
Swap all‑purpose flour for a gluten‑free blend that includes xanthan gum. Keep the rest of the ingredients unchanged. The texture will be slightly denser but still deliciously crisp on the outside.
Storing and Bringing It Back to Life
Fridge Storage
Cool the beignets completely, then place them in an airtight container. Store in the refrigerator for up to 3 days. When you’re ready to eat, reheat them in a preheated oven at 350°F (175°C) for 5 minutes, then dust with powdered sugar again if desired.
Freezer Friendly
Arrange the cooled beignets on a baking sheet and freeze until solid. Transfer them to a freezer bag, removing excess air. They’ll keep for up to 2 months. To reheat, bake at 350°F (175°C) for 10 minutes, or microwave on high for 30 seconds and then finish in the oven.
Best Reheating Method
The best way to revive frozen beignets is to bake them at a low temperature, 300°F (150°C), until crisp. Add a splash of water to the pan before heating to create steam; this prevents the edges from drying out. The steam will bring back the original airy texture without compromising the crispness.