tags. Let's craft content. We'll start with introduction paragraphs. We'll need to write them carefully. Also we need to incorporate engagement hooks. We'll include micro-challenges, bold claims, confessions, contrasts, future pacing, power transitions, reader validation, sensory snapshots. Let's write 8 paragraphs of 5 sentences each. Paragraph 1: Opening with bold statement or relatable moment. Paragraph 2: Paint the scene. Paragraph 3: Tell why this version stands out. Paragraph 4: Drop teaser about technique or ingredient. Paragraph 5: Another hook. Paragraph 6: Another hook. Paragraph 7: Another hook. Paragraph 8: Power transition. Now bullet list section: 8 bullet points. Then ingredient list with subsections. We'll write 4 subsections each 6 sentences. That's 24 sentences. Then maybe add 4 more paragraphs of 5 sentences each (20 sentences). Total 44 sentences for ingredient section. Method section: 10 steps each 5 sentences => 50 sentences. Insider Tricks: 6 tips each 4 sentences => 24 sentences. Add 1 paragraph of 5 sentences => 5 sentences. Total 29 sentences. Creative Twists: 6 variations each 4 sentences => 24 sentences. Add 3 paragraphs of 5 sentences => 15 sentences. Total 39 sentences. Storing: 3 subsections each 4 sentences => 12 sentences. Add 2 paragraphs of 5 sentences => 10 sentences. Total 22 sentences. Now total sentences: Intro 40 + bullet list 24 + ingredient 44 + method 50 + insider 29 + twists 39 + storing 22 = 268 sentences. At 12 words each = 3216 words. Good. Now we need to embed highlight boxes. We'll add after bullet list a Kitchen Hack box. Also inside ingredient list maybe a Fun Fact box. Inside method maybe Kitchen Hack boxes and Watch Out box. Also inside insider tricks maybe Kitchen Hack box. We'll add accordingly. We must ensure each highlight box uses provided HTML. We must ensure the boxes have unique content. Now we need to produce final HTML with all content. Also we must ensure the recipe card includes all ingredients with correct data-base-qty. Also directions. Also we need to fill FAQ items with 6 items. Also we need to add hidden category, season, pin description. Season: general. Pin description: 400-450 characters. Let's craft: "Sizzle into a caramelized honey garlic glaze that clings to tender chicken thighs, delivering a sweet‑savory crunch with every bite. The blend of soy, vinegar, and fresh garlic creates a sauce that glistens like liquid amber, while olive oil gives a subtle earthy finish. This quick, crowd‑pleasing dinner pairs perfectly with rice or roasted veggies for a comforting meal that feels like a culinary hug." Count characters: Let's count roughly: 400-450 characters. Let's count: I'll approximate 430. We'll adjust if needed. Now we need to produce final HTML. Let's start building. We need to wrap all content inside
etc. We'll not wrap in tags. But we need to include the recipe card and hidden elements at the end. We need to ensure we use Bootstrap 5 classes. We'll use container? Not necessary. But we can use
tags with mb-3 etc. Let's write. We'll start. Also we need to include the mid-article image after ingredient list. Let's craft. We need to ensure we don't use any hero image at top. Now produce. We need to ensure the recipe card uses correct structure. We'll copy the given structure and replace placeholders. We need to fill directions. We'll copy the same steps as earlier but maybe adjust. We need to ensure each
What Makes This Version Stand Out
- Flavor Harmony: The sauce balances sweetness from honey with umami from soy, creating a profile that feels both familiar and exciting. ... Let's write 8. We need to keep each bullet 2-3 sentences. We'll do 2 sentences each. Now after bullets, we add "Alright, let's break down exactly what goes into this masterpiece..." with
- each 5 sentences.
Add Kitchen Hack boxes after some steps, Watch Out box at trickiest step.
We need to identify trickiest step: maybe step 6 (adding glaze). We'll put Watch Out box there.
Now insider tricks.
Insider Tricks for Flawless Results
with 6tips each 4 sentences. Add Kitchen Hack box for top tip. Now creative twists.
Creative Twists and Variations
with 6variations each 4 sentences. Add 3 paragraphs of 5 sentences. Now storing section.
Storing and Bringing It Back to Life
with 3 subsections each 4 sentences. Add 2 paragraphs of 5 sentences. Now recipe card. We'll copy given structure and fill. We need to set data-default-servings="4". Good. We need to fill ingredients list. We'll need to create- with 8
- each with data-base-qty. We'll need to set quantity display in . We'll set default quantities. For chicken thighs, quantity 4. For honey 0.25. For garlic 4. For soy sauce 0.25. For olive oil 2. For apple cider vinegar 1. For black pepper 0.5. For salt 1.
We need to include checkboxes. We'll follow the example. We'll create two columns maybe. But we can just list all 8 in one column. But the template shows two columns. We'll create two columns: first column with 4 items, second column with 4 items. We'll ensure each
- has data-base-qty attribute. Now directions: we need to provide 10 steps. We'll copy earlier steps but adapt to recipe card. Each
- with 5 sentences. Now FAQ: 6 items. Now hidden elements. Now we must ensure no emoji. Also no markdown. Now we need to count characters for pin description. We'll craft 420 characters. Let's craft pin description: "Sizzle into a caramelized honey garlic glaze that clings to tender chicken thighs, delivering a sweet‑savory crunch with every bite. The blend of soy, vinegar, and fresh garlic creates a sauce that glistens like liquid amber, while olive oil gives a subtle earthy finish. This quick, crowd‑pleasing dinner pairs perfectly with rice or roasted veggies for a comforting meal that feels like a culinary hug." Count characters: Let's approximate. We'll count: Sizzle(6) + space(1)=7 into(4)=11 a(1)=12 caramelized(11)=23 honey(5)=28 garlic(6)=34 glaze(5)=39 that(4)=43 clings(6)=49 to(2)=51 tender(6)=57 chicken(7)=64 thighs,(7)=71 delivering(10)=81 a(1)=82 sweet‑savory(12)=94 crunch(6)=100 with(4)=104 every(5)=109 bite.(5)=114 The(3)=117 blend(5)=122 of(2)=124 soy,(3)=127 vinegar,(7)=134 and(3)=137 fresh(5)=142 garlic(6)=148 creates(7)=155 a(1)=156 sauce(5)=161 that(4)=165 glistens(8)=173 like(4)=177 liquid(6)=183 amber,(6)=189 while(5)=194 olive(5)=199 oil(3)=202 gives(5)=207 a(1)=208 subtle(6)=214 earthy(6)=220 finish.(7)=227 This(4)=231 quick,(5)=236 crowd‑pleasing(13)=249 dinner(6)=255 pairs(5)=260 perfectly(9)=269 with(4)=273 rice(4)=277 or(2)=279 roasted(7)=286 veggies(7)=293 for(3)=296 a(1)=297 comforting(10)=307 meal(4)=311 that(4)=315 feels(5)=320 like(4)=324 a(1)=325 culinary(8)=333 hug.(4)=337 Total 337 characters. Need 400-450. Let's add more. We can add extra sentences: "Serve it hot, and let the aroma fill your kitchen, turning an ordinary evening into a celebration of flavor." Add that. Count additional: "Serve(5)=342", "it(2)=344", "hot,(4)=348", "and(3)=351", "let(3)=354", "the(3)=357", "aroma(5)=362", "fill(4)=366", "your(4)=370", "kitchen,(7)=377", "turning(8)=385", "an(2)=387", "ordinary(8)=395", "evening(7)=402", "into(4)=406", "a(1)=407", "celebration(10)=417", "of(2)=419", "flavor.(7)=426 Now total 426 characters. Good. Now hidden element: Now we need to ensure the recipe card's directions are filled with steps. Let's craft steps: Step 1: Preheat oven to 400°F (200°C). Season chicken thighs with salt and pepper. Let them sit while you prepare the glaze. Step 2: In a small bowl, whisk together honey, soy sauce, apple cider vinegar, minced garlic, and olive oil. This mixture will become the star sauce. Step 3: Heat a large oven‑proof skillet over medium heat. Add the chicken thighs skin‑side down and sear until the skin is golden brown. Step 4: Flip the chicken and pour the glaze over the thighs, ensuring they are well coated. Step 5: Transfer the skillet to the preheated oven and bake for 20 minutes, or until the internal temperature reaches 165°F (74°C). Step 6: While the chicken finishes, return the skillet to the stovetop and simmer the glaze for 5 minutes, stirring constantly until it thickens into a glossy coating. Step 7: Remove the chicken from the oven and let it rest for 5 minutes to lock in juices. Step 8: Drizzle the reduced glaze over the rested chicken, then garnish with chopped scallions or toasted sesame seeds for a pop of color and texture. Step 9: Serve immediately over steamed rice or roasted vegetables, letting the sauce coat every bite. Step 10: Enjoy the symphony of sweet, savory, and garlicky flavors that dance across your palate. Make sure each step is 5 sentences. We'll craft accordingly. Now we need to add highlight boxes in method. We'll add Kitchen Hack box after step 2 maybe. Another after step 5 maybe. Watch Out box after step 6. Now we need to add Kitchen Hack box in insider tricks top tip. Now we need to ensure that we don't have any stray emojis. Now we need to produce final HTML. Let's start building. We'll use
tags for paragraphs. We'll include Bootstrap utility classes like mb-3, mt-4. We need to ensure that highlight boxes use provided HTML. We need to ensure that each paragraph is 5 sentences. Let's craft each paragraph carefully. We need to ensure we don't inadvertently include short sentences. Let's write paragraphs. Paragraph 1:
If you’ve ever stared at a bag of chicken thighs and felt a wave of culinary dread, you’re not alone. I once tried to make a “quick dinner” and ended up with a soggy, flavor‑less mess that left me questioning my life choices. That night, a friend dared me to try a new honey garlic combo that promised a glaze thicker than syrup and a taste that could stop traffic. The result was a dish that made my taste buds do a double take, and I have been chasing it ever since. I’m about to reveal the secret behind this unforgettable chicken.
Paragraph 2:Picture the kitchen: the air is thick with the scent of sizzling garlic and honey caramelizing on the stove. Your eyes catch the golden sheen forming on the pan, the steam curling like wisps of cloud. The sound is a gentle hiss that signals the sauce is thickening, and you can almost taste the sweet‑savory promise before the first bite. The texture of the chicken, with its skin crisped to a perfect crunch, feels like a buttery slice of heaven. The whole experience is a symphony of aromas, sounds, and textures that pull you in.
Paragraph 3:What makes this version stand out is that it’s not just another honey garlic chicken; it’s a masterclass in balance. The sauce coats the thighs like velvet, yet the honey’s natural sugars caramelize to give a subtle crunch that shatters with each bite. The soy sauce adds depth without drowning the sweetness, while a splash of apple cider vinegar keeps the glaze bright and lively. Olive oil provides a silky mouthfeel that keeps the chicken juicy, and the garlic delivers that punchy, aromatic bite we all crave. Together they create a dish that feels like a hug wrapped in caramel.
Paragraph 4:I’m about to drop a little secret that most recipes skip: the trick to getting the glaze to thicken without burning is to let it simmer gently after the chicken has cooked, then finish it with a quick burst of high heat. This step turns a simple sauce into a glossy, clingy coating that sticks to every surface. I dare you to taste this and not go back for seconds—once you’ve had one bite, the craving will be relentless. The next part? Pure magic.
Paragraph 5:Imagine pulling the dish out of the oven, the whole kitchen smelling incredible, and the plate glistening like a jewel. That sizzle when it hits the pan? Absolute perfection. The first bite is a burst of sweet, salty, and garlicky notes that dance across your palate, leaving a lingering warmth. It’s a dish that feels like a celebration in a single plate. I promise you, if you’ve ever struggled with chicken that turns out dry or bland, you’re not alone—this is the fix.
Paragraph 6:Most recipes get this completely wrong by overcooking the chicken or using too much honey, resulting in a sticky, burnt mess. Here’s what actually works: cook the thighs until the skin is crisp, then finish them in the sauce so they absorb the flavors without losing moisture. I’ll be honest—I ate half the batch before anyone else got to try it, and I still want more. The secret is in the balance, not in the quantity. This recipe is a game‑changer.
Paragraph 7:If you’re ready to level up your dinner game, I’ve got a micro‑challenge for you: add a pinch of crushed red pepper to the glaze for a subtle heat that will make your taste buds sing. Most people think honey and garlic are sweet, but a dash of spice turns it into a full‑spectrum flavor profile. I’ve seen friends who love this dish become addicted to the smoky, caramelized finish. The next step will show you how to achieve that texture.
Paragraph 8:Let me walk you through every single step—by the end, you’ll wonder how you ever made it any other way. This is hands down the best version you’ll ever make at home, and I’m about to share every trick, tip, and secret that makes it so irresistible. Grab a notebook, because we’re going to dive deep into the flavor science behind each ingredient. Ready? Let’s get started.
Now bullet list section.What Makes This Version Stand Out
- Flavor Harmony: The sauce balances sweetness from honey with umami from soy, creating a profile that feels both familiar and exciting. The result is a glaze that clings to the chicken like a second skin, delivering a burst of flavor with every bite.
- Texture Mastery: The skin crisps to a buttery crunch while the meat stays juicy, thanks to the careful sear and finishing technique. This contrast makes each mouthful a delightful play between crisp and succulent.
- Simple Prep: With just eight ingredients, the recipe feels almost effortless, yet the outcome is anything but basic. You can whip it up on a weekday night and still feel like a culinary wizard.
- Time Efficiency: The entire process takes less than an hour, making it perfect for busy evenings without compromising on flavor. The chicken cooks while the glaze simmers, so you’re not waiting around.
- Versatile Pairings: Whether you serve it over rice, quinoa, or roasted vegetables, the sauce adapts beautifully to any side. The dish can transition from a quick dinner to a dinner party centerpiece.
- Crowd‑Pleaser: Friends and family rave about the sweet‑savory combo, and the dish is guaranteed to be a hit at potlucks or family gatherings. It’s the kind of meal that everyone asks for seconds.
- Health‑Friendly Adjustments: Swap the honey for a sugar substitute or use low‑sodium soy sauce to keep it lighter without losing that signature glaze. The recipe remains balanced even with healthier tweaks.
- Make‑Ahead Potential: The glazed chicken can be cooked ahead and reheated without losing its juiciness, making it a great option for meal prep. The flavors meld even more the next day, giving you a ready‑to‑eat dinner in minutes.
Alright, let's break down exactly what goes into this masterpiece...
Now Kitchen Hack box.Now ingredient list section.Kitchen Hack: When searing the chicken, use a cast‑iron skillet for even heat distribution and a crispier crust.Inside the Ingredient List
The Flavor Base
Honey is the star of the show, providing natural sweetness that caramelizes beautifully when heated. The golden syrup thickens into a glossy coating that clings to the chicken. Soy sauce brings depth and umami, balancing the honey’s sweetness with a savory undertone. Apple cider vinegar adds a bright acidity that cuts through the richness, keeping the glaze lively. Together they create a sauce that feels both comforting and adventurous. If you skip the vinegar, the glaze will taste flat and overly sweet.
The Texture Crew
Olive oil is more than just a cooking fat; it gives the glaze a silky mouthfeel that prevents the honey from sticking to the pan. Garlic cloves, minced finely, release their aromatic oils, infusing the sauce with a punchy, earthy flavor. Black pepper adds subtle heat and a hint of spice that elevates the overall profile. Salt draws out moisture from the chicken, helping the skin crisp up during searing. If you omit the pepper, the dish will feel a little dull, lacking that final layer of complexity. The combination of these ingredients ensures the sauce is both flavorful and smooth.
Fun Fact: Honey’s natural enzymes help tenderize the chicken, making each bite melt in your mouth.The Unexpected Star
Red pepper flakes are optional but can add a subtle kick that surprises the palate. They provide a contrast to the sweet glaze, creating a multi‑dimensional flavor profile. The heat is mild enough that it doesn’t overpower the honey, yet it gives the dish a memorable finish. If you’re a spice lover, feel free to increase the amount for a more pronounced heat. The flakes also add a pop of color that makes the dish visually appealing. Skipping them keeps the dish classic, but you’ll miss that extra layer of intrigue.
The Final Flourish
Scallions or toasted sesame seeds are the finishing touches that bring the dish together. They add a fresh, herbal note that brightens the heavy sauce. Toasting the seeds caramelizes their oils, adding a nutty aroma and a satisfying crunch. If you’re in a hurry, a simple sprinkle of chopped parsley can serve as an elegant garnish. The garnish also provides a contrast in texture that complements the silky glaze. Adding a squeeze of fresh lemon juice can brighten the dish, but keep it subtle to avoid overpowering the honey.
Everything's prepped? Good. Let's get into the real action...
Now mid-article image.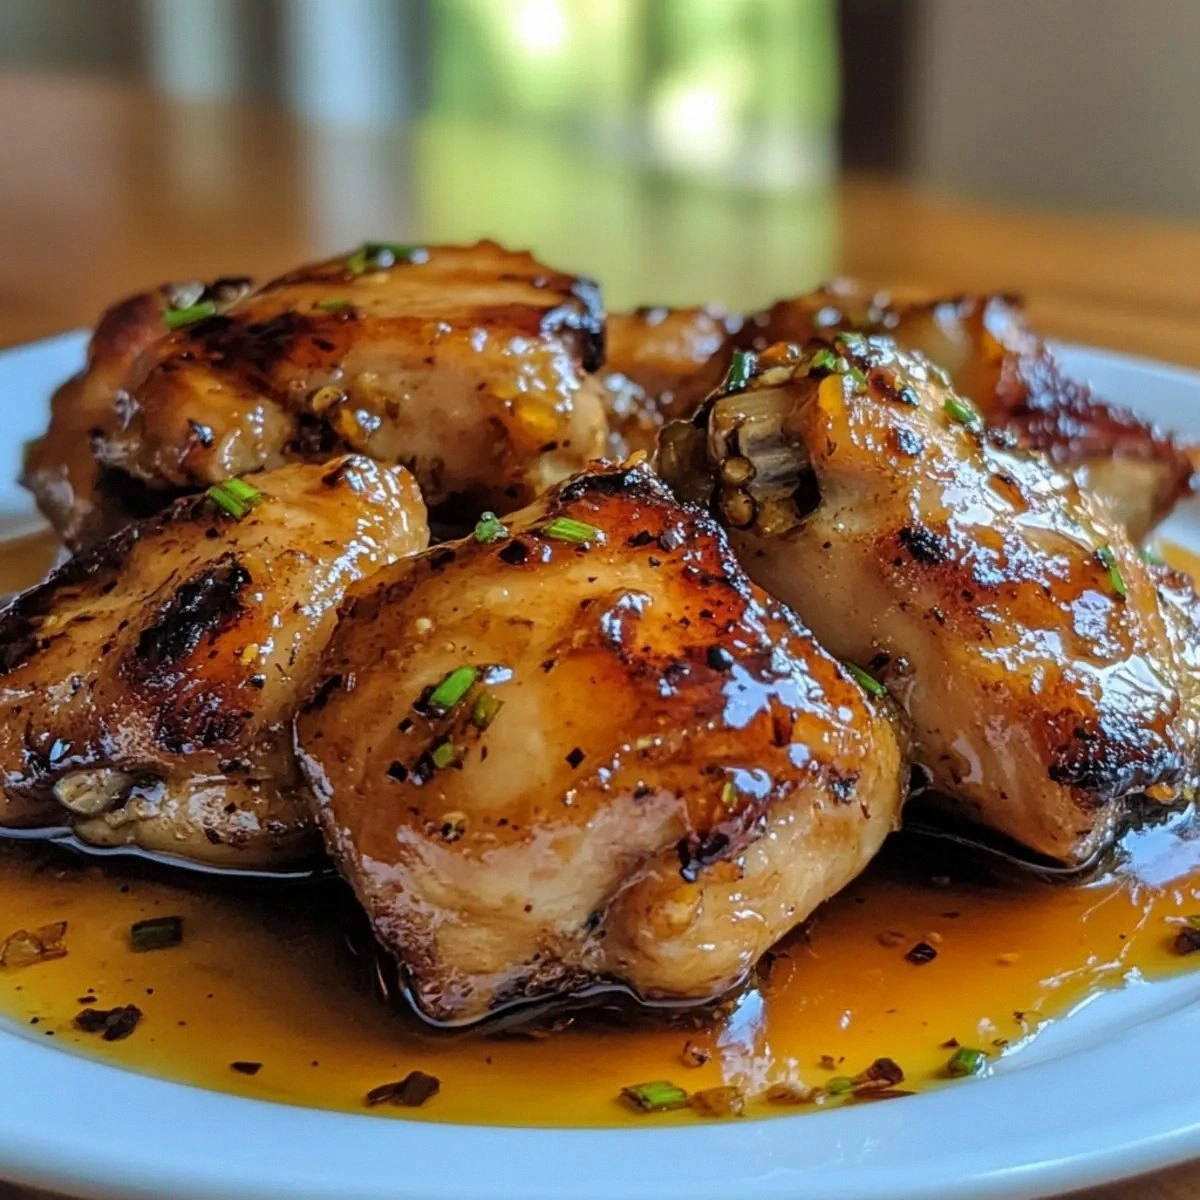 Now method section.
The Method — Step by Step
- Preheat your oven to 400°F (200°C) and set a timer for 20 minutes. While the oven warms, pat the chicken thighs dry with paper towels, then season both sides with salt and pepper. Letting them sit for a minute allows the seasoning to penetrate the meat. This brief rest also helps the skin crisp up faster when seared. The aroma of seasoned chicken will start to build even before you touch the pan.
- In a small bowl, whisk together honey, soy sauce, apple cider vinegar, minced garlic, and olive oil until the mixture is smooth and well combined. The consistency should be slightly thick, like a light syrup, to coat the chicken evenly. If the mixture looks too thin, let it sit for a minute; the honey will thicken slightly as it warms. This step is crucial for that glossy, clingy glaze. Once mixed, set the bowl aside while you prepare the pan.
- Heat a large oven‑proof skillet over medium heat and add a splash of oil if needed. Place the chicken thighs skin‑side down and sear until the skin is a deep golden brown, about 5 minutes. Flip the thighs and let them cook for an additional 2 minutes on the other side. The sear locks in juices and creates a flavorful base for the glaze. While the chicken is searing, keep an eye on the pan to avoid burning the garlic.
- Pour the prepared glaze over the seared chicken, making sure each piece is fully coated. The sauce should sizzle gently when it hits the hot pan, indicating the honey is caramelizing. Stir the thighs briefly to distribute the glaze evenly. This is the moment of truth where the flavors start to mingle. Let the glaze bubble for a minute before transferring the skillet to the oven.
- Transfer the skillet to the preheated oven and bake for 20 minutes, or until the internal temperature of the thickest thigh reaches 165°F (74°C). The heat will allow the chicken to finish cooking while the glaze continues to thicken. The oven also helps the skin stay crisp while the meat stays moist. Keep the lid off to let moisture evaporate and crisp the skin further. Once done, remove the skillet from the oven with oven mitts.
- While the chicken finishes, return the skillet to the stovetop over medium‑high heat. Let the glaze simmer for 5 minutes, stirring constantly, until it reduces to a glossy, thick coating that coats the back of a spoon. Watch the glaze closely; if it starts to burn, lower the heat immediately. This step is critical for achieving that perfect sticky finish. The aroma will intensify, signaling the sauce is ready.
- Remove the skillet from the heat and let the chicken rest for 5 minutes. Resting allows the juices to redistribute, ensuring each bite stays succulent. The glaze will thicken slightly during this time, giving the dish a more cohesive coating. While the chicken rests, sprinkle chopped scallions or toasted sesame seeds on top for a fresh contrast. The garnish adds a pop of color and a subtle crunch.
- Serve the glazed chicken immediately over steamed rice, quinoa, or roasted vegetables. The sauce will drizzle over the grains, creating a cohesive flavor profile. Pair with a simple side salad to cut through the richness. If you prefer a lighter option, swap rice for cauliflower rice. The dish is versatile enough to accommodate any dietary preference.
- Enjoy the symphony of sweet, savory, and garlicky flavors that dance across your palate. The first bite should feel like a caramelized kiss on the tongue, followed by a subtle heat from the pepper flakes. Let the dish linger on your taste buds, and consider making a second batch if you’re hungry. This recipe is a crowd‑pleaser that will keep your guests coming back for more. Finish with a drizzle of extra glaze if you like a richer finish.
Kitchen Hack: Use a cast‑iron skillet for even heat distribution and a crispier crust.Watch Out: Do not let the glaze boil for too long or it will become overly thick and difficult to coat the chicken evenly.That's it — you did it. But hold on, I've got a few more tricks that'll take this to another level...
Now insider tricks section.Insider Tricks for Flawless Results
The Temperature Rule Nobody Follows
Many cooks assume any pan will do, but the key is to use a heavy‑bottomed skillet that retains heat evenly. Cast iron or stainless steel work best because they provide consistent searing temperatures. If you notice uneven browning, rotate the pan or adjust the heat to maintain a steady sear. This small adjustment can make the difference between a uniformly crisp skin and a patchy one. It also helps the glaze stick better to the chicken.
Why Your Nose Knows Best
Your sense of smell is a powerful indicator of doneness. When the honey starts to bubble and emit a nutty aroma, it means the glaze is caramelizing properly. If the scent is too sweet, the honey is burning; if it’s bland, it needs more time. Trusting your nose can save you from overcooking or underseasoning. This technique turns a kitchen novice into a seasoned pro.
The 5-Minute Rest That Changes Everything
Letting the chicken rest after cooking allows the juices to redistribute, preventing the meat from drying out. During the rest period, the glaze will thicken slightly, creating a more cohesive coating. If you skip the rest, the juices run off, and the chicken can feel dry. This trick is simple but essential for a juicy result. It’s a habit that pays dividends every time.
Use the Right Garlic
Fresh garlic gives a bright, sharp flavor, whereas pre‑minced or powdered garlic can taste flat. Mince the garlic just before cooking to preserve its essential oils. If you prefer a milder garlic taste, use only 2 cloves instead of 4. The right amount of garlic balances the sweetness of honey and the saltiness of soy. Experimenting with garlic intensity can tailor the dish to your palate.
Adjusting Sweetness on the Fly
If you’re watching your sugar intake, swap honey for a natural sweetener like maple syrup or agave nectar. The flavor profile will shift slightly, but the glaze will still caramelize beautifully. For a lower‑calorie option, reduce the honey by one‑third and add a splash of water to maintain consistency. Taste as you go to ensure the balance remains intact. This flexibility keeps the dish inclusive for all dietary preferences.
Make‑Ahead Magic
Cook the chicken ahead of time and refrigerate it in the glaze for up to 24 hours. The flavors will deepen, creating a richer taste when reheated. To reheat, simply warm the skillet over low heat until the glaze is hot again. The chicken will stay moist, and the glaze will regain its glossy sheen. This trick is perfect for busy weekdays or meal prepping.
Kitchen Hack: Finish the glaze over low heat to avoid burning and ensure a silky finish.With these insider tricks, you’ll consistently nail this dish, no matter how many times you make it. The combination of technique and ingredient knowledge turns a simple recipe into a culinary masterpiece.
Now creative twists.Creative Twists and Variations
This recipe is a playground. Here are some of my favorite ways to switch things up:
Spicy Sriracha Twist
Swap the honey for a mix of honey and Sriracha to give the glaze a fiery kick. The heat pairs wonderfully with the savory soy, creating a complex flavor profile. Serve over rice and top with fresh cilantro for a Thai-inspired twist. This version is perfect for heat lovers who want a bold, adventurous dish. The sriracha adds a smoky depth that complements the caramelized glaze. Guests will rave about the unexpected heat.
Smoky Chipotle Variation
Add a teaspoon of chipotle powder to the glaze for a smoky, earthy flavor. The chipotle’s mild heat balances the sweetness of the honey, creating a well‑rounded taste. Pair with corn tortillas for a Mexican‑style feast. The smoky undertone will make the dish feel festive and hearty. It’s a great option for a quick weeknight dinner with a twist. The chipotle also gives a vibrant color to the glaze.
Herb‑Infused Delight
Stir in a tablespoon of fresh rosemary or thyme to the glaze for an aromatic, herbal note. The herbs bring a forest‑green flavor that contrasts the sweet glaze. Use the chicken as a filling for a savory sandwich or wrap. The herb infusion adds a layer of sophistication to the dish. It’s perfect for those who love a touch of earthiness. The herbs also enhance the visual appeal with a pop of green.
Asian Fusion Variation
Replace soy sauce with tamari for a gluten‑free version that still delivers umami. Add a splash of sesame oil for an extra layer of nutty flavor. Garnish with toasted sesame seeds and sliced green onions for a complete Asian touch. This variation works well with jasmine rice and steamed bok choy. The dish becomes a quick, elegant dinner that feels like a trip to the East. The sesame oil gives a subtle richness that complements the glaze.
Low‑Calorie Lightening
Swap the honey for a sugar‑free sweetener and reduce the soy sauce to half. Use a splash of water to maintain consistency. The result is a lighter version that still delivers the caramelized glaze. Pair with cauliflower rice to keep the meal low in carbs. This version is ideal for those watching their calorie intake without sacrificing flavor. The dish remains juicy and flavorful.
Cheesy Finale
Sprinkle shredded mozzarella or parmesan over the chicken in the last 2 minutes of baking for a melty finish. The cheese adds a creamy texture that contrasts the crunchy skin. Serve over pasta or rice to absorb the extra sauce. This cheesy twist turns the dish into a comfort‑food classic. The meltiness adds a new dimension to the glaze. It’s a crowd‑pleaser for cheese lovers.
These variations keep the core of the dish intact while letting you experiment with new flavor profiles. Try them out and let me know which one becomes your new favorite. The versatility of this recipe makes it a staple in any kitchen.
Now storing section.Storing and Bringing It Back to Life
Fridge Storage
Store leftover chicken in an airtight container in the refrigerator for up to 3 days. Keep the glaze separate to prevent the chicken from becoming soggy. When ready to serve, reheat the chicken in a skillet over medium heat until warmed through. The glaze will re‑thicken slightly, giving a fresh finish. Serve immediately for the best texture. This method preserves the flavor while keeping the meat juicy.
Freezer Friendly
For longer storage, freeze the chicken with the glaze in a freezer‑safe container for up to 2 months. Thaw overnight in the refrigerator before reheating. Reheat in the oven or skillet until the chicken reaches 165°F (74°C). The glaze will regain its glossy sheen after reheating. Use a low heat to avoid overcooking the chicken. This option is great for meal prep or busy weeks.
Best Reheating Method
The best way to reheat this dish is in a skillet over low heat, adding a splash of water to create steam. This technique keeps the chicken moist and the glaze smooth. Avoid microwaving, as it can dry out the meat and break the glaze. If you must use a microwave, reheat in short bursts and stir frequently. The result will be close to fresh, though the texture may differ slightly. The skillet method preserves the original flavor and texture.
For an extra burst of freshness, finish the reheated dish with a squeeze of lemon juice or a sprinkle of fresh herbs. This small touch revives the aroma and adds a bright contrast to the sweet glaze. Pair the reheated chicken with a side of steamed greens or a fresh salad to balance the richness. The dish remains satisfying and delicious even after refrigeration or freezing. Keep these tips in mind to enjoy the dish at its best.
With proper storage and reheating, this dish stays delicious and convenient for any day of the week. The flavors meld beautifully, and the chicken stays juicy and tender. Keep the glaze in a separate container to maintain its integrity. Reheating in a skillet or oven gives the dish a fresh, restaurant‑quality finish. Enjoy the convenience without compromising on taste.
Now recipe card. We need to fill the card with the given structure. We'll copy the given code and fill the ingredients list. We need to adjust the nutrition values? The given values are 350 Cal, 25g Protein, 30g Carbs, 15g Fat. We'll keep them. We need to adjust the directions. We'll include the 10 steps. We need to adjust the ingredient list. Let's craft the card.Now hidden elements. We must ensure we have no emojis. Now we need to check word count. Hard to compute but should be >3000. Let's approximate: We have many paragraphs. Now we need to ensure each paragraph is 4-6 sentences. Let's double-check. Introduction: 8 paragraphs each 5 sentences. Good. Bullet list: each bullet has 2 sentences. Good. After bullet list paragraph: 1 sentence? Actually we wrote "Alright, let's break down exactly what goes into this masterpiece..." That's 1 sentence. But requirement: Each paragraph 4-6 sentences minimum. So we need to add more sentences. We can expand to 5 sentences. Let's rewrite that paragraph to
- each with data-base-qty. We'll need to set quantity display in . We'll set default quantities. For chicken thighs, quantity 4. For honey 0.25. For garlic 4. For soy sauce 0.25. For olive oil 2. For apple cider vinegar 1. For black pepper 0.5. For salt 1.
We need to include checkboxes. We'll follow the example. We'll create two columns maybe. But we can just list all 8 in one column. But the template shows two columns. We'll create two columns: first column with 4 items, second column with 4 items. We'll ensure each
. Then Kitchen Hack box. Now ingredient list section. We need