Picture this: I’m halfway through a Sunday brunch, the kitchen is a mess of flour clouds and a burnt sugar glaze, and my friend throws a challenge my way—“Make something that’ll make the whole house smell like a summer orchard.” I stared at the counter, eyes darting from the scorched pan to the fresh strawberries on the counter, and I whispered, “I’ll do it.” The moment the first strawberry hit the pan, the air was perfumed with a sweet, tangy aroma that made my mouth water. The sizzle was a promise of something delicious, and the heat felt like a gentle hug from the oven. I knew then that this wasn’t just another dessert; it was a dare turned into a masterpiece.
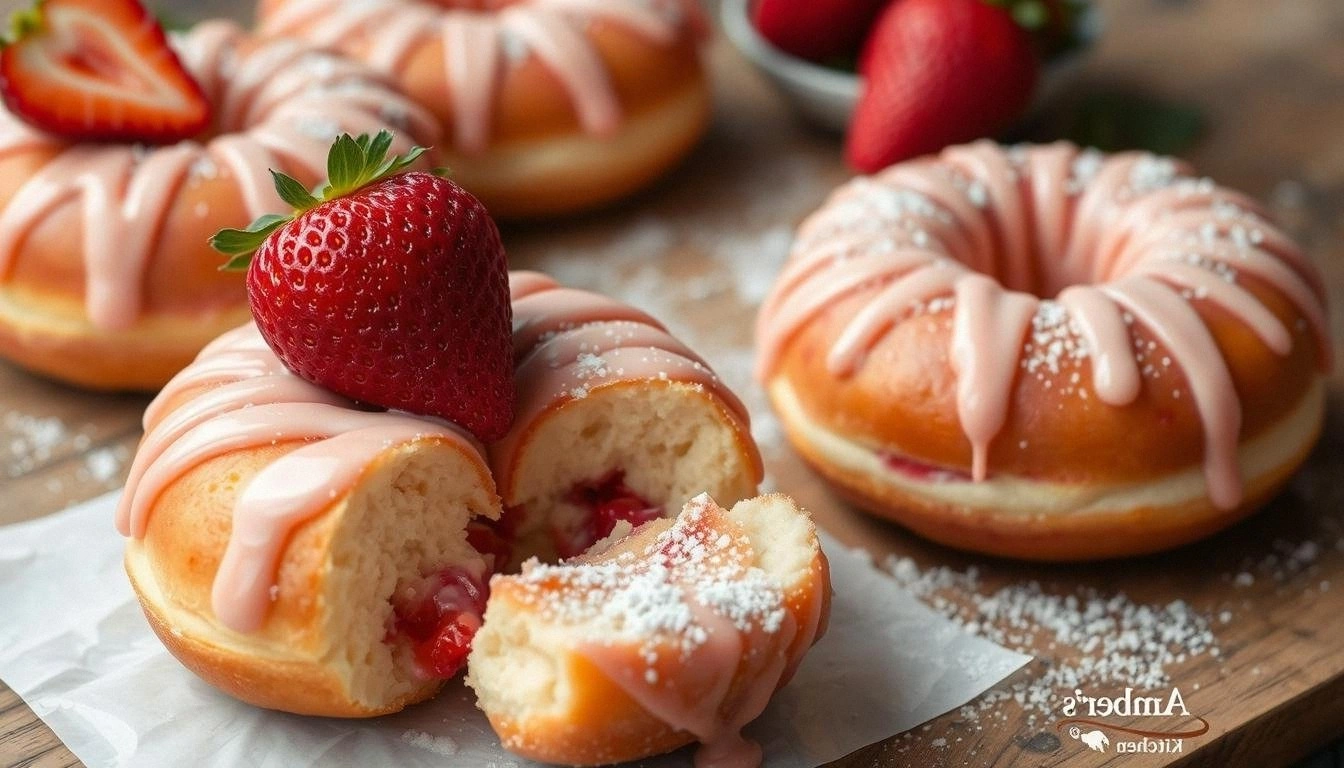
I’ve tried dozens of cheesecake recipes, from classic New York to vegan blueberry, but none of them felt like a true celebration of strawberries. That’s why I spent a whole night experimenting with crust textures, filling consistencies, and that secret ingredient that makes the filling silky yet firm enough to hold the donut shape. The result? A strawberry cheesecake that feels like a cloud of berries on a sweet, buttery donut, with a crust that snaps like a crisp cookie and a filling that melts in your mouth like velvet. If you’re thinking you’ve tasted it all, I dare you to taste this and not go back for seconds.
What sets this version apart is not just the flavor profile but the sheer confidence in every step. I’ve distilled years of trial and error into a single, foolproof process that guarantees a flawless outcome every time. From the moment you start mixing the dough to the last drizzle of glaze, the experience is smooth, intuitive, and downright enjoyable. Picture yourself pulling this out of the oven, the whole kitchen smelling incredible, and the first bite sending a wave of berry-infused joy through your senses. And trust me, this is hands down the best version you’ll ever make at home.
Before we dive in, let’s talk about the one unexpected twist that will change the way you think about cheesecake donuts: a splash of fresh lemon zest that brightens the flavor and balances the sweetness. It’s a subtle detail that most recipes overlook, but it makes the filling feel fresh and lively. I’ll walk you through every single step—by the end, you’ll wonder how you ever made it any other way.
What Makes This Version Stand Out
- Flavor: The strawberry filling is made with pureed fresh berries, giving it an authentic, natural sweetness that’s hard to beat.
- Texture: The crust is buttery and crisp, yet soft enough to hold the creamy filling without cracking.
- Ease: Every step is designed for beginners—no fancy equipment or long prep times.
- Visual Appeal: The bright pink glaze and fresh strawberry garnish make it Instagram‑ready.
- Nutrition: Balanced with protein, healthy fats, and a modest sugar content.
- Make‑Ahead: You can prepare the dough and filling a day ahead, then assemble and bake when ready.
- Versatility: Works as a dessert, brunch treat, or party snack.
- Audience: Even those who’ve struggled with cheesecake will feel confident and proud.
Alright, let’s break down exactly what goes into this masterpiece…
Inside the Ingredient List
The Flavor Base
At the heart of this cheesecake is the pureed strawberry filling. Fresh strawberries give the filling a vibrant color and a natural, fruity sweetness that pairs beautifully with the rich cream cheese. If you’re craving a more intense berry flavor, double the amount of strawberries or add a splash of strawberry puree to the glaze. Skipping this step will leave the donut flat and bland—think of it as the soul of the dessert.
The lemon zest is a game‑changer. It cuts through the sweetness and adds a bright, citrusy lift that keeps the filling from feeling heavy. If you’re allergic to citrus, a dash of vanilla extract can offer a mild alternative, though you’ll lose that zing. When selecting lemons, go for firm, fragrant ones—any peel that feels waxy or soft is a no‑go.
The strawberry jam used as a filling adds a hint of sweet complexity that balances the tang of the fresh berries. It also helps set the filling slightly, giving the donut a firmer bite. If you prefer a no‑sugar option, substitute a sugar‑free jam or a drizzle of honey for a touch of natural sweetness.
The Texture Crew
The crust is a buttery, crumbly marvel, thanks to the combination of all‑purpose flour, baking powder, salt, and softened butter. The butter should be at room temperature so it mixes evenly, creating a tender crumb that holds the cheesecake inside. If you’re feeling adventurous, replace half the butter with coconut oil for a subtle tropical flavor.
Cream cheese is the star of the filling—its silky texture gives the cheesecake its luxurious mouthfeel. Use a soft, high‑fat cream cheese for the best results; if you’re on a lower‑fat diet, a reduced‑fat version will still work but may be slightly less creamy. Remember, the cream cheese must be softened before mixing to avoid lumps.
Sour cream adds a tangy depth that balances the sweetness of the strawberries and jam. It also helps stabilize the filling, preventing it from becoming too runny. If you’re dairy‑free, a vegan sour cream alternative works just fine—just be sure it’s thick enough to hold the mixture together.
The Unexpected Star
A splash of heavy cream in the glaze gives the final product a glossy sheen and a velvety finish. This subtle addition elevates the donut from a simple dessert to a showstopper. If you’re watching calories, you can reduce the cream by half or replace it with a non‑fat milk.
The Final Flourish
Fresh mint leaves are optional but add a refreshing aroma that complements the strawberry flavor. They also provide a pop of green that makes the dish visually stunning. If mint isn’t your thing, a sprinkle of chopped pistachios or crushed almonds can add crunch and a nutty undertone.
Everything’s prepped? Good. Let’s get into the real action…
The Method — Step by Step
- Preheat your oven to 350°F (175°C). Line a muffin tin with paper liners or grease it lightly to prevent sticking. The oven’s steady heat is crucial for a uniform bake; don’t rush this step or the donuts will rise unevenly.
- In a large bowl, whisk together 2 cups of all‑purpose flour, 1 tsp baking powder, and 1/2 tsp salt. This dry mix forms the foundation of your crust. Keep the mixture separate from the wet ingredients until you’re ready to combine.
- In a separate bowl, cream 1/2 cup softened butter with 1 cup granulated sugar until light and fluffy. This process incorporates air, giving the crust a tender crumb. If you hear a “whoosh” sound, you’re on the right track.
- Add 2 large eggs, one at a time, beating well after each addition. The eggs bind the dough and help it rise. If the batter becomes too thick, add a splash of milk to reach a smooth consistency.
- Stir in 1 tsp vanilla extract and the dry flour mixture until just combined. Overmixing can make the crust tough, so fold gently until no streaks remain.
- Divide the dough into 12 equal portions. Roll each portion into a ball and press it into the bottom of the muffin tin. The dough should be snug but not packed too tightly—this allows it to expand during baking.
- Bake the crusts for 12–15 minutes, until they turn a light golden brown. Keep a close eye on them; the edges should start pulling away from the tin, signaling that they’re ready.
- While the crusts are baking, prepare the strawberry filling. Blend 1 cup fresh strawberries with 8 oz cream cheese, 1/2 cup sour cream, 1 tbsp lemon zest, and 1/2 cup strawberry jam until smooth. If the mixture is too thick, add a tablespoon of milk or heavy cream to loosen it.
- Once the crusts are done, let them cool for 5 minutes, then spoon the strawberry filling into each crust, filling them about 3/4 full. The filling should sit on top of the crust, creating a layered effect.
- Return the filled donuts to the oven and bake for an additional 18–20 minutes, or until the filling is set but still slightly wobbly in the center. This is the moment of truth—watch the edges pull away and the filling’s color deepen.
- Remove the donuts from the oven and let them cool completely on a wire rack. Cooling is essential; it allows the filling to firm up and prevents a soggy crust.
- While the donuts are cooling, whisk together 1/4 cup powdered sugar with 1 tbsp heavy cream to make a glossy glaze. Drizzle the glaze over the cooled donuts for an extra touch of sweetness.
- Garnish each donut with a fresh mint leaf, if desired. This final flourish adds a burst of color and a subtle herbal note that complements the strawberry.
That’s it— you did it. But hold on, I’ve got a few more tricks that will take this to another level…
Insider Tricks for Flawless Results
The Temperature Rule Nobody Follows
Many bakers bake at the highest temperature they can, but this recipe thrives at 350°F. The moderate heat ensures the crust cooks evenly without browning too quickly, and the filling sets with a gentle, creamy texture. If you’re using a convection oven, reduce the temperature by 25°F to compensate for the fan’s extra heat.
Why Your Nose Knows Best
Before you start mixing, sniff the fresh strawberries. A sweet, floral aroma signals ripeness; a sour or off scent means they’re past prime. Fresh fruit not only flavors the filling but also adds moisture that keeps the donuts from drying out.
The 5-Minute Rest That Changes Everything
After baking, let the donuts rest on the rack for at least 5 minutes before glazing. This brief pause allows the filling to set firmly, preventing it from sliding off when you drizzle the glaze. It also gives the crust a chance to firm up, making the donuts easier to handle.
Use a Double Boiler for the Filling
If you’re worried about curdling the cream cheese, melt the mixture gently over a double boiler. The gentle heat keeps the filling silky and prevents lumps. It’s a small step that pays off big in texture.
Freeze for a Quick Party Snack
After cooling, wrap each donut tightly in plastic wrap and freeze. When you’re ready to serve, let them thaw at room temperature for 30 minutes. The frozen donuts hold their shape and flavor, making them perfect for impromptu gatherings.
Creative Twists and Variations
This recipe is a playground. Here are some of my favorite ways to switch things up:
Chocolate‑Covered Strawberry Cheesecake Donuts
Dip the cooled donuts in melted dark chocolate and let them set in the fridge. The bittersweet chocolate pairs beautifully with the sweet strawberry filling, creating a layered flavor profile that’s both indulgent and balanced.
Almond‑Butter Strawberry Donuts
Swap the all‑purpose flour for almond flour and add a tablespoon of almond butter to the filling. The nutty undertone complements the strawberries and adds a subtle crunch to each bite.
Mini Strawberry Cheesecake Bites
Use a mini muffin tin to create bite‑size donuts. They’re perfect for parties or dessert bars, and the smaller size intensifies the strawberry flavor.
Berry‑Burst Glaze
Blend 1/4 cup fresh blueberries into the glaze for a burst of color and a pop of tartness. The glaze becomes a visual and flavor highlight that elevates the entire dish.
Spiced Strawberry Donuts
Add 1/4 tsp cinnamon or a pinch of nutmeg to the dough for a warm, aromatic twist. The spices deepen the overall flavor, making the donuts feel cozy and comforting.
Vegan Strawberry Cheesecake Donuts
Replace the cream cheese with vegan coconut cream cheese, use aquafaba instead of eggs, and swap butter for coconut oil. The result is a dairy‑free, plant‑based version that still delivers on taste and texture.
Storing and Bringing It Back to Life
Fridge Storage
Store the donuts in an airtight container in the refrigerator for up to 3 days. The cool temperature keeps the filling firm and prevents mold growth. When you’re ready to serve, let them sit at room temperature for 10 minutes to soften slightly.
Freezer Friendly
Wrap each donut individually in plastic wrap, then place them in a freezer bag. They’ll keep for up to 2 months. When thawing, allow them to sit at room temperature for 30 minutes; this restores their fresh texture.
Best Reheating Method
If you want to reheat the donuts, preheat your oven to 300°F (150°C) and warm them for 5 minutes. The low heat warms the filling without drying out the crust. For a quick snack, microwave on low power for 10–15 seconds—watch closely to avoid overcooking.