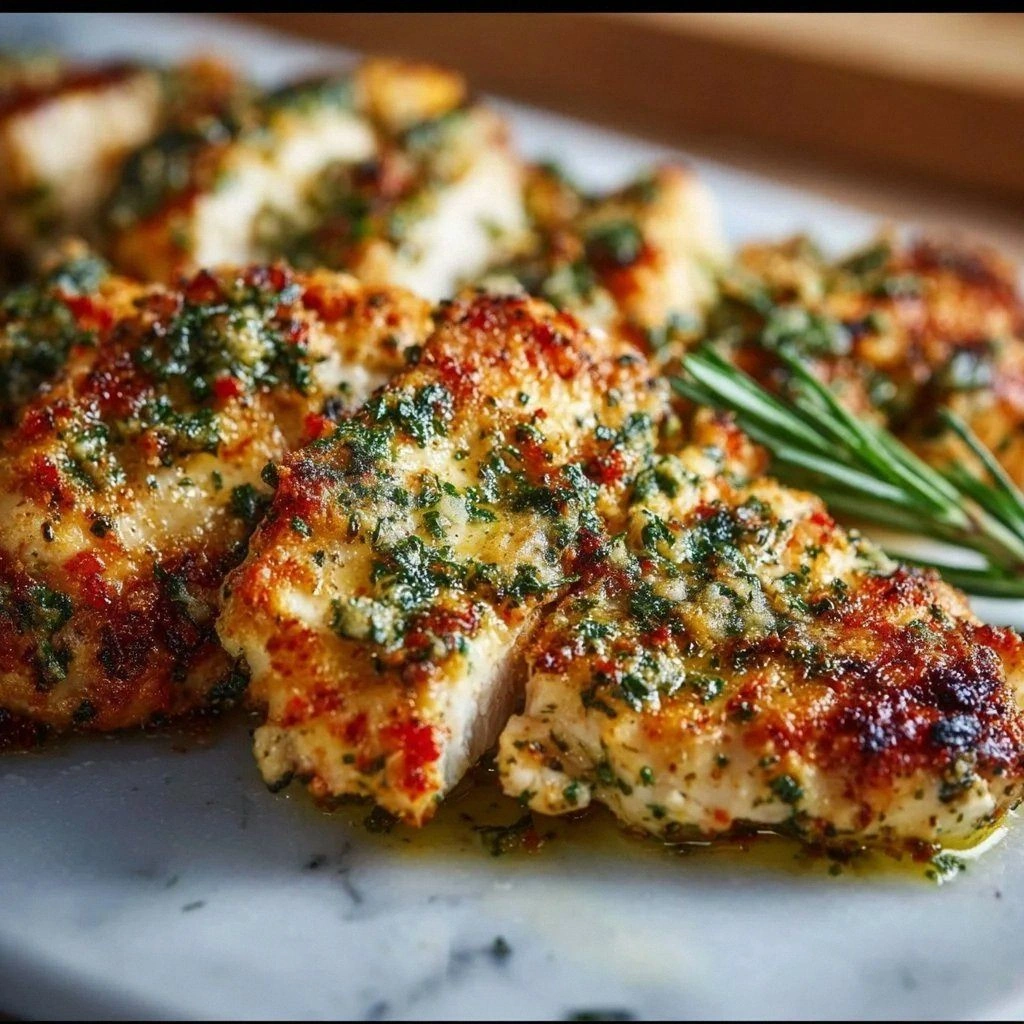
I was staring at a half‑cooked chicken breast, the oven door open, and the kitchen smelling like burnt garlic and regret. The clock was ticking, the timer was set to 25 minutes, and my taste buds were already demanding something more. I reached for the pantry, grabbed the most ridiculous combination of ingredients I could find, and whispered, “If this doesn’t work, I’m going to be a culinary disaster.” That night, the chicken emerged golden, the garlic‑parmesan crust crackled like a tiny thunderstorm, and I knew I’d stumbled onto a game‑changing flavor profile.
Picture this: the sizzling sound of garlic hitting hot olive oil, the aroma of freshly grated Parmesan drifting up like a savory cloud, and the sight of chicken breasts turning from pale to a deep, appetizing brown. The first bite delivers a buttery crunch that shatters like thin ice, followed by a melt‑in‑your‑mouth garlic richness that lingers on the palate. The subtle citrus zest lifts the heaviness of the cheese, while the herbs provide a whisper of green that feels both fresh and comforting. It’s a symphony of textures and tastes, each note carefully orchestrated to play against the other.
What makes this version stand out? It’s not just the classic garlic‑parmesan combo; it’s the meticulous layering of flavors, the choice of panko breadcrumbs for that extra crunch, and the final flourish of melted butter that binds everything together. I’ve taken the classic recipe and elevated it by adding a dash of lemon zest for brightness and a touch of oregano for depth. The result is a dish that feels gourmet yet remains incredibly approachable, perfect for a week‑night dinner or a crowd‑pleasing appetizer.
But here’s the twist: I’ve discovered that a simple step—marinating the chicken in olive oil, garlic, and herbs for just 15 minutes—does wonders for flavor penetration and moisture retention. Most recipes get this completely wrong by skipping the marination or using too much liquid, which ends up making the chicken soggy. This short, intentional marination period unlocks a depth of flavor that you won’t find in the standard version.
I dare you to taste this and not go back for seconds. Picture yourself pulling this out of the oven, the whole kitchen smelling incredible, and the first bite giving you that “wow” moment you’ve been craving. Let me walk you through every single step—by the end, you’ll wonder how you ever made it any other way.
What Makes This Version Stand Out
- Flavor Depth: The combination of fresh garlic, Parmesan, and lemon zest creates a complex flavor profile that’s both savory and bright. The herbs add a subtle earthiness that balances the richness.
- Texture Contrast: Panko breadcrumbs give a satisfying crunch, while the melted butter keeps the chicken moist and silky on the inside. This contrast feels like a culinary dance.
- Ease of Prep: The recipe uses pantry staples and requires only one marination step. No fancy equipment or time‑consuming techniques.
- Make‑Ahead Friendly: Marinate the chicken up to 24 hours in advance for even deeper flavor. The dish can be grilled or baked later without losing quality.
- Versatility: Works as a main dish, a sandwich filling, or a party appetizer. Swap the chicken for shrimp or tofu for a different twist.
- Crowd‑Pleaser: The buttery, garlicky crust is irresistible to kids and adults alike. It’s the kind of dish that turns a regular dinner into a celebration.
- Ingredient Quality: Using high‑quality Parmesan and fresh herbs elevates the dish beyond the average takeout‑style chicken.
Inside the Ingredient List
The Flavor Base
The foundation of this dish starts with the chicken itself—boneless, skinless breasts that offer a clean canvas for the flavors to shine. Olive oil is the medium that carries the garlic and herbs into the meat, ensuring each bite is infused. Garlic, minced to release its oils, is the star that delivers that unmistakable garlicky punch. Salt and pepper are the silent partners, balancing sweetness and cutting through the richness.
The Texture Crew
Panko breadcrumbs are the secret to that coveted crunch. They’re light, airy, and absorb the butter and cheese without becoming soggy. Grated Parmesan cheese adds a salty, nutty depth and helps bind the breadcrumbs into a cohesive crust. A splash of melted butter, added just before grilling, gives the crust a glossy sheen and a buttery finish. The final sprinkle of fresh parsley adds a pop of color and a hint of green freshness.
The Unexpected Star
Lemon zest may seem like a minor detail, but it injects a bright, citrusy note that cuts through the heaviness of the cheese. It also provides a subtle aroma that elevates the dish’s overall sensory experience. The oregano and basil, dried or fresh, lend an herbal undertone that balances the garlic’s intensity. These ingredients work together like a well‑tuned orchestra, each playing its part.
The Final Flourish
The final touch is the drizzle of melted butter that coats the crust, giving it a glossy, golden finish. This butter not only adds richness but also helps the Parmesan melt into a cohesive, caramelized coating. The finishing sprinkle of fresh parsley adds a touch of color and a subtle herbal note that brightens the dish. Together, these elements create a dish that’s both visually appealing and deeply satisfying.
Everything's prepped? Good. Let's get into the real action...
The Method — Step by Step
- Start by patting the chicken breasts dry with paper towels—this helps the coating stick. Place them in a shallow dish and pour the olive oil over them, ensuring each piece is lightly slicked. Add the minced garlic, salt, and pepper, then gently massage the mixture into the chicken. Let the chicken sit for 15 minutes; this short marination period allows the flavors to seep in.
- While the chicken marinates, whisk together the panko breadcrumbs, grated Parmesan, oregano, basil, and lemon zest in a bowl. The mix should feel like a fine, dry sand—no clumps, just a uniform blend. If you like a little extra crunch, toss in a pinch of crushed red pepper flakes.
- Preheat your grill or grill pan to medium‑high heat (around 375°F). While the grill is heating, pat the marinated chicken dry again, then coat each breast in the breadcrumb mixture, pressing firmly so the crumbs adhere. Shake off any excess crumbs before placing the chicken on the grill.
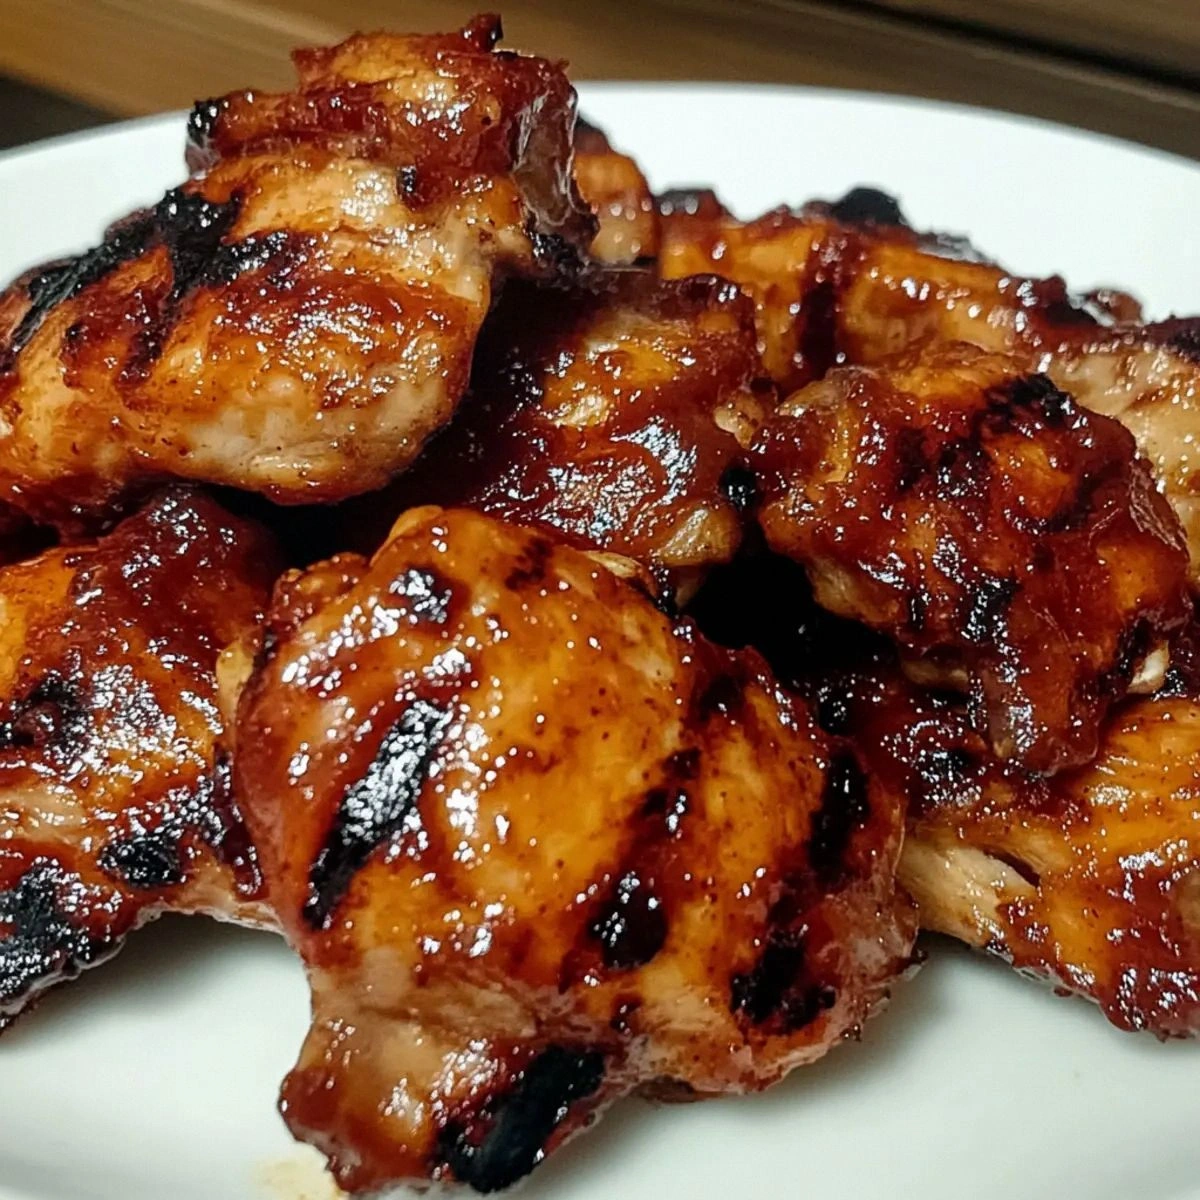
- Place the chicken on the grill and close the lid. Cook for about 4–5 minutes on each side, flipping once. The chicken should develop a golden crust that’s slightly blistered, and the internal temperature should reach 165°F. The sizzling sound when it hits the grill is your cue that the flavor is locking in.
- Just before the chicken finishes cooking, brush the top of each breast with melted butter. This not only adds flavor but also gives the crust a glossy, caramelized look. The butter should sizzle slightly, creating a small steam cloud that signals the final touch.
- Remove the chicken from the grill and let it rest for 5 minutes. Resting allows the juices to redistribute, ensuring each bite remains moist. The crust will slightly firm up, making it easier to cut.
- Slice the chicken against the grain into thick strips. This prevents the meat from becoming chewy and keeps the texture tender. Arrange the slices on a platter, drizzle any leftover juices, and sprinkle fresh parsley for a pop of color.
- Serve immediately, pairing with a crisp salad or a side of roasted vegetables. The garlic‑parmesan coating pairs beautifully with a light vinaigrette or a simple lemon‑butter sauce. Enjoy the burst of flavor and the satisfying crunch that follows.
That's it—you did it. But hold on, I've got a few more tricks that'll take this to another level...
Insider Tricks for Flawless Results
The Temperature Rule Nobody Follows
Many chefs think a high heat is always best, but a steady medium‑high (about 375°F) is key for a crispy crust without overcooking the meat. This temperature allows the breadcrumbs to toast evenly while the chicken stays juicy. I once grilled at 450°F and ended up with a charred exterior and a dry interior—lesson learned.
Why Your Nose Knows Best
Smell is your best ally. When the garlic starts to brown, the aroma will signal that the coating is caramelizing. Don’t rush; let the scent develop fully before flipping. If you’re unsure, use a timer as a backup, but trust your nose for the final verdict.
The 5‑Minute Rest That Changes Everything
Resting the chicken after grilling allows the juices to redistribute, keeping the meat moist. It also lets the breadcrumb coating set, making it easier to cut cleanly. Skip this step and you’ll end up with a crumbly, uneven crust.
Use Fresh Herbs Over Dried
Fresh parsley and basil add a bright, vibrant flavor that dried herbs can’t match. They also provide a pop of color that elevates the dish’s appearance. If you’re short on fresh herbs, use dried, but increase the quantity slightly to compensate.
Butter, Butter, Butter
A generous brush of melted butter before the final grilling step seals the crust and adds a buttery shine. It also helps the Parmesan melt into a cohesive, caramelized coating. Think of it as a finishing glaze that turns a good dish into a great one.
Creative Twists and Variations
This recipe is a playground. Here are some of my favorite ways to switch things up:
Spicy Cajun Kick
Swap the oregano and basil for a Cajun spice blend and add a pinch of cayenne pepper. The heat will contrast nicely with the creamy Parmesan, giving the dish a bold, smoky flavor. It’s perfect for those who love a little heat.
Herb‑Infused Chicken
Use a mix of fresh thyme, rosemary, and sage instead of dried herbs. The aromatic herbs infuse the chicken with a forest‑like scent, and the fresh flavors stay bright. This variation works great with a side of roasted root vegetables.
Cheesy Baked Version
After coating the chicken, place it on a baking sheet and bake at 400°F for 20 minutes. The oven’s even heat creates a uniformly golden crust. Finish with a sprinkle of extra Parmesan before serving.
Vegan Swap
Replace the chicken with thick slices of portobello mushrooms or tofu. Marinate them in the same garlic‑olive oil mixture, then coat with breadcrumbs and Parmesan substitute. The result is a hearty, plant‑based dish that still delivers that signature crunch.
Grilled Shrimp Upgrade
Thin shrimp work well with this coating—just reduce the cooking time to 2–3 minutes per side. The shrimp’s natural sweetness pairs beautifully with the garlic‑parmesan crust. Serve with a squeeze of fresh lemon for a zesty finish.
Storing and Bringing It Back to Life
Fridge Storage
Cool the chicken completely, then store it in an airtight container in the refrigerator for up to 3 days. The crust may soften slightly, but reheating will revive the crunch. Keep the chicken on a paper towel to absorb excess moisture.
Freezer Friendly
Wrap each chicken breast individually in plastic wrap, then place them in a freezer bag. Freeze for up to 2 months. Thaw in the refrigerator overnight before reheating. The coating stays intact if you reheat properly.
Best Reheating Method
Reheat in a preheated oven at 375°F for 10–12 minutes, or until the internal temperature reaches 165°F. If you’re short on time, a quick sauté in a hot skillet will work, but be careful not to overcook. Add a tiny splash of water before reheating to steam back to perfection.