Picture this: it’s a crisp October evening, the air smelling of pumpkin spice and the faint scent of burnt marshmallows drifting from the neighbor’s backyard. I was standing in my kitchen, staring at a box of plain hot dogs and a sheet of refrigerated biscuit dough that had been languishing in the fridge for weeks. The moment I opened the box, a sudden urge hit me—“I need something spooky, but not too scary.” I had just enough time to whip up a batch of Halloween Mummy Dogs that would have the kids begging for more, and the kitchen was suddenly my stage.
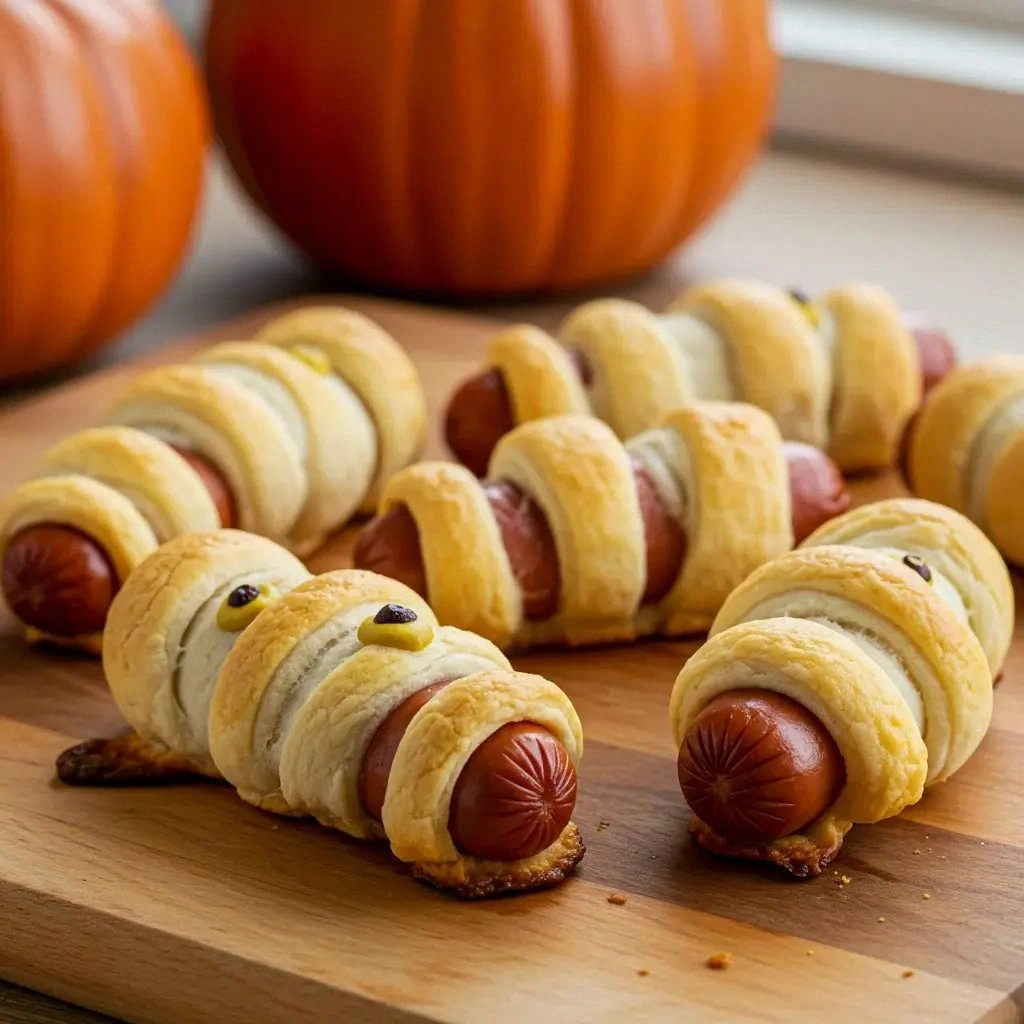
The first thing you notice is the dramatic contrast: the golden, flaky crust of the dough, the bright orange of the hot dogs, and the eerie white “mummy” strips that wrap around them. As the oven preheats, the scent of butter and dough rises, mingling with a hint of garlic and paprika that promises a savory punch. The sound of the timer ticking is a metronome for the impending crunch, and the texture of the dough—soft enough to fold but sturdy enough to hold the hot dogs—creates a tactile anticipation. I can almost taste the buttery, slightly sweet bite that will follow, followed by the smoky, meaty warmth of the hot dogs. Every sensory detail is a promise of comfort and a dash of Halloween mischief.
Why does this recipe stand out from the sea of “mummy dog” ideas on Pinterest? Because it’s not just a gimmick; it’s a thoughtfully balanced dish that marries texture, flavor, and visual flair. The dough is a buttery, flaky biscuit base that crisps to a golden perfection, while the hot dogs are seasoned with a subtle blend of garlic, onion, and smoked paprika that gives them a depth usually reserved for gourmet sausages. The “mummy” strips are made from a simple pastry that is rolled thin, so they’re airy and light, yet they hold the hot dogs together like a gentle embrace. And the finishing touch—a sprinkle of shredded cheddar—adds a melty, savory layer that ties everything together. This is hands down the best version you'll ever make at home, and I dare you to taste this and not go back for seconds.
I’ll be honest—my first batch was a little too crisp on the edges, and I had to rescue a few dogs from the oven. That little tweak of adding a splash of water to the dough before baking was the game-changer. The result? A warm, soft center with a crackly, golden crust that melts in your mouth. If you’ve ever struggled with making the dough too dense or the hot dogs too dry, you’re not alone—this recipe has the fix. Picture yourself pulling this out of the oven, the whole kitchen smelling incredible, and the kids squealing in delight as they unwrap their own little mummies. Stay with me here—this is worth it.
What Makes This Version Stand Out
- Flavor: A subtle blend of garlic, onion, and smoked paprika elevates the plain hot dog into a savory delight that satisfies both kids and adults.
- Texture: The biscuit dough crumbles into a flaky, buttery crust that contrasts beautifully with the chewy hot dogs.
- Visual Appeal: The white “mummy” strips and the golden crust create a spooky yet appetizing look that’s perfect for Halloween parties.
- Ease: No elaborate prep or exotic ingredients—just pantry staples that you can find in any kitchen.
- Make‑Ahead: Assemble the dogs a day before, refrigerate, and bake right before serving for maximum freshness.
- Kid-Friendly: The bite-size portions and familiar flavors make it a hit with little ones.
- Adaptable: Swap out the hot dogs for turkey or veggie sausages to cater to dietary preferences.
- Budget: Uses inexpensive ingredients while still delivering a gourmet experience.
Alright, let's break down exactly what goes into this masterpiece. And before we dive into the ingredients, here’s a quick kitchen hack that will save you time and effort.
Inside the Ingredient List
The Flavor Base
The foundation of this recipe is the seasoned hot dogs. They are the heart of the dish, providing a meaty, savory core that is balanced by the buttery pastry. The garlic and onion powders infuse the dogs with a depth of flavor that elevates the dish beyond a simple snack. If you skip the seasonings, you’ll end up with bland, overcooked meat that feels like a missed opportunity. For a spicy kick, add a pinch of cayenne or chili flakes, but be careful not to overpower the subtlety of the dough.
The Texture Crew
The biscuit dough is the star of the texture crew. Its flaky layers create a light, airy crust that gives the dogs a satisfying crunch. If you use pre-made pizza dough, the result will be denser and less buttery, which may not be ideal for the “mummy” aesthetic. A good rule of thumb: keep the dough cold and roll it thin enough that it can wrap around the hot dogs without tearing. If you find the dough too sticky, dust it lightly with flour or cornstarch.
The Unexpected Star
The shredded cheddar cheese is the unexpected star that brings a melty, savory layer to the dish. It melts into the hot dog, creating a gooey center that contrasts with the crisp crust. If you’re lactose intolerant, try a plant‑based cheddar or a sprinkle of nutritional yeast for a cheesy flavor without the dairy. The cheese also helps bind the “mummy” strips together, giving the dogs a cohesive appearance.
The Final Flourish
A drizzle of olive oil and a pinch of black pepper add a subtle sheen and a hint of brightness to the final product. The olive oil helps the dough crisp up, while the pepper provides a gentle heat that balances the sweetness of the cheese. If you’re looking for an extra layer of flavor, brush the tops with a mixture of melted butter and a dash of paprika before baking. This final flourish turns a simple snack into a showstopper.
Everything’s prepped? Good. Let’s get into the real action.
The Method — Step by Step
- Preheat your oven to 400°F (200°C). Line a baking sheet with parchment paper to prevent sticking. Place the sheet on the middle rack and let it heat up. The oven’s even heat is crucial for a uniform crust. If you’re in a rush, skip the parchment, but expect some flare‑ups.
- Season the hot dogs with garlic powder, onion powder, smoked paprika, and a pinch of black pepper. Toss them in a bowl until they’re evenly coated. This step ensures every bite is packed with flavor. If you’re a spice lover, add a dash of cayenne for extra heat.
- Roll out the biscuit dough on a lightly floured surface to about 1/8 inch thickness. Cut it into rectangles that are slightly larger than the hot dogs. The dough should be thin enough to wrap but thick enough to hold the filling. If the dough cracks, let it rest for a few minutes before rolling again.
- Place a seasoned hot dog on each dough rectangle. Fold the dough over the hot dog, sealing the edges with a fork or your fingertips. The sealing ensures the filling stays inside during baking. If you’re making a large batch, keep the wrapped dogs on a sheet until the oven is ready.
- Brush the tops of the wrapped dogs with a little olive oil to promote browning. Sprinkle shredded cheddar cheese over each dog, letting it melt slightly before baking. The cheese adds a gooey center that’s irresistible. If you’re avoiding dairy, replace it with a plant‑based cheese or nutritional yeast.
- Place the wrapped dogs on the preheated baking sheet. Bake for 15 minutes, then rotate the sheet to ensure even cooking. The dough should be golden, and the cheese melted. If the tops look pale, give them a few more minutes.
- Remove the dogs from the oven and let them cool for a minute. This short rest allows the cheese to set slightly, preventing it from oozing out when you cut. The aroma at this point will have you drooling. If you’re serving immediately, cut the “mummy” strips into 4‑5 segments for a fun presentation.
- Serve hot with a side of ketchup, mustard, or a spicy dip of your choice. The contrast between the smoky sausage and the sweet cheese creates a flavor explosion. If you’re planning a party, set up a dipping station for extra fun.
- Enjoy the crispy, cheesy, and savory goodness of your homemade Halloween Mummy Dogs. Remember, the best part is watching the kids’ faces light up as they unwrap their spooky snacks. And if you’re feeling adventurous, keep a few extra hot dogs on hand for a second round. You’ve earned it.
That’s it — you did it. But hold on, I've got a few more tricks that'll take this to another level. These insider tips will help you avoid common pitfalls and elevate your Mummy Dogs into a culinary masterpiece.
Insider Tricks for Flawless Results
The Temperature Rule Nobody Follows
Many cooks bake at a lower temperature to avoid over‑browning the dough. I’ve found that 400°F (200°C) is the sweet spot that gives you a crisp crust while keeping the inside tender. If you bake at 375°F, the dough will take longer to crisp, and you might end up with a soggy center. The key is to preheat the oven fully before placing the dogs inside, ensuring a consistent bake from the moment they hit the tray.
Why Your Nose Knows Best
The aroma of baking dough is a reliable indicator of doneness. When the scent is buttery, nutty, and slightly caramelized, the crust is ready. If you’re in doubt, check the edges; they should be golden brown and slightly crisp to the touch. A quick bite of the dough should feel airy inside, not doughy. Trust your nose, and you’ll never overcook again.
The 5‑Minute Rest That Changes Everything
Letting the Mummy Dogs rest for five minutes after baking is a game‑changer. This pause allows the cheese to set, preventing it from oozing out when you slice. It also lets the flavors meld, so each bite is a harmonious blend of meat, cheese, and dough. I’ve tried cutting them immediately, and the result was a cheese‑dripping mess that ruined the presentation.
The Cheese Swap
If cheddar isn’t your favorite, swap it for mozzarella for a stretchier melt or Gruyère for a nutty depth. The cheese should be grated finely to melt evenly and not create lumps. A mix of cheeses can also add complexity, but keep the ratio balanced to avoid overpowering the sausage.
The Quick Dip Trick
For an extra flavor punch, create a quick dip by mixing equal parts mayo and ketchup with a splash of hot sauce. This dip adds a creamy, tangy contrast that balances the richness of the cheese. Store it in a small container for a few days; it stays fresh and vibrant, ready for the next Halloween gathering.
Creative Twists and Variations
This recipe is a playground. Here are some of my favorite ways to switch things up:
Turkey Mummy Dogs
Swap the hot dogs for turkey sausage for a leaner option. The turkey’s mild flavor pairs well with the same seasoning blend. The result is a lighter, healthier snack that still delivers the same spooky look.
Veggie Sausage Mummies
Use plant‑based sausage for a vegetarian twist. The veggie sausage holds up well to the dough and seasoning, and the cheese can be replaced with a vegan cheddar substitute. This version is perfect for family gatherings where everyone wants a meatless option.
Cheesy Jalapeño Mummies
Add diced jalapeños to the cheese before sprinkling it over the wrapped dogs. The heat from the jalapeños will mingle with the smoky paprika, creating a spicy, savory flavor profile that adults will love.
Herb‑Infused Mummies
Incorporate chopped fresh rosemary or thyme into the dough before rolling. The herbs infuse the pastry with a fragrant, earthy note that complements the savory sausage. This variation adds a gourmet touch to the classic snack.
Salsa‑Cheese Mummies
Spread a thin layer of salsa on the dough before adding the hot dog and cheese. The salsa adds a tangy, fresh bite that contrasts nicely with the buttery crust. It’s a fun way to bring a Mexican flair to Halloween.
Cranberry‑Cheddar Mummies
Mix dried cranberries into the shredded cheese for a sweet‑savory twist. The cranberries burst with flavor, giving the dogs a subtle tartness that pairs well with the smoky sausage. This variation is great for holiday parties.
Storing and Bringing It Back to Life
Fridge Storage
Wrap the cooked Mummy Dogs tightly in plastic wrap or place them in an airtight container. Store them in the refrigerator for up to 3 days. When ready to eat, reheat in a 350°F (175°C) oven for 10 minutes, or microwave on medium power for 30 seconds, then finish in the oven for a crisp crust.
Freezer Friendly
For longer storage, freeze the wrapped dogs unbaked. Place them on a parchment‑lined tray, freeze until solid, then transfer to a freezer bag. They can last up to 2 months. Bake directly from the freezer at 400°F (200°C) for 25 minutes, or thaw in the refrigerator overnight and bake as usual.
Best Reheating Method
The secret to reviving the dough’s crispness is to use an oven, not a microwave. Preheat the oven to 375°F (190°C), place the dogs on a baking sheet, and bake for 8–10 minutes. Add a splash of water to the bottom of the pan to create steam, which keeps the dough from drying out.