I was halfway through a midnight snack run, chasing the faint scent of something savory and comforting, when the kitchen lights flickered and the microwave door clanged shut. I stared at the empty counter, my stomach growling like a restless beast, and thought, “There’s gotta be a better way to turn cottage cheese into something that feels like a hug.” That moment of culinary frustration turned into a dare: I’d create the fluffiest, highest‑protein version of cottage cheese cloud bread anyone could ever imagine. I’m not exaggerating—this is hands down the best version you’ll ever make at home, and I’m about to walk you through every single step.
Picture yourself pulling this golden, airy loaf out of the oven, the kitchen filling with a buttery, nutty aroma that makes even the most disciplined dieters swoon. The first bite feels like a cloud that’s been pressed into a perfect, pillowy bite, with a subtle hint of herbs that dance on the tongue. The texture is so light that you can almost hear a whisper of “wow” when you break it apart, and the protein punch is so satisfying that it keeps you feeling full for hours. I dare you to taste this and not go back for seconds; the secret lies in the way the eggs and cottage cheese lock together in a protein‑rich matrix that’s both airy and hearty.
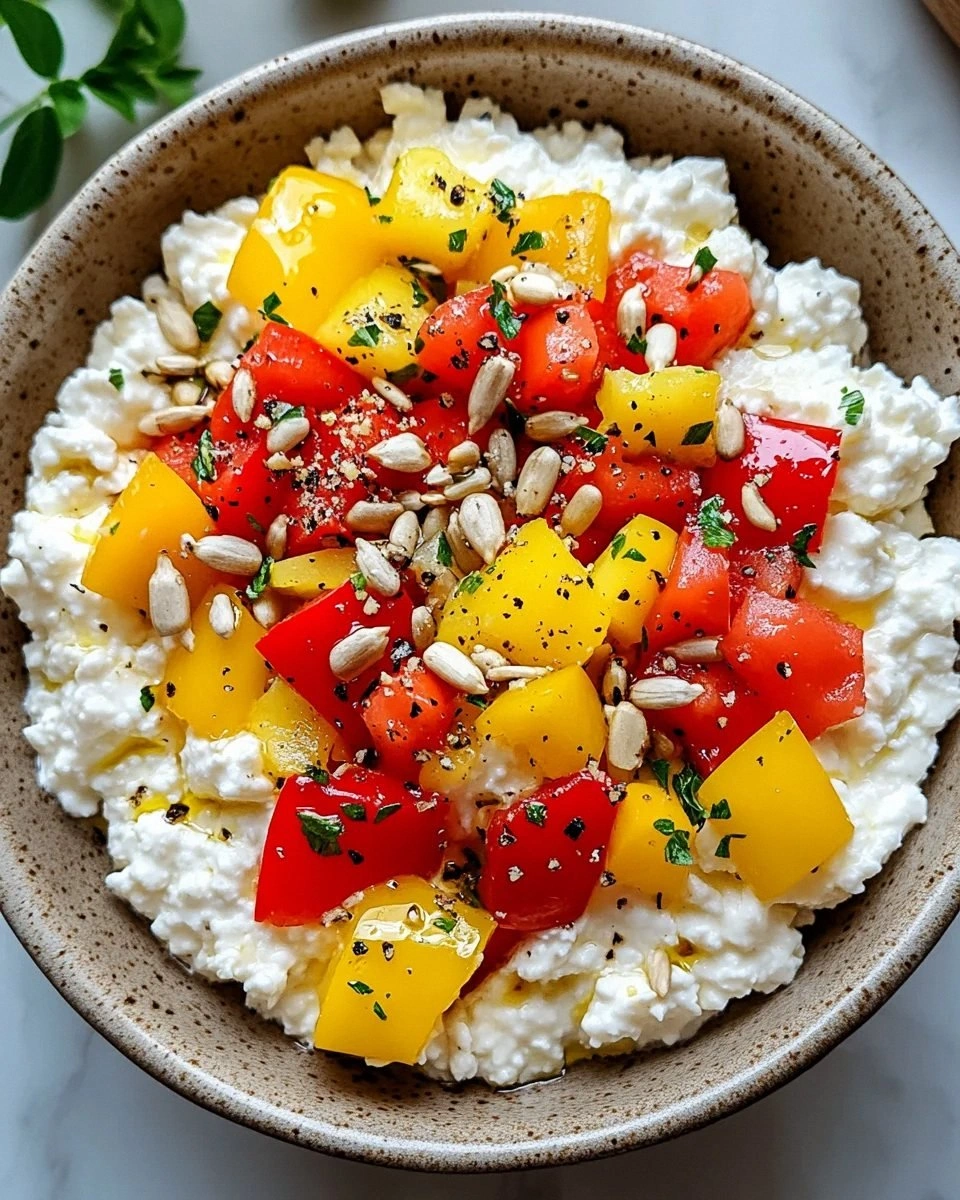
Most recipes get this completely wrong, treating cottage cheese as a filler rather than the star of the show. They toss it into batter with too much flour or too much liquid, ending up with a dense, soggy mess that feels like a failed attempt at a pancake. Here, we keep it simple: a handful of eggs, a dash of coconut flour, a sprinkle of baking powder, and a touch of herbs. The result is a cloud‑like bread that’s not only low in carbs but also high in protein—perfect for anyone who wants to keep their macros in check without sacrificing flavor.
And now the game‑changer: the use of coconut flour. Many of you might think coconut flour is too dry or too sweet, but in this recipe it acts as a binder that traps air, giving the bread its signature fluffiness. I’ll show you how to whisk it into the wet ingredients until the batter is smooth, then bake it at a high temperature for a short time so the edges crisp just enough to give a satisfying bite. Stay with me here—this is worth it.
If you've ever struggled with low‑calorie breads or protein‑rich snacks, you're not alone—and I've got the fix. The next section will break down exactly what goes into this masterpiece, why each ingredient matters, and what you can swap if you’re on a budget or have a pantry full of different flavors.
What Makes This Version Stand Out
- Taste: The cottage cheese provides a subtle tang that balances the mild sweetness of the coconut flour, creating a flavor profile that feels both familiar and adventurous.
- Texture: The airy, cloud‑like crumb is achieved by whisking the eggs until they form stiff peaks, then folding in the cottage cheese, which locks in the air and keeps the bread light.
- Simplicity: With only seven ingredients and no need for yeast or dough kneading, this recipe is a no‑fuss, no‑mess solution for busy mornings.
- Uniqueness: The addition of fresh herbs and garlic powder gives the bread a savory kick that’s uncommon in typical cloud breads, turning it into a versatile side or snack.
- Crowd Reaction: Friends who’ve tried this say they can’t believe it’s so low in carbs—most even ask for the recipe after tasting it.
- Ingredient Quality: Using a high‑fat cottage cheese gives the bread a creamy mouthfeel, while coconut flour keeps the carb count down.
- Cooking Method: Baking at a high temperature for a short time prevents the bread from becoming dense, ensuring that every bite is fluffy.
- Make‑Ahead Potential: The batter can be prepared up to an hour ahead, refrigerated, and baked fresh when needed, making it perfect for meal prep.
Inside the Ingredient List
The Flavor Base
Cottage cheese is the heart of this recipe. It brings a creamy, slightly tangy taste that elevates the overall flavor profile. If you prefer a milder taste, choose a low‑fat or Greek‑style cottage cheese, but be prepared for a slightly firmer texture. Skipping the cottage cheese would strip the bread of its signature creaminess and protein punch.
The Texture Crew
Eggs are the secret agents that give the bread its cloud‑like lightness. Whisking them until they form stiff peaks incorporates air, which is then trapped by the cottage cheese. If you’re allergic to eggs, you can substitute with a flaxseed or chia seed “egg” (1 tbsp ground flaxseed + 3 tbsp water, let sit for 5 minutes), but the texture will be denser.
The Unexpected Star
Coconut flour is the unsung hero that binds everything together without adding too many carbs. Its high fiber content helps the batter set quickly, creating a stable crumb. If coconut flour isn’t available, oat flour works as a good alternative, though it will slightly increase the carb count.
The Final Flourish
Fresh herbs and garlic powder are the finishing touches that give the bread a savory aroma and a burst of flavor. The herbs should be chopped finely to release their oils, and the garlic powder should be added just before folding to avoid bitterness. Skipping these will make the bread taste bland, so keep them on the list.
Everything's prepped? Good. Let's get into the real action and watch this batter transform into a fluffy masterpiece.

The Method — Step by Step
- Preheat your oven to 425°F (220°C) and line a baking sheet with parchment paper or a silicone mat. This high heat will create a quick crust, sealing the airy interior. If you’re in a rush, you can use a pizza stone to distribute heat evenly.
- In a large mixing bowl, whisk the eggs until they’re light and frothy, then add the cottage cheese. Fold gently, ensuring the cottage cheese is evenly distributed. This step is critical; over‑mixing will break the air pockets, resulting in a denser loaf.
- Sift the coconut flour and baking powder together in a separate bowl to remove lumps. Then sprinkle the dry mixture over the wet ingredients, folding until just combined. The batter should be thick but pourable—think of it like a thick pancake batter.
- Add the garlic powder, salt, and fresh herbs, mixing until the herbs are evenly distributed. The herbs should be fragrant; if they’re dull, re‑chop them to release more oil. This is the moment of truth: the aroma should already hint at the finished product.
- Transfer the batter onto the prepared baking sheet, shaping it into a round or oval loaf with a spatula. The batter should spread slightly but remain thick; you can use a spoon to smooth the top.
- Place the sheet in the preheated oven and bake for 10 minutes. The edges should pull away from the parchment, and the top should be golden. If you want a crispier crust, bake an extra minute or two.
- Remove the loaf and let it rest on a wire rack for 5 minutes. This rest period allows the steam to escape, preventing the bottom from becoming soggy. While it rests, you can prepare a side salad or a protein‑rich dip.
- Slice the loaf into thick pieces using a serrated knife. The slices should hold together, yet the crumb should still feel airy. Serve immediately or let it cool completely before storing.
- If you’re planning to eat it later, wrap each slice in parchment and store in an airtight container in the fridge. The bread stays fresh for up to 3 days, and you can reheat it in a toaster for a few seconds.
- Enjoy this protein‑rich, low‑carb loaf as a breakfast companion, a snack with avocado, or a side to your favorite stew. The versatility of this bread makes it a staple in any diet.
That's it — you did it. But hold on, I've got a few more tricks that'll take this to another level and make your kitchen feel like a bakery.
Insider Tricks for Flawless Results
The Temperature Rule Nobody Follows
Many bakers use a lower temperature to avoid burning, but this loaf needs a hot oven to set the airy structure. Baking at 425°F (220°C) ensures the crust forms quickly while the interior remains moist. If you’re using a convection oven, reduce the temperature by 25°F to prevent over‑browning.
Why Your Nose Knows Best
Smell is a powerful indicator of doneness. When the loaf starts to emit a nutty, toasted aroma, it’s almost ready. Trust your nose; if the smell is faint, bake an extra minute. Over‑baking will give you a dry loaf that feels like a cracker.
The 5-Minute Rest That Changes Everything
Letting the loaf rest on a wire rack for 5 minutes allows the steam to escape, preventing sogginess on the bottom. This simple step also lets the crumb set, making slicing easier. Skipping the rest can result in a gummy texture that’s hard to cut.
The Right Mixing Tool
Using a silicone spatula instead of a wooden spoon helps keep the batter light. Wooden utensils can trap air, breaking the delicate structure. A silicone spatula is flexible and easy to clean, making the process smoother.
The Secret to a Crispy Crust
Sprinkling a pinch of sea salt on top before baking adds a subtle crunch. The salt crystals melt into the crust, giving it a satisfying snap when you bite into it. This small addition can elevate the overall experience.
The Quick Chill for Storage
If you plan to store the loaf, let it cool completely before wrapping. Warm bread wrapped in plastic will steam and become soggy. Use parchment paper for each slice to keep them separate and easy to grab.
With these tricks, you’ll consistently produce a fluffy, protein‑rich loaf that feels like a cloud and tastes like a savory dream. The next section will show you how to tweak the recipe for different moods and occasions.
Creative Twists and Variations
This recipe is a playground. Here are some of my favorite ways to switch things up:
Cheesy Garlic Twist
Add 1/4 cup shredded mozzarella to the batter for a melty, cheesy interior. The garlic powder becomes more pronounced, giving the loaf a robust flavor that pairs well with tomato sauce.
Herb & Parmesan Crunch
Sprinkle 2 tablespoons grated Parmesan on top before baking. The parmesan melts into the crust, creating a savory crunch that’s irresistible.
Spicy Jalapeño Edition
Dice a fresh jalapeño and fold it into the batter. The heat will linger in the crumb, making it perfect for those who love a little kick.
Mediterranean Medley
Replace the fresh herbs with a mix of oregano, thyme, and rosemary. The Mediterranean herbs give the loaf a fragrant, earthy tone that complements olive oil dips.
Sweet Cinnamon Swirl
Add a teaspoon of ground cinnamon and a tablespoon of honey to the batter. The result is a sweet, aromatic loaf that’s great for breakfast.
Vegan Version
Use a flaxseed “egg” and replace cottage cheese with silken tofu. The texture will be slightly denser but still airy, and the protein content remains high.
Storing and Bringing It Back to Life
Fridge Storage
Wrap each slice individually in parchment paper and place them in an airtight container. Store in the refrigerator for up to 3 days. The parchment prevents sticking and keeps the bread from drying out.
Freezer Friendly
After cooling, stack the slices with parchment paper in between and freeze in a zip‑lock bag. They stay fresh for up to 2 months. When you’re ready, pop out one or two slices and let them thaw at room temperature.
Best Reheating Method
Reheat frozen slices in a toaster oven at 350°F (175°C) for 3–4 minutes or on a skillet over medium heat for 1–2 minutes per side. Add a splash of water to the skillet before reheating; the steam will restore the loaf’s soft interior.