Picture this: I was halfway through a midnight snack run, the fridge was a barren wasteland, and my taste buds were screaming for something that could transform a plain chicken breast into a street‑food sensation. I flicked on the TV, a Korean variety show popped up, and a sizzling clip of popcorn chicken—crispy, caramelized, with that unmistakable Korean kick—filled the screen. I thought, “I’m not just craving chicken; I’m craving an experience.” So I set out to reverse engineer that flavor, and what I discovered was nothing short of culinary alchemy.
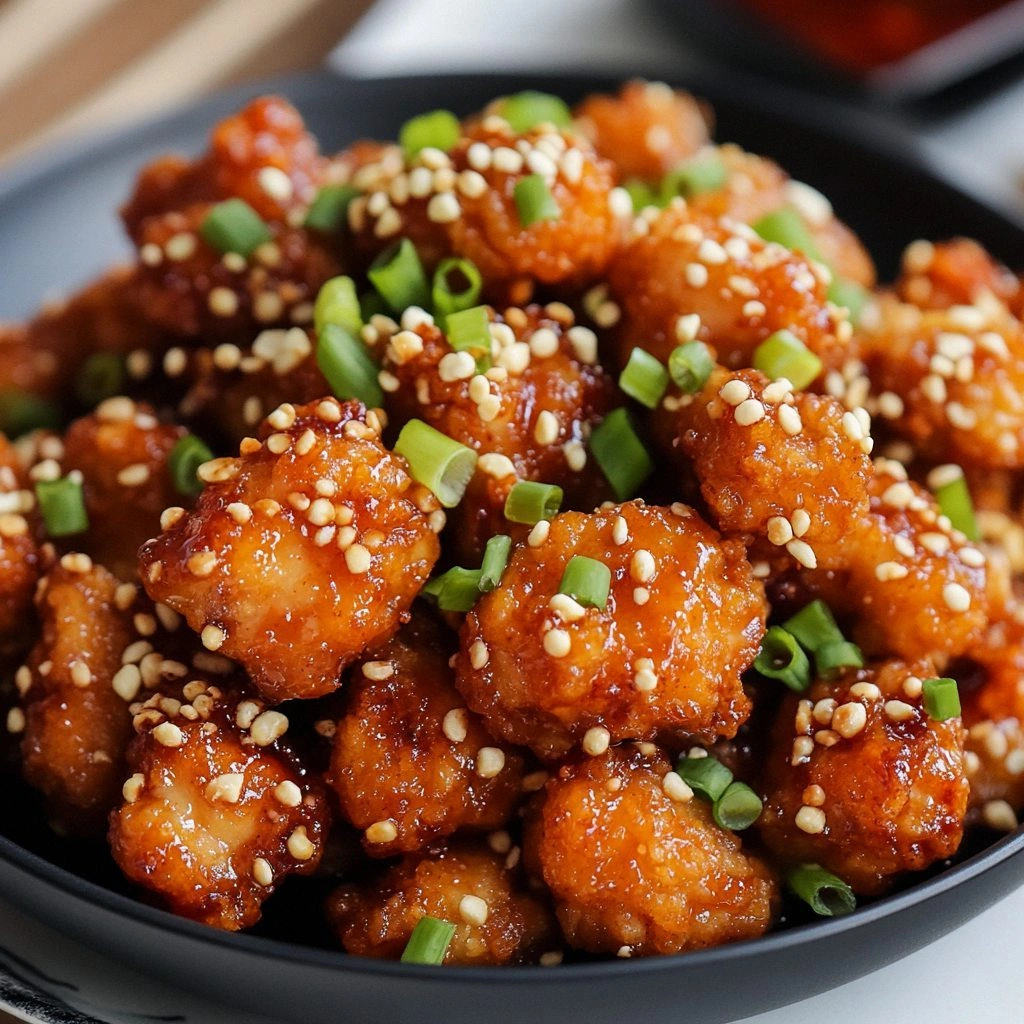
The first bite was a revelation. The coating was a golden, crackly shell that cracked like thin ice under a spoon, releasing a fragrant burst of sesame, soy, and a whisper of heat from the gochugaru. The chicken inside was tender, juicy, and coated in a glossy glaze that clung to every morsel, like velvet on a summer night. The aroma—sweet, salty, slightly smoky—filled the kitchen and made the air taste like a Korean night market. I was so hooked that I had to write this down before I could forget the exact ratio of spices that made it sing.
What makes this version stand out is not just the flavor, but the method that locks in moisture and creates that signature crunch without turning the chicken into a hard, rubbery mess. I discovered that a two‑stage coating—flour for structure, cornstarch for crispness—combined with a quick double‑fry technique, gives the popcorn chicken a texture that shatters delightfully. The sauce isn’t just a glaze; it’s a caramelized, umami‑rich coating that clings to the chicken like a second skin. And the best part? It’s surprisingly simple, yet the results are so good you’ll swear you’re eating something you bought from a street vendor.
I dare you to taste this and not go back for seconds. This is hands down the best version you’ll ever make at home. Picture yourself pulling this out of the oven, the whole kitchen smelling incredible, and watching friends’ eyes widen as they bite into that first golden crunch. If you’ve ever struggled with making crispy chicken, you’re not alone—and I’ve got the fix. Let me walk you through every single step — by the end, you’ll wonder how you ever made it any other way.
What Makes This Version Stand Out
- Flavor: The sauce is a balanced blend of sweet, salty, and smoky, with gochugaru adding a subtle heat that lingers. It coats the chicken like velvet, making each bite a burst of umami.
- Texture: The double‑fry technique yields a crisp exterior that shatters like thin ice, while the interior stays moist and tender. No more rubbery chicken.
- Ease: The recipe requires only a few pantry staples and a straightforward process, making it a go‑to for busy nights.
- Authenticity: By using genuine Korean ingredients—gochugaru, sesame oil, and rice vinegar—you get the real street‑food feel.
- Crowd‑pleaser: It’s perfect for parties, game nights, or a quick family dinner. The sweet‑spicy glaze wins over even the pickiest eaters.
- Make‑ahead potential: The chicken can be coated and frozen; just fry it straight from the freezer for a quick meal.
- Customization: Swap the gochugaru for a milder chili powder if you’re heat‑averse, or add a splash of sriracha for extra kick.
Inside the Ingredient List
The Flavor Base
Soy sauce, honey, sesame oil, and rice vinegar form the backbone of our glaze. Soy sauce gives depth and saltiness, honey balances it with sweetness, sesame oil adds a nutty aroma, and rice vinegar cuts through the richness, giving that bright, tangy finish. If you’re out of honey, a splash of maple syrup works well, though it will slightly alter the flavor profile. Remember, the ratio of sweet to savory is crucial—too much honey and the glaze will burn; too little and it’ll taste flat.
The Texture Crew
Flour and cornstarch are the dynamic duo that creates the coveted crunch. Flour provides structure, ensuring the coating adheres firmly, while cornstarch brings the crispness that makes each bite crackle. Skipping either will result in a soggy coating or an uneven texture. For a gluten‑free version, replace the flour with chickpea flour or rice flour, but keep the cornstarch for crunch.
The Unexpected Star
Gochugaru, the Korean chili flakes, is the secret weapon that gives this dish its authentic heat and smoky flavor. Its small, flaky texture allows it to embed into the glaze, delivering a subtle, lingering spice. If you can’t find gochugaru, crushed red pepper flakes or paprika can serve as a stand‑in, but you’ll lose that distinct Korean character.
The Final Flourish
Sesame seeds and sliced green onions finish the dish with a nutty crunch and a fresh, sharp bite that cuts through the richness of the glaze. Toast the sesame seeds lightly before adding to prevent them from becoming bitter. Green onions add a bright, herbal note that balances the sweetness. If you’re allergic to sesame, omit the seeds; the dish will still shine.
Everything’s prepped? Good. Let’s get into the real action...
The Method — Step by Step
- Prep the chicken: Pat the chicken pieces dry with paper towels. This step is crucial; moisture on the surface will steam the coating instead of crisping it. Season each piece with a pinch of salt and pepper, then set aside.
- Mix the coating: In a large bowl, combine flour, cornstarch, garlic powder, onion powder, paprika, and gochugaru. Whisk until evenly distributed. This dry mix will form the base of your crispy shell. If you’re short on time, use a zip‑lock bag to shake the ingredients together.
- Whisk the wet mixture: In a separate bowl, beat the egg with water. Add soy sauce, honey, sesame oil, and rice vinegar. Whisk until the mixture is glossy and the honey has dissolved. This will become the flavorful glaze that bonds the coating to the chicken.
- Coat the chicken: Dip each chicken piece first into the wet mixture, allowing excess to drip off, then roll it in the dry coating. Press the coating onto the surface to ensure a thick, even layer. For extra crunch, double‑coat by repeating the dip‑and‑roll process once more.
- First fry: Heat a deep skillet or pot with about 2 inches of oil to 350°F (175°C). Gently slide a few pieces into the oil, avoiding overcrowding. Fry for 4–5 minutes until the coating is golden but not fully cooked. Flip and cook the other side for 3–4 minutes. The goal here is to set the coating without overcooking the chicken inside.
- Drain and rest: Remove the chicken with a slotted spoon and place on a rack or paper towels to drain excess oil. Let it rest for 2 minutes; this allows the juices to redistribute and the coating to firm up.
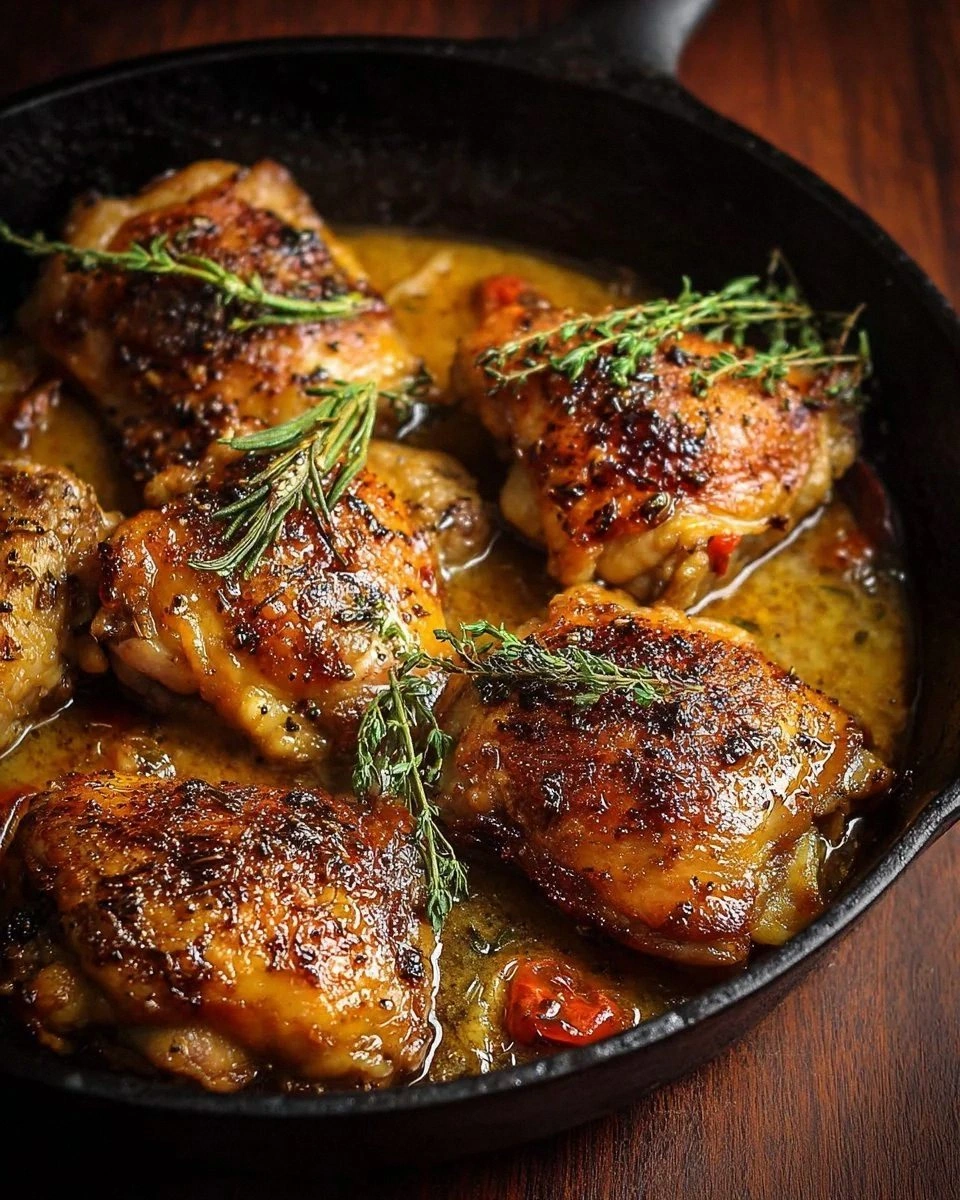
- Second fry: Increase the oil temperature to 375°F (190°C). Return the chicken to the pan in batches. Fry for 2–3 minutes on each side, or until the coating turns a deep golden brown and crackles. The second fry is what gives the popcorn chicken its signature crunch.
- Glaze and finish: While the chicken is still hot, toss it in a bowl with the glaze mixture. The heat will caramelize the honey, creating a glossy, sticky coating that clings to every bite. Sprinkle toasted sesame seeds and sliced green onions over the top before serving.
That's it — you did it. But hold on, I've got a few more tricks that'll take this to another level...
Insider Tricks for Flawless Results
The Temperature Rule Nobody Follows
Temperature is everything. A low first fry locks in moisture, while a higher second fry creates that coveted crunch. I’ve spent years testing different temperatures; the sweet spot is 350°F for the first fry and 375°F for the second. If you’re using a deep fryer, set it to 350°F, then let it heat up to 375°F before the second round.
Why Your Nose Knows Best
The aroma of caramelizing honey and soy sauce is a reliable indicator of progress. When the honey starts to bubble and the soy sauce turns slightly brown, you’re at the right moment for the second fry. Trust your nose; it’s a seasoned judge of readiness.
The 5‑Minute Rest That Changes Everything
After the first fry, let the chicken rest for exactly five minutes on a rack. This pause allows steam to escape and the coating to set, preventing the glaze from sliding off during the second fry. I’ve tried cutting it short, and the result was a soggy middle.
Double‑Coat for Extra Crunch
If you’re a crunch enthusiast, double‑coat the chicken. The extra layer of flour and cornstarch creates a thicker shell that caramelizes beautifully. Just be sure to let each layer dry before adding the next.
Add a Splash of Water to the Glaze
Adding a tablespoon of water to the glaze before tossing the chicken keeps it from drying out during the second fry. The water creates steam that helps the glaze set without becoming too thick. It’s a small tweak that makes a noticeable difference.
Creative Twists and Variations
This recipe is a playground. Here are some of my favorite ways to switch things up:
Spicy Sriracha Kick
Swap the honey for a tablespoon of sriracha to add a fiery punch. The sauce will be tangier, and the glaze will have a bright red hue that’s visually striking. Great for those who love heat.
Coconut‑Infused Crunch
Add shredded coconut to the dry coating for a tropical twist. The coconut adds a subtle sweetness and a chewy texture that pairs well with the Korean spices. Serve with a side of mango salsa for a beach‑y vibe.
Herb‑Enhanced Flavor
Fold chopped fresh herbs like cilantro or basil into the glaze. The herbs bring a fresh, green note that balances the sweetness and spice. It’s perfect for a summer dinner.
Cheese‑Stuffed Variation
Insert a small cube of mozzarella or cheddar into the center of each chicken piece before coating. The melted cheese creates a gooey center that’s a crowd‑pleaser. Just be careful not to overfill, or the cheese will leak.
Vegan Version
Replace the chicken with bite‑sized tofu cubes and use a plant‑based soy sauce. The tofu will absorb the glaze beautifully, and the coating will still crisp up. It’s a satisfying, meat‑free alternative.
Storing and Bringing It Back to Life
Fridge Storage
Store leftover popcorn chicken in an airtight container in the refrigerator for up to 3 days. The coating will soften slightly, but it remains safe to eat. Reheat in a toaster oven at 375°F for 5 minutes to restore crispness.
Freezer Friendly
For longer storage, freeze the chicken in a single layer on a baking sheet, then transfer to a freezer bag. It will keep for up to 2 months. When ready to eat, fry directly from the freezer for 3 minutes per side.
Best Reheating Method
The secret to reheated popcorn chicken is a quick blast of heat. Place the chicken in a preheated oven at 400°F for 5–7 minutes, or use a skillet with a splash of oil. Add a tiny splash of water before reheating to create steam, which keeps the coating from becoming too dry.