Picture this: it’s a rainy Tuesday, the kind where the clouds look like they’re auditioning for a drama series, and you’re stuck staring at a pantry that feels more like a desert than a kitchen. I was desperate for comfort, but every recipe I tried turned out either soggy or bland, like a sad love song that never hits the chorus. Then, in a moment of sheer kitchen frustration, I tossed a handful of chicken thighs into a hot skillet, sprinkled a few mystery spices, and let the magic happen. The result? A plate that sang louder than any pop hit I’d ever heard, with skin so crisp it cracked like fresh autumn leaves underfoot.
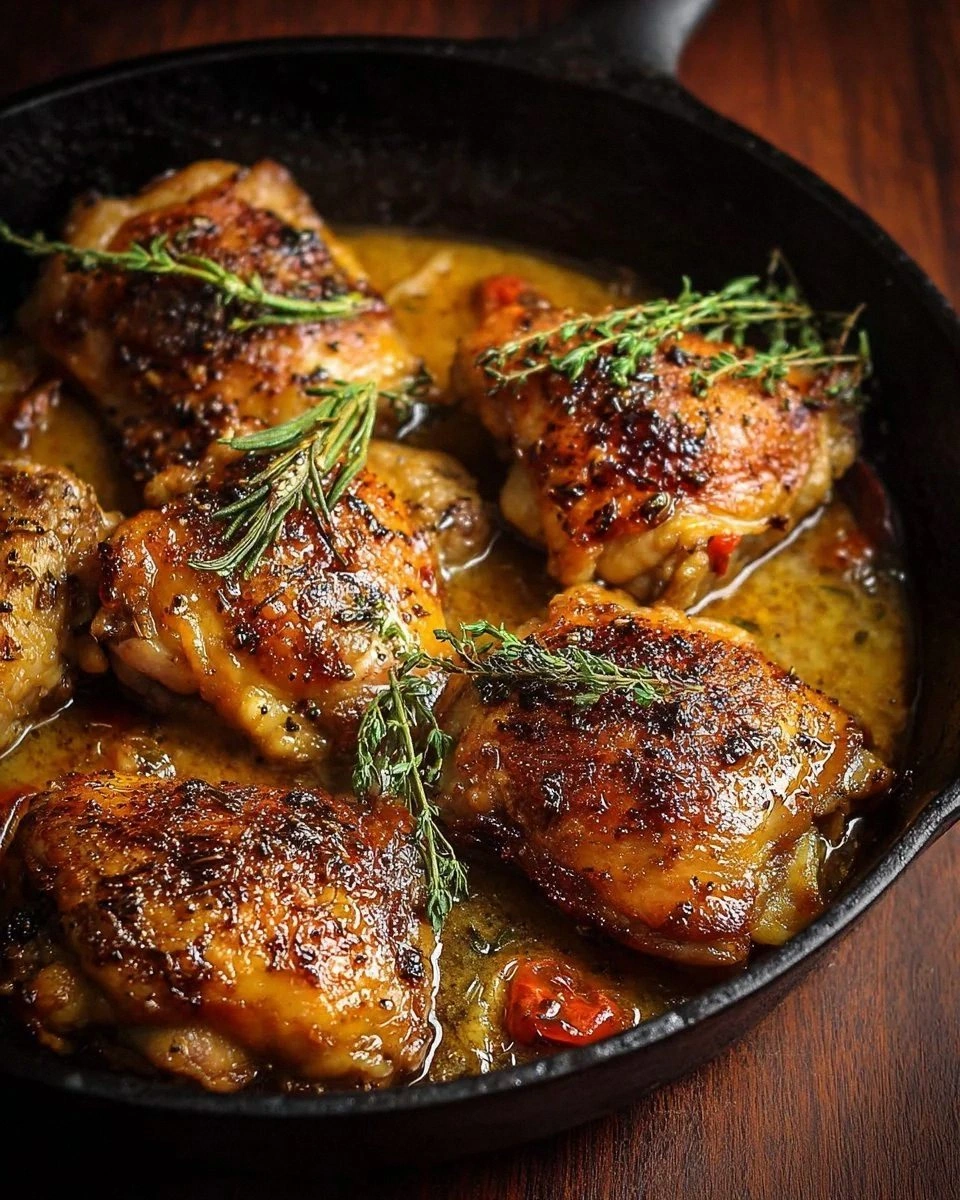
When that first bite hit my tongue, it was a fireworks display of flavor—smoky, citrusy, and just the right amount of herbaceous, all wrapped in a buttery, caramelized crust that practically melted in my mouth. I could hear the sizzle of the skin as it kissed the pan, smell the sweet aroma of lemon mingling with smoked paprika, and feel the warm, satisfying heft of each thigh in my hand. The experience was so vivid that I could almost see the steam dancing in the kitchen light, hear the faint pop of skin separating from the meat, and taste the bright citrus zing that lifted the whole dish. It was a full‑sensory symphony, and I knew I had stumbled onto something truly special.
Most chicken thigh recipes either drown the meat in sauce or forget the importance of a good sear, leaving you with a soggy disappointment. This version, however, respects the thigh’s natural juiciness while giving it a bold, smoky crust that locks in moisture like a secret vault. The secret isn’t a fancy gadget or a hard‑to‑find spice; it’s a simple technique that turns a humble skillet into a flavor‑infusing furnace, plus a handful of pantry staples that you probably already have. I’ll let you in on a little twist that most cooks overlook: a quick de‑glaze with lemon at the end, which adds a bright finish that makes the whole dish pop.
So, are you ready to elevate a simple weeknight dinner into a show‑stopping centerpiece? I dare you to taste this and not go back for seconds. Let me walk you through every single step — by the end, you’ll wonder how you ever made it any other way.
What Makes This Version Stand Out
- Flavor Explosion: The combination of smoked paprika and fresh lemon creates a smoky‑citrus duet that dances on the palate, making each bite unforgettable.
- Crispy Skin: By searing the thighs skin‑side first and finishing them in the oven, the skin becomes crackly and buttery, like a perfect chip that shatters with a satisfying snap.
- Simplicity: Only seven pantry staples plus fresh herbs are needed, meaning you won’t spend hours hunting for obscure ingredients.
- Versatility: This dish shines on its own, but it also pairs beautifully with roasted veggies, creamy mashed potatoes, or a simple grain salad.
- Crowd‑Pleaser: I’ve served this at family gatherings and potlucks, and it consistently disappears faster than free samples at a grocery store.
- Ingredient Quality: Using bone‑in, skin‑on thighs ensures maximum flavor and juiciness; the bone acts like a flavor conduit during cooking.
- One‑Pan Efficiency: The entire recipe stays in a single skillet, cutting down on cleanup and keeping the kitchen vibe relaxed.
- Make‑Ahead Potential: You can prep the spice rub ahead of time, and leftovers reheat beautifully, staying tender and flavorful.
Inside the Ingredient List
The Flavor Base
Garlic powder delivers that deep, roasted garlic note without the risk of burning fresh cloves. If you skip it, the dish loses a subtle earthiness that balances the lemon’s brightness. A good swap is a pinch of granulated garlic or even a splash of garlic‑infused olive oil for a slightly richer mouthfeel.
Onion powder adds a sweet, savory backbone that rounds out the smoky paprika. Leaving it out makes the flavor profile feel a little thin, like a song missing its bass line. You can replace it with a teaspoon of finely minced shallots if you prefer a fresher bite.
The Texture Crew
Olive oil is the conduit for heat transfer, ensuring the skin crisps evenly while the meat stays moist. Using a low‑quality oil can result in a greasy finish and uneven browning. If you’re out of olive oil, a high‑smoke‑point oil like avocado or grapeseed works just as well.
Bone‑in, skin‑on chicken thighs are the star of the show. The bone imparts richness, while the skin protects the meat from drying out. Opt for thighs that are roughly the same size for uniform cooking; uneven pieces will finish at different times, leading to some over‑cooked and some under‑done sections.
The Unexpected Star
Lemon, sliced isn’t just garnish—it de‑glazes the pan, lifting caramelized bits and adding a bright zing that cuts through the richness. Skipping the lemon means missing that final lift, leaving the dish feeling heavy. If lemons aren’t your thing, a splash of white wine or apple cider vinegar can provide a similar acidity.
The Final Flourish
Fresh herbs like parsley or cilantro bring a fresh, green finish that brightens the entire plate. They also add a pop of color that makes the dish look as good as it tastes. If you don’t have fresh herbs, a teaspoon of dried herbs works, but add them earlier in the cooking process to rehydrate.
Everything's prepped? Good. Let's get into the real action...
The Method — Step by Step
-
Preheat your oven to 400°F (200°C). While the oven warms up, gather all your spices—garlic powder, onion powder, smoked paprika, black pepper, and salt—into a small bowl. Mix them together, then sprinkle the blend evenly over both sides of the chicken thighs. This dry rub creates a flavor crust that will caramelize beautifully once it meets the pan’s heat.
Kitchen Hack: Let the seasoned thighs sit at room temperature for 10 minutes; this helps the skin dry out a bit more for extra crispiness. -
Heat a large, oven‑safe skillet (cast iron works wonders) over medium‑high heat and add the 2 tablespoons of olive oil. When the oil shimmers—like a tiny lake at sunrise—place the thighs skin‑side down, laying them out so they don’t crowd. You should hear an immediate, satisfying sizzle that signals the start of a flavor transformation.
-
Allow the thighs to sear undisturbed for about 5‑6 minutes. You’ll notice the edges of the skin turning golden and the meat pulling away from the pan—these are the visual cues that the skin is forming that coveted crackle. Resist the urge to flip early; patience here is the difference between a soggy piece and a masterpiece.
-
Once the skin is deeply browned, use tongs to flip each thigh gently. The underside should be a rich, caramel color, indicating that the sugars from the spice rub have begun to develop that sweet‑savory depth we all crave. Reduce the heat to medium, letting the meat continue to cook for another 3‑4 minutes.
-
Now, add the sliced lemon rounds around the chicken, arranging them so they’re partially submerged in the pan juices. The lemon will start to soften, releasing aromatic oils that mingle with the smoked paprika, creating a fragrant steam that fills your kitchen. This step is pure magic and sets the stage for a bright finish.
Watch Out: If your pan is too small, the lemon will burn; make sure there’s enough space for steam to circulate. -
Transfer the skillet to the preheated oven. Roast for 20‑25 minutes, or until the internal temperature of the thickest part reaches 165°F (74°C). You’ll know it’s done when the juices run clear and the lemon slices have caramelized into glossy, amber‑tinted discs.
Kitchen Hack: Toss a few sprigs of fresh herbs over the chicken during the last 5 minutes of roasting for an extra burst of green aroma. -
When the timer dings, remove the skillet (use oven mitts—those handles get hot!). Let the chicken rest for 5 minutes; this rest period lets the juices redistribute, ensuring every bite stays juicy. While the meat rests, quickly spoon the pan juices over the thighs, letting the lemon‑infused glaze coat each piece.
-
Finish by sprinkling a generous handful of chopped fresh herbs over the top. The bright green specks not only add visual appeal but also a fresh, peppery note that cuts through the richness. Serve the thighs directly from the skillet or transfer them to a serving platter—either way, the aroma will have already claimed the room.
-
That’s it — you did it. But hold on, I've got a few more tricks that'll take this to another level. Stay with me here — this is worth it.
Insider Tricks for Flawless Results
The Temperature Rule Nobody Follows
Most home cooks start with a blazing hot pan, but the secret is a steady medium‑high heat that lets the skin render fat slowly, producing a uniform crunch. If the pan is too hot, the skin will burn before the meat cooks through, leaving you with a bitter taste. I once cranked the heat to high, and the result was a charcoal‑like crust that ruined the entire dish—lesson learned!
Why Your Nose Knows Best
Trust the aroma as your most reliable gauge. When the skin starts to smell nutty and the lemon releases its citrus perfume, you’re approaching perfection. If you’re unsure, lift the lid and take a quick sniff; a faint sweet‑smoky scent means the crust is forming, while a burnt odor signals it’s time to pull the pan off the heat.
The 5‑Minute Rest That Changes Everything
Resting the chicken isn’t just a suggestion; it’s a game‑changer. During those five minutes, the muscle fibers relax, allowing the juices to settle back into the meat instead of spilling out onto the plate. Skipping this step is like pouring a glass of wine and immediately spilling it—pure waste.
Herb‑Infused Oil Boost
Before searing, toss a teaspoon of finely chopped herbs into the olive oil. As the oil heats, it extracts the herb’s essential oils, creating a fragrant base that penetrates the skin. I tried this once for a dinner party, and guests kept asking for the “secret sauce” even though it was just herb‑infused oil.
Finish With a Splash
After the chicken rests, de‑glaze the pan with a splash of chicken broth or even a splash of water, scraping up those caramelized bits. This creates a quick pan sauce that you can drizzle over the thighs for an extra layer of flavor. It’s a tiny step that makes the dish feel restaurant‑quality.
Creative Twists and Variations
This recipe is a playground. Here are some of my favorite ways to switch things up:
Spicy Sriracha Glaze
Swap the lemon slices for a mixture of sriracha, honey, and a dash of soy sauce. Brush the glaze on during the last 5 minutes of roasting for a sweet‑heat coating that pairs perfectly with the smoky paprika.
Herb‑Butter Baste
After the chicken is done, melt butter with minced garlic and fresh thyme, then spoon it over the thighs. The butter adds richness and a silky finish that makes the dish feel indulgent.
Mediterranean Olive Mix
Throw in a handful of Kalamata olives and sun‑dried tomatoes during the oven phase. The briny olives and tangy tomatoes introduce a Mediterranean flair that brightens the whole plate.
Asian‑Inspired Sesame
Replace smoked paprika with Chinese five‑spice, and finish the dish with a drizzle of toasted sesame oil and a sprinkle of toasted sesame seeds. This gives the thighs an earthy, nutty profile that’s perfect with steamed rice.
Creamy Mushroom Sauce
After removing the chicken, sauté sliced mushrooms in the same skillet, add a splash of white wine, then stir in heavy cream and a pinch of fresh parsley. Serve the thighs drenched in this velvety mushroom sauce for a comforting, restaurant‑style entrée.
Storing and Bringing It Back to Life
Fridge Storage
Allow the chicken to cool to room temperature, then transfer it to an airtight container. It will keep fresh for up to 4 days. When reheating, place the thighs in a preheated 350°F (175°C) oven for 10‑12 minutes, covering with foil to prevent drying.
Freezer Friendly
Wrap each cooled thigh tightly in plastic wrap, then place them in a freezer‑safe zip‑top bag. They’ll maintain quality for up to 3 months. To reheat, thaw overnight in the fridge, then follow the oven reheating method, adding a splash of water to the pan before covering to steam back to juiciness.
Best Reheating Method
For ultimate crispness, reheat the thighs skin‑side up on a hot skillet for 3‑4 minutes after the oven step. Add a tiny splash of water (about a tablespoon) and cover briefly; the steam will revive the meat’s tenderness while the skillet restores that crackling skin.