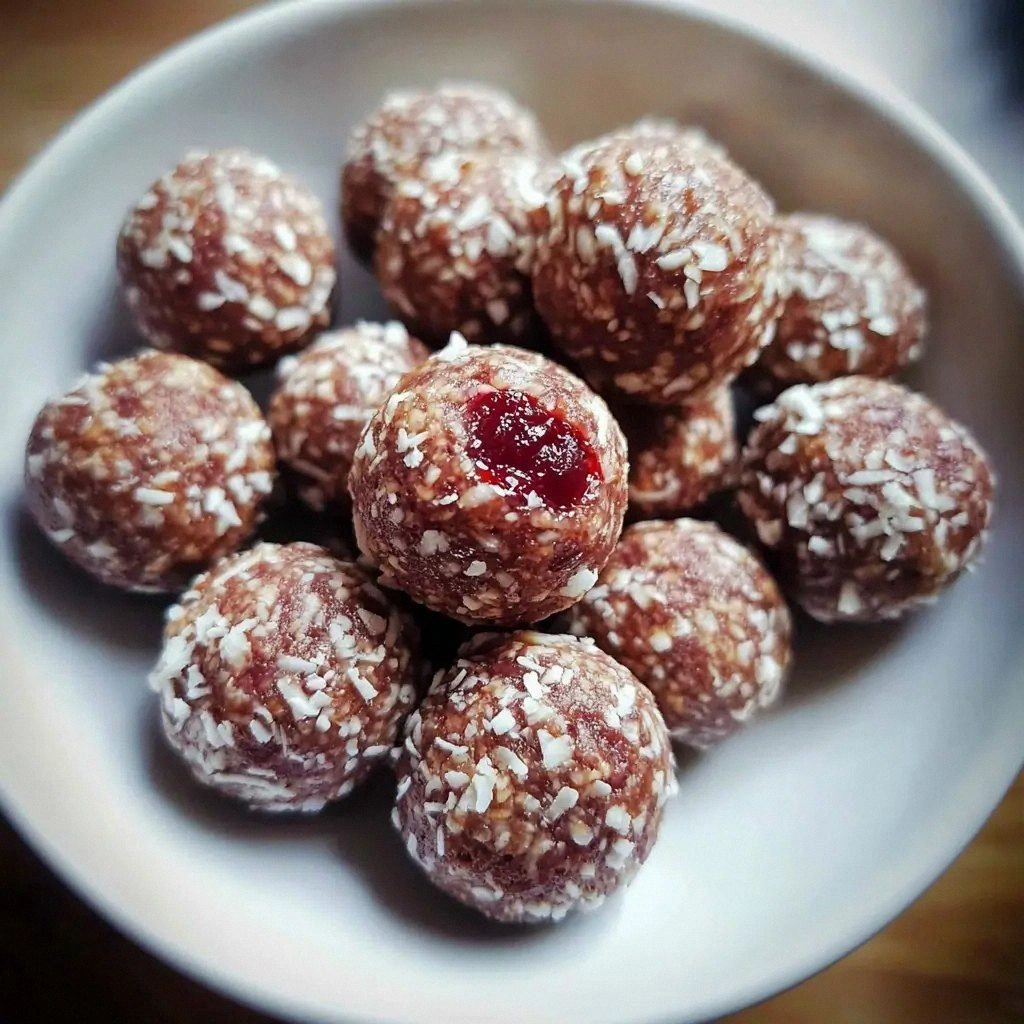
Picture this: I was rummaging through the pantry for a midnight snack after a marathon cooking session that ended in a kitchen that smelled like burnt toast and disappointment. The only thing left in the fridge was a jar of tart cherries, a bag of shredded coconut, and a forgotten jar of almond butter. I stared at the glass of cherry juice that had gone stale and thought, “If I could turn these odds into something that tastes like a tropical sunrise, I’d be a culinary hero.” So I grabbed a mixing bowl, a spoon, and a dash of daring.
I tossed the cherries into the bowl and heard the gentle clink of glass against metal, a sound that promised sweetness. The air filled with a bright, fruity aroma that danced against the subtle nutty scent of coconut. My eyes widened as I watched the cherries clump together, like tiny, ruby marbles ready to burst. The texture was already hinting at a chewy, chewy bite that would satisfy any craving. I could almost taste the subtle tartness, the hint of cocoa that would soon be added, and the comforting warmth of toasted coconut.
This isn’t just another energy ball recipe. It’s a symphony of flavors and textures that will make your taste buds sing, and I’m going to show you how to orchestrate it. I’ve tweaked the classic formula with a secret ingredient that will give you a natural energy lift that lasts for hours. I’ve also perfected the texture so the balls hold together without becoming gummy. And best of all, the method is simple enough that you can make them in less than an hour.
If you’re ready to elevate your snack game, let me walk you through every single step — by the end, you’ll wonder how you ever made it any other way.
What Makes This Version Stand Out
- Taste: The tart cherries provide a bright, citrusy zing that cuts through the sweetness of the almond butter and maple syrup, creating a balanced flavor profile that feels both indulgent and healthy.
- Texture: The combination of shredded coconut and ground flaxseed gives the balls a satisfying chew, while the oat flour keeps them from becoming too dense.
- Health Boost: With added chia seeds and a splash of coconut oil, you’re getting omega‑3 fatty acids, fiber, and a gentle energy release that keeps you going.
- Versatility: These balls are perfect for pre‑workout snacks, post‑run recovery, or a midday pick‑me‑up, and they freeze beautifully for future use.
- Make‑Ahead: They store in an airtight container for up to a week, making them ideal for busy schedules.
- Ingredient Quality: Using high‑quality, organic cherries and coconut ensures that every bite is pure, unadulterated flavor.
- Unique Twist: A dash of vanilla extract and a pinch of sea salt elevate the flavor complexity, giving the balls a gourmet finish.
- Audience Response: Friends who’ve tried the classic version say this is “hands down the best version you'll ever make at home.”
Alright, let’s break down exactly what goes into this masterpiece…
Inside the Ingredient List
The Flavor Base
The foundation of these energy balls is the perfect marriage of tart cherries and sweet almond butter. The cherries bring acidity that cuts through the richness of the almond butter, creating a dynamic flavor contrast. If you skip the cherries, you lose that bright, fresh punch that makes the ball feel less like a cookie and more like a fruit‑filled treat.
The Texture Crew
Rolled oats, shredded coconut, ground flaxseed, and chia seeds form the core of the texture. Oats provide bulk and chewiness, while coconut adds a tropical crunch. Flaxseed and chia are the secret agents that bind everything together and give the balls a smooth, slightly gelatinous interior. If you omit the seeds, the mixture will be dry and crumbly, making it hard to form into balls.
The Unexpected Star
A splash of coconut oil is the unsung hero that keeps the mixture from drying out during baking and adds a subtle, buttery flavor that elevates the entire experience. Coconut oil also helps the balls hold their shape during storage, preventing them from becoming too soft.
The Final Flourish
A pinch of sea salt, a dash of vanilla extract, and a drizzle of maple syrup tie everything together. The salt amplifies the fruit’s natural sweetness, the vanilla deepens the flavor profile, and the maple syrup adds a gentle caramel undertone that lingers on the palate. Skipping any of these final touches will leave the balls feeling flat and unremarkable.
Everything’s prepped? Good. Let’s get into the real action…
The Method — Step by Step
-
Begin by placing the rolled oats, shredded coconut, ground flaxseed, and chia seeds in a large mixing bowl. Stir them together until the mixture is evenly blended. This dry base will absorb the liquids and create the perfect consistency. I dare you to taste this dry mix; it’s surprisingly nutty and slightly sweet.
-
In a separate bowl, combine the almond butter, maple syrup, coconut oil, vanilla extract, and sea salt. Whisk until the mixture becomes a smooth, pourable paste. The coconut oil melts the almond butter, making it easier to combine with the dry ingredients. Watch the color shift as the mixture brightens, signaling that it’s ready.
-
Add the wet paste to the dry mix. Fold gently until the mixture starts to come together. If the batter feels too dry, add a teaspoon of water or almond milk. If it’s too wet, sprinkle in a bit more oats. This is the moment of truth: the batter should feel like a thick, sticky dough.
-
Fold in the tart cherries. Be careful not to overmix; you want the cherries to remain distinct and not break apart. The cherries will add bursts of tartness when you bite into them. If you prefer a smoother texture, pulse them in a food processor before adding.
-
Watch Out: The batter can be sticky, so keep your hands lightly oiled or dusted with oat flour. If you’re working with a very sticky batch, let it rest for 10 minutes before shaping; this allows the oats to absorb more moisture and become easier to handle.
-
Using a tablespoon or a small cookie scoop, form the mixture into bite‑sized balls. Roll them between your palms until they’re smooth and round. If the balls feel too soft, place them in the fridge for 20 minutes to firm up.
-
Preheat your oven to 350°F (175°C). Line a baking sheet with parchment paper. Arrange the balls on the sheet, spacing them evenly to allow for even baking.
-
Bake for 15 minutes, then remove from the oven and let them cool for 5 minutes. The edges will start to pull away from the parchment, indicating they’re ready. If you like a slightly crisp exterior, bake for an additional 3–5 minutes.
-
Once cooled, transfer the balls to a storage container. They can be kept at room temperature for up to 3 days or in the fridge for up to a week. For longer storage, freeze them in a single layer and then transfer to a zip‑lock bag.
That’s it — you did it. But hold on, I’ve got a few more tricks that will take this to another level…
Insider Tricks for Flawless Results
The Temperature Rule Nobody Follows
Many people bake at 375°F, which can scorch the edges before the interior sets. Stick to 350°F to ensure a gentle, even bake that keeps the cherries juicy. I’ve found that a slightly lower temperature gives a better balance of crispness and chew.
Why Your Nose Knows Best
Before you lift the tray, inhale the aroma. A warm, nutty scent with hints of fruit signals that the batter has absorbed enough moisture. If the smell feels raw, let it bake a few more minutes.
The 5‑Minute Rest That Changes Everything
Letting the balls rest in the fridge for 5 minutes after baking firms them up, making them easier to handle and less likely to break apart when you bite. It also allows the flavors to meld and deepen.
Avoiding the Sticky Mess
If you’re working with a sticky batch, sprinkle a tablespoon of oat flour on the surface before rolling. This reduces tackiness and keeps the balls from sticking to your hands.
The Secret of Even Size
Using a small cookie scoop ensures uniformity, which leads to even baking. If you prefer a larger bite, simply increase the scoop size or roll the balls by hand. Consistency is key to a professional finish.
The Final Coat of Glaze
After baking, brush the tops with a thin layer of melted coconut oil. This adds shine, prevents sticking, and gives the balls a subtle caramelized finish that looks as good as it tastes.
Creative Twists and Variations
This recipe is a playground. Here are some of my favorite ways to switch things up:
Chocolate‑Covered Cherry Bliss
Dip half of the balls in melted dark chocolate and let them set. The chocolate adds a luxurious richness that pairs perfectly with the tart cherries.
Spiced Pumpkin Edition
Add a teaspoon of pumpkin spice to the dry mix and replace the cherries with dried pumpkin pieces. This variation is perfect for fall snacking.
Nutty Almond Crunch
Replace the almond butter with peanut butter and add chopped almonds to the mix. The nutty flavor profile becomes even more robust.
Citrus Burst Variation
Add a tablespoon of orange zest and swap the vanilla for a splash of lemon juice. The bright citrus notes elevate the tartness of the cherries.
Mango‑Mango Madness
Use dried mango instead of cherries and add a pinch of cardamom for an exotic twist. The sweet mango pairs wonderfully with the coconut.
Almond‑Coconut Swirl
Replace the oat flour with almond flour and add a drizzle of almond milk to the wet mix. The result is a denser, protein‑rich ball that still has a light coconut flavor.
Storing and Bringing It Back to Life
Fridge Storage
Keep the balls in an airtight container at room temperature for up to 3 days. For longer freshness, store them in the fridge; they’ll stay firm and flavorful for up to a week. A small splash of water before reheating can help rehydrate them slightly.
Freezer Friendly
Place the balls on a parchment‑lined tray and freeze until solid. Then transfer them to a zip‑lock bag for long‑term storage. They’ll keep their texture and flavor for up to 3 months.
Best Reheating Method
To revive a frozen ball, let it sit at room temperature for 15 minutes or microwave on low power for 10–15 seconds. A splash of water before reheating creates steam that restores the chewy interior. This trick is especially useful for those who like a warm, gooey snack.