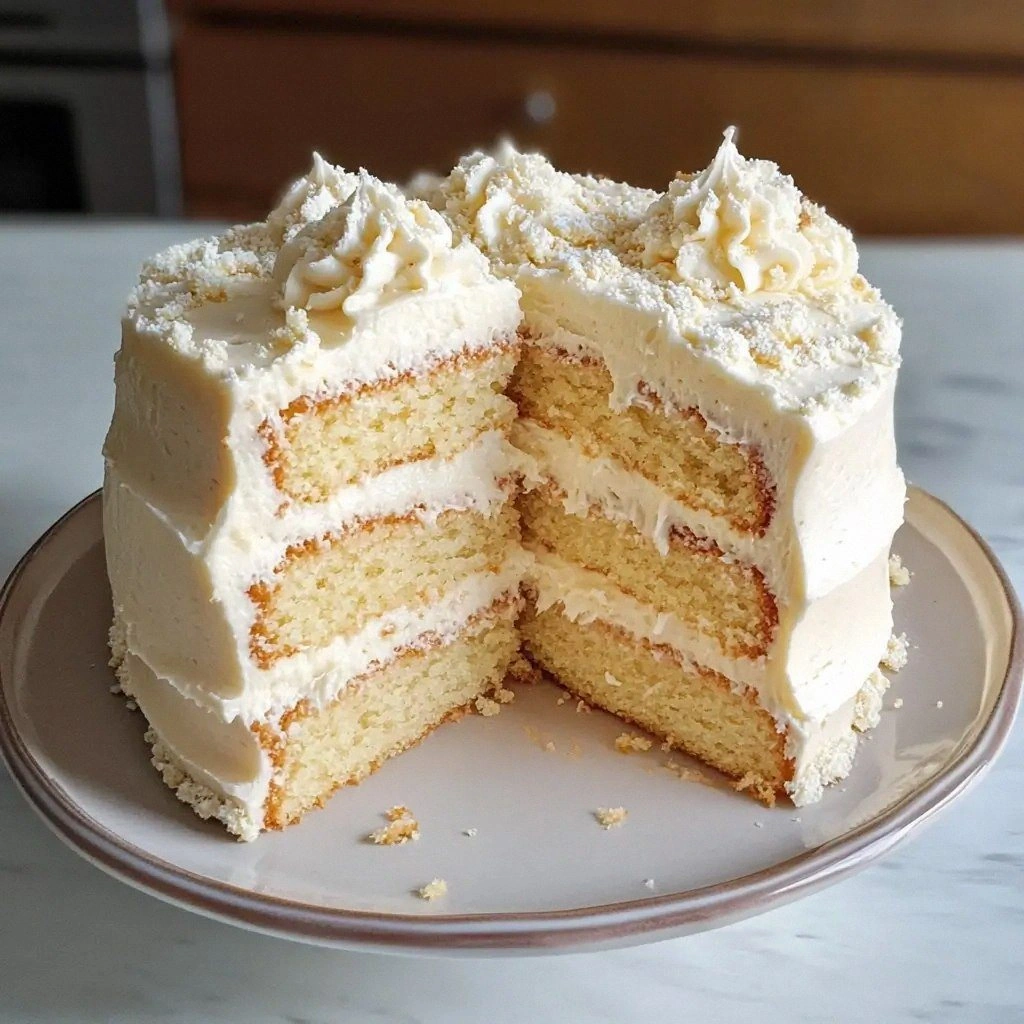
I still remember the night I tried to impress my sister with a fancy dessert and ended up with a cake that looked like a science experiment gone wrong. The batter had turned into a thick, lumpy sludge, and the oven temperature had been misread by a whole 25 degrees. My sister’s eyebrows were raised, and I could hear the faint hiss of disappointment from the kitchen. That disaster sparked a mission: to create a vanilla layer cake that would not only rise perfectly but also melt in your mouth like a dream. I spent hours researching, tasting, and tweaking until I found the exact balance of flour, sugar, and leavening that turned the batter into a golden cloud. The result? A cake so fluffy, every bite feels like a hug from the inside.
Picture the scene: a warm kitchen filled with the sweet scent of vanilla and butter, the sound of a whisk slicing through a glossy batter, and the anticipation of watching the layers rise. The batter pours into the pans with a silky sheen, and as it bakes, the aroma climbs the ceiling, mingling with the faint crackle of the oven door. The moment the timer dings, a golden crown emerges, and the edges start to pull away like a gentle sigh. You can almost hear the subtle crack of a perfect crumb, the delicate pop that signals readiness. The first slice is a revelation—soft, airy, and lightly sweet, with a hint of caramelized sugar that lingers on your palate. The cake’s texture feels like a cloud, light enough to float yet dense enough to satisfy.
What sets this version apart from the countless vanilla cake recipes that flood the internet is the meticulous attention to each ingredient’s role. I’ve discovered that using a small amount of baking soda alongside baking powder creates a lift that is both subtle and impressive. The butter is softened to room temperature but never melted, preserving its structure and allowing the batter to trap air bubbles for a tender crumb. The vanilla is extracted from the beans themselves, not just an imitation, giving the cake a depth of flavor that ordinary extracts cannot match. The milk is whole, adding richness and moisture that keeps the layers from drying out. Finally, the frosting is a silky, creamy masterpiece that coats each crumb without overpowering the cake’s delicate sweetness.
I dare you to taste this and not go back for seconds. This is hands down the best version you'll ever make at home. If you've ever struggled with a cake that turns out dense or uneven, you're not alone—and I've got the fix. Picture yourself pulling this out of the oven, the whole kitchen smelling incredible, and the first bite revealing a light, airy texture that melts in your mouth. Stay with me here—this is worth it. Let me walk you through every single step—by the end, you'll wonder how you ever made it any other way.
What Makes This Version Stand Out
- Fluffy Texture: The careful balance of leavening agents creates a light, airy crumb that feels like a cloud.
- Deep Vanilla Flavor: Using real vanilla bean extract instead of imitation gives the cake a rich, nuanced undertone.
- Moisture Retention: Whole milk and softened butter lock in moisture, preventing the layers from drying out.
- Silky Frosting: The creamy frosting coats each crumb like velvet, enhancing the overall mouthfeel.
- Versatile Base: The cake can be dressed up with berries, chocolate, or citrus without losing its integrity.
- Make‑Ahead Friendly: The cake can be assembled and frosted a day ahead, making it ideal for parties.
- Visual Appeal: The golden crust and perfectly even layers make it Instagram‑ready.
Alright, let's break down exactly what goes into this masterpiece…
Inside the Ingredient List
The Flavor Base
The foundation of any great cake is its flavor base, and this recipe starts with the most essential components. All-purpose flour provides the structure, but the key lies in the ratio—two cups precisely measured to avoid overmixing. Sugar, at one and a half cups, not only sweetens but also tenderizes the crumb by breaking down gluten strands. Baking powder and soda act as the rising agents; the powder gives a gentle lift while the soda introduces a subtle tang that balances the sweetness. Salt, a mere half teaspoon, is the secret enhancer that brings out the vanilla’s depth.
If you skip any of these, the cake will suffer. Too little flour and it will collapse; too much sugar and it becomes cloying. The leavening balance is critical—overdoing the soda can leave a metallic aftertaste, while too much powder can make the cake dense. Swapping all-purpose flour for cake flour yields a softer crumb, but the batter will become thinner, requiring adjustments to the liquid content. Selecting high-quality vanilla bean extract is a game changer; a single vanilla pod can add up to 25% more flavor than a teaspoon of imitation.
The Texture Crew
Texture is everything, and this cake’s crew includes butter, eggs, and milk. Butter, softened to room temperature but not melted, incorporates air when creamed with sugar, forming the foundation of the cake’s lightness. Four large eggs act as binders, adding structure and richness while also helping the batter rise. Whole milk, measured at one cup, provides moisture and a slight caramel note, making the crumb tender and juicy. The eggs’ yolks contribute to the cake’s color and richness, while the whites help maintain a smooth batter.
If you use a lower-fat milk or skim milk, the cake may become slightly dry; conversely, using heavy cream can make it overly rich. The eggs must be at room temperature to ensure they blend smoothly with the butter, preventing lumps. Some bakers prefer to separate the eggs, whisking the whites to soft peaks and folding them in at the end for extra lift, but this recipe keeps it simple for maximum flavor. A small pinch of salt in the milk helps to balance the sweetness and accentuates the vanilla.
The Unexpected Star
The unexpected star of this cake is the vanilla bean itself. While many recipes rely on vanilla extract, this version uses whole vanilla pods, which release the bean’s aromatic oils directly into the batter. The bean’s seeds are ground and added to the mixture, giving the cake a bright, floral aroma that lingers. The depth of flavor from the beans is incomparable; it adds a subtle complexity that transforms a plain vanilla cake into a gourmet treat.
If you’re short on time, a high-quality vanilla extract will still yield a delightful cake, but the beans provide an extra layer of fragrance that is hard to replicate. The pods can be stored in the fridge for up to a month, so you can keep a fresh supply on hand. When slicing the cake, you’ll notice faint specks of vanilla that add a visual cue to its aromatic presence. The beans also pair wonderfully with other flavors like lemon zest or almond extract, allowing for endless customization.
The Final Flourish
The final flourish is the creamy frosting that crowns the cake. It begins with one cup of softened butter, which is creamed until light and fluffy. Powdered sugar, four cups in all, is sifted to avoid lumps and to create a silky texture. Vanilla extract, two teaspoons, infuses the frosting with a bright, sweet undertone that complements the cake’s vanilla base. A tablespoon of whole milk, added gradually, adjusts the consistency to a spreadable but firm state. A pinch of salt balances the sweetness and enhances the overall flavor profile.
If you prefer a lighter frosting, reduce the powdered sugar by a quarter cup and add a splash of lemon juice for brightness. For a richer version, substitute half the butter with cream cheese, which adds tang and a velvety texture. The frosting’s thickness should be firm enough to hold its shape on the cake but not so thick that it becomes difficult to spread. The final touch is a gentle swirl of melted dark chocolate on top, adding a hint of bitterness that cuts through the sweetness. This final flourish turns an ordinary cake into a showstopper.
Everything's prepped? Good. Let's get into the real action…
The Method — Step by Step
- Preheat the Oven: Set your oven to 350°F (175°C) and line two 9-inch round pans with parchment paper. The parchment prevents sticking and ensures even baking. While the oven heats, let the butter soften at room temperature for about 30 minutes. This step is crucial for a smooth batter. Once the oven is ready, you’ll feel the anticipation building.
- Mix Dry Ingredients: In a medium bowl, whisk together flour, baking powder, baking soda, and salt. The dry mix should be light and airy, indicating proper leavening. Sift the mixture once more to ensure no lumps remain. This creates an even distribution of leavening agents. The result is a batter that rises evenly.
- Cream Butter and Sugar: In a stand mixer, beat the softened butter and sugar on medium speed until the mixture is pale and fluffy. This process incorporates air, giving the cake its lightness. The mixture should take about 4–5 minutes to reach a smooth consistency. This is the moment of truth where the batter’s texture is set. Keep an eye on the color; it should brighten noticeably.
- Add Eggs and Vanilla: Beat in the eggs one at a time, ensuring each is fully incorporated before adding the next. Then stir in the vanilla bean seeds and extract. The eggs bind the batter, while vanilla enriches the flavor. The batter should be smooth and glossy. This step adds depth to the cake’s profile.
- Combine Wet and Dry: Alternately add the dry mixture and milk to the batter, starting and ending with the dry mix. Mix just until incorporated to avoid overworking the batter. The batter should be thick but pourable. The alternation ensures even distribution of moisture. This technique preserves the cake’s lightness.
- Divide and Bake: Spoon the batter evenly into the prepared pans, smoothing the tops with a spatula. Bake for 25–30 minutes, or until a toothpick comes out clean. The cake should rise evenly, forming a golden crown. Let the cakes cool in the pans for 10 minutes before transferring to a wire rack. This cooling step prevents cracking.
- Cool Completely: Allow the cakes to cool entirely on a wire rack before frosting. This prevents the frosting from melting into a soggy base. The cakes should feel firm to the touch. A cool cake ensures a crisp frosting edge. This step is essential for a flawless finish.
- Prepare the Frosting: Cream the butter until light and fluffy, then gradually add powdered sugar, vanilla, and milk. Beat until the frosting reaches a smooth, spreadable consistency. If it’s too thick, add a splash of milk; if too thin, add more powdered sugar. The frosting should hold its shape when piped. This creamy layer will coat each crumb like velvet.
- Assemble the Cake: Place the first layer on a cake stand, spread frosting evenly, then add the second layer. Use a spatula to level the top, ensuring a flat surface. This creates a professional look and prevents the frosting from sliding. The cake should feel sturdy and balanced. This step brings the layers together.
- Finish with Frosting: Apply a thin crumb coat to seal the cake, then chill for 10 minutes. This smooths out any imperfections. After chilling, apply a final, generous layer of frosting. This creates a glossy finish that catches the light. The frosting should be smooth and glossy, ready for decoration.
- Decorate: Add your favorite decorations—fresh berries, chocolate shavings, or a drizzle of caramel. The final touch elevates the cake from simple to spectacular. Use a piping bag for clean lines or a spoon for a rustic look. The decoration should complement the cake’s flavor. This final step showcases your creativity.
- Serve and Enjoy: Slice with a hot knife for clean cuts. Serve immediately or store in an airtight container. The cake will stay fresh for up to three days in the fridge. The frosting will retain its texture when reheated gently. The result is a cake that tastes as good as it looks.
That's it — you did it. But hold on, I've got a few more tricks that'll take this to another level.
Insider Tricks for Flawless Results
The Temperature Rule Nobody Follows
Many bakers set their oven to the temperature listed on the recipe, but ovens can vary significantly. I always calibrate my oven with an oven thermometer, ensuring it reads at least 10°F lower than the display. This prevents overbaking and keeps the cake moist. A slightly cooler oven also helps the layers rise evenly, avoiding a domed top. Consistent temperature is key for a perfect crumb.
Why Your Nose Knows Best
Your nose is a reliable indicator of doneness. When the cake is ready, the scent of freshly baked vanilla and butter will be unmistakable. If the aroma feels too sweet, the cake may still be baking. If it’s slightly nutty, it’s near done. Trusting your nose saves you from the dreaded overbaked cake. The scent will guide you to the ideal moment.
The 5-Minute Rest That Changes Everything
After baking, let the cake rest in the pans for 10 minutes before transferring to a rack. This pause allows the structure to set, preventing cracks when removed. A quick rest also lets the steam escape, giving the cake a crisp exterior. Some bakers skip this step, resulting in a soggy base. A 10-minute rest is a small time investment for a dramatic improvement.
Even Spreading with a Piping Bag
Using a piping bag with a large star tip creates a smooth, glossy finish. It also allows you to create decorative swirls that add visual appeal. If you don’t have a piping bag, a plastic bag with a corner cut works as a makeshift alternative. The key is to fill the bag evenly to avoid uneven frosting layers. A clean finish showcases the cake’s elegance.
Cooling the Frosting for Perfect Texture
If your frosting is too soft, chill it for 10 minutes before applying. This makes it easier to spread and reduces the risk of smearing. Conversely, if it’s too stiff, let it sit at room temperature for a few minutes. Proper frosting consistency ensures a smooth, professional look. Temperature control is a simple yet effective trick.
Storing for Freshness
Wrap the cake tightly in plastic wrap and store it in an airtight container. This prevents the cake from absorbing odors from the fridge. When ready to serve, let it sit at room temperature for 30 minutes to restore moisture. The cake will taste fresher and more flavorful after this step. Proper storage keeps the cake at its best.
Creative Twists and Variations
Chocolate Swirl Surprise
Stir a tablespoon of melted dark chocolate into the batter for a subtle mocha flavor. The chocolate adds depth without overpowering the vanilla. This variation works well for chocolate lovers and adds a decadent twist. Pair it with chocolate chips for extra texture. The result is a rich, multi-layered cake.
Lemon Zest Twist
Add a teaspoon of lemon zest to the batter for a bright, citrusy note. The zest brings a refreshing contrast to the sweet vanilla. It pairs beautifully with a lemon glaze for a tangy finish. This version is perfect for spring or summer gatherings. The lemon zest adds a burst of freshness.
Almond Joy Edition
Replace half the flour with almond flour for a nutty flavor. Add toasted almond slices to the batter for crunch. Use coconut flakes in the frosting for a tropical vibe. This variation creates a dessert that feels like a candy bar. It’s ideal for those who love a nutty, sweet treat.
Berry Bliss Layer
Fold fresh blueberries into the batter for a burst of juiciness. Top the cake with a blueberry compote for an extra pop of flavor. The berries add a pop of color and a sweet-tart balance. This version is a crowd-pleaser at brunches. The berries make the cake look festive.
Caramel Drizzle Delight
Drizzle caramel sauce over the frosted cake for a glossy finish. The caramel adds a buttery sweetness that complements the vanilla. Use a thick, homemade caramel for the best flavor. This twist turns a simple cake into a decadent dessert. The caramel glaze adds shine and texture.
Espresso Infusion
Add a tablespoon of instant espresso powder to the batter for a subtle coffee flavor. The espresso enhances the vanilla’s richness and adds depth. Pair it with a coffee-infused frosting for a double espresso kick. This variation is great for coffee lovers and adds a sophisticated touch. The espresso note elevates the overall flavor profile.
Storing and Bringing It Back to Life
Fridge Storage
Wrap the cake tightly in plastic wrap, ensuring no air pockets remain. Store it in an airtight container to keep moisture in and odors out. Keep the cake in the refrigerator for up to three days. When ready to serve, let it sit at room temperature for 30 minutes to restore its softness. The cake will maintain its freshness and flavor. The wrap helps preserve the delicate frosting.
Freezer Friendly
For long-term storage, wrap the cake in parchment paper and then in plastic wrap. Place it in a freezer-safe container or zip-top bag. The cake can be frozen for up to two months without losing quality. When ready to enjoy, thaw it in the refrigerator overnight. Let it rest at room temperature for 30 minutes before serving. The cake will regain its original texture and taste.
Best Reheating Method
To reheat a frozen or chilled cake, place it in a preheated oven at 300°F (150°C) for 10 minutes. Remove from the oven and let it cool slightly before serving. The cake will regain its warmth and moisture. If the frosting has softened, gently warm it in the microwave for 5–10 seconds. This quick heat restores the frosting’s smoothness. The cake will taste freshly baked once more.